Audacity Tutorial

Audacity is a free and multilingual digital audio recorder & editor application. It is a cross-platform tool supported by all the major operating systems such as Windows, Linux, macOS. It is a popular tool among musicians and podcasters; It supports multi-track sound editing with some advanced editing tools.
It was released on May 28, 2000. since then, its popularity is on the rise. It was the most popular download from FossHub on Oct 24, 2020. It was also awarded as SourceForge Community Choice Award for Best multimedia project in 2007 & 2009.
In this section, we will see what is Audacity, how to download & install Audacity, how to use Audacity on different operating systems, etc.
In this tutorial, we have included the following topics:
- What is Audacity
- Features of Audacity
- How to Download Audacity
- How to Install Audacity on Linux
- How to Use Audacity
- How to Record using Audacity
- How to Remove Noise Using Audacity
- How to Adjust the Speed of Audio Using the Audacity
- How to Trim an Audio Using the Audacity
- How to Split an Audio Clip
- How to Change the Pitch of an Audio
- Mp3 Encoding
- Conclusion
What is Audacity
Audacity is a free audio recorder & editor. It supports some extensive audio features such as recording, editing, noise removal, pitch changer, multi-track editing, sound mixer, and more for music and podcasts.
Features of Audacity
Audacity is well known for recording audio. Apart from recording, it may perform audio editing by adding several effects such as normalization, trimming, fading in & out, changing pitch, etc. So, it is a useful tool for mixing the audio as well.
Some useful features of Audacity are as following:
- Free
- Cross-platform support
- Multilingual
- Recording & playback.
- Scrubbing
- A timer to schedule the recordings
- Punch & Roll recording
- Audio Editing
- Unlimited operations
- Cut, copy, paste the audios
- Multi-track Audio Mixing
- Navigation Control & Zoom
- Speed Adjustments ( Tempo)
- Audio Pitch adjustment
- Digital tracks conversion from cassette tapes
- Similar Graphical User Interface on different operating systems
- Massive support for the digital effects and plug-ins
- Noise Reduction
- Real-time audio preview
- Audio Spectrum Analysis
- Supports sevral audio fromats such as WAV, AIFF, MP3, etc.
- Import & Export the audio files
- User-selectable colorways for waveforms
How to Download Audacity
Audacity is free software. It can be downloaded for free for different operating systems from various web resources. Let’s see the easiest way to download and install Audacity on different operating systems.
To download Audacity, visit the official download page of Audacity. Click Here to redirect to the Official download link. It will open the download page, now, navigate to the Download menu and select the required platform & download options such as Windows, Mac, Linux, Source, Plug-ins.
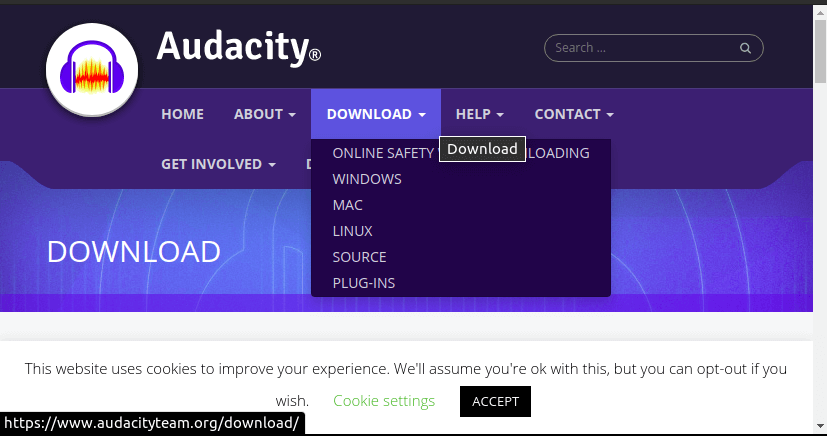
For Windows, select the Windows option from the pop-up menu. It will open a verification, verify the captcha. It will open a download page; select the appropriate download link from this page.
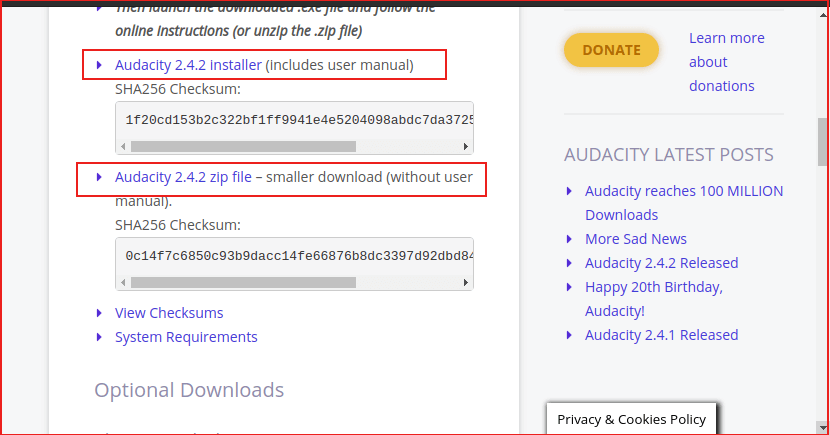
It will open the FossHub website having the appropriate download link for different platforms:
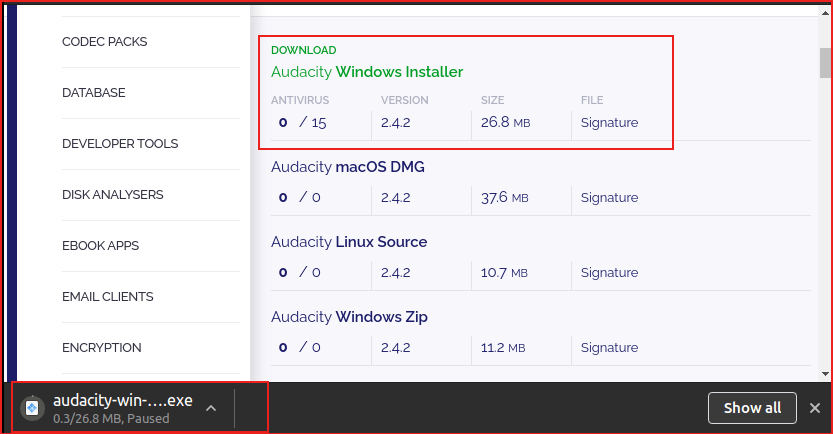
For Windows, select the Windows installer file. It will download the installer file. Now, run the installer file to install it on your system. It will start installing the Audacity; follow the installation prompt to install it.
How to Install Audacity on Linux
There are multiple ways in Linux to install the Audacity software. We can install the Audacity on the Linux system by using the installer file or by executing the below command:
The above command will ask for the system password. Type the password and press the Enter key; It will automatically download the software and all the dependencies.
Alternatively, we can install it from the source code or from the Ubuntu Store.
To install it on Ubuntu, open Ubuntu Software and search for it.
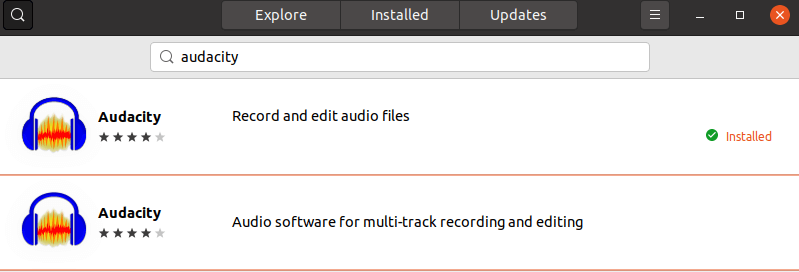
Click on the audacity result and install it.
Hence, we can easily install the Audacity on our system. Let’s understand how to use it.
How to Use Audacity
The Audacity tool has an easy to use interface. It provides almost similar interface and functionality on each platform, such as Windows, Linux, macOS. It contains the following interface:
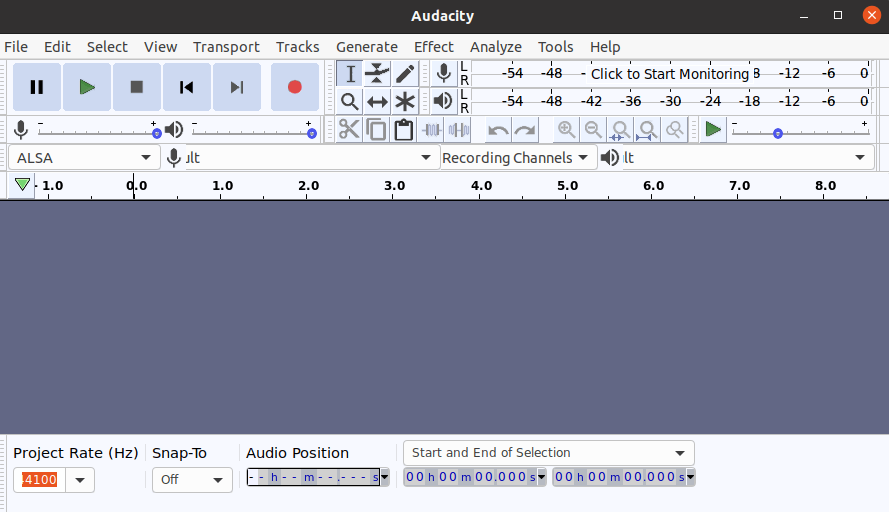
It has a standard audio editor interface. It contains a top menu bar and quick tool options, and buttons to record and edit audios. It contains the following menu options:
- File
- Edit
- Select
- View
- Transport
- Tracks
- Generate
- Effect
- Analyze
- Tools
- Help
We can perform an editing operation using the above menu.
How to Record using Audacity
Audacity provides an easy way to record the audio. To record with it, consider the below points:
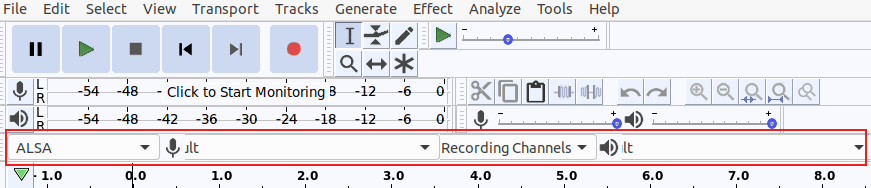
- To record audio, select the proper audio device from the below menu:

- Check the recording level from the monitoring meter. It will specify the signal strength.

The loudest part of the voice should not pass the 0db value on the monitoring scale. This value is called peaking, which stands for the loudest portion of your sound stream.
To reduce it, distance the microphone slider so the sound value peaks at -6 to -3, which is an ideal value for clean audio.
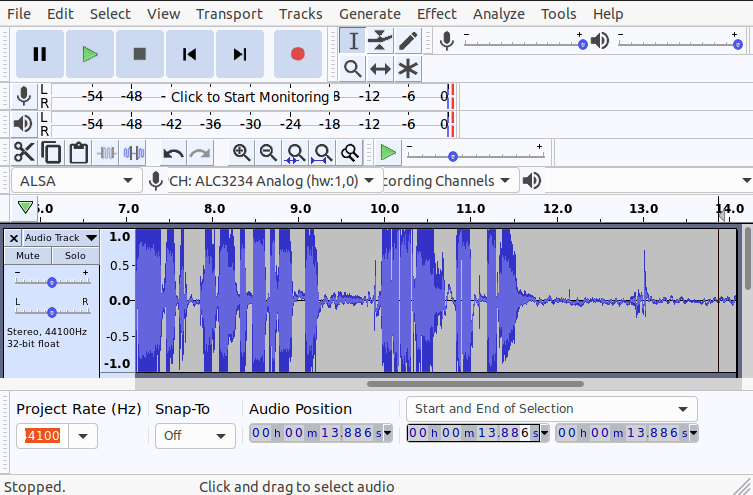
Now, we can record clear audio. To record audio, press the red button on the main toolbar of the Audacity:

It will start recording the audio. To stop the recording, press the stop button:

It will stop the recording and will display the recording as follows:
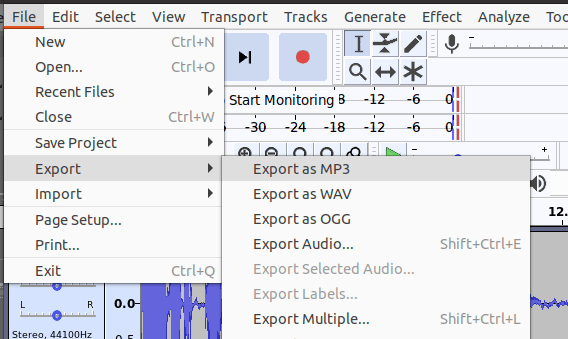
Now, we can play, edit and save this recording. To save this recording, select the Export option for saving it to different audio formats such as MP3, WAV, OGG, etc. To save it as a project use the Save Project option.
The difference between both save options is that the Export options export the file in a specific format and the Save Project option saves the works in the current position. Later, we can start editing from the point where we have left the editing.
Now, we have recorded our first audio using Audacity.
The major issue with the recordings is the noise. Most of the microphone recordings contain noise. We may have issues with our main audio. Don’t worry; the Audacity is one of the finest tools to remove the noise from the audios. Let’s understand how to remove noise from our recordings.
How to Remove Noise Using Audacity
The Audacity supports a built-in plug-in for noise reduction. To remove the noise, select the clip of audio by dragging it or for the entire clip, hit the CTRL+A keys. Now, navigate to the Effects-> Noise Reduction menu.
To use the Noise Reduction plug-in, we have to create a Noise Profile.
To create a noise profile, select the Get Noise Profile Option from the below window:
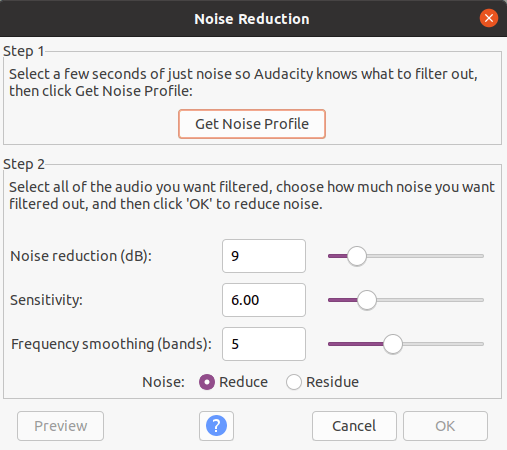
It will create a noise profile for the selected audio. We can adjust the values such as noise reduction, sensitivity, frequency smoothing with a real-time preview option. Once we have got nice and clean audio, click OK to apply noise reduction.
Now, if you are not satisfied with the audio speed, don’t worry; you can adjust that as well.
How to Adjust the Speed of Audio Using the Audacity
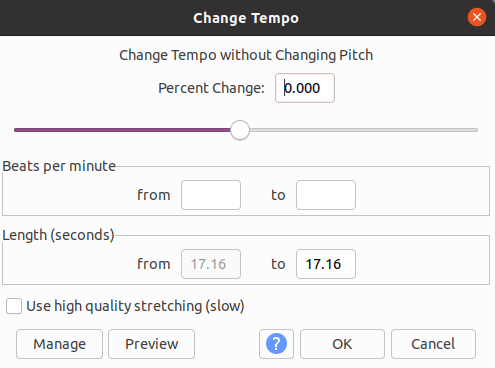
Audacity supports a built-in plug-in for adjusting the speed of the audio. We can slow down or speed up the audio using Audacity. The speed of the audio is well known as the tempo.
To adjust the tempo of audio, navigate to Effects-> Change Tempo menu. To change the tempo of audio, follow the below steps:
- Select the portion of the audio clip or entire audio
- Navigate to Effects > Change Tempo menu.
- Adjust the slider to slow down and speed up the audio in the ratio of BPM (beats per minute).
- Preview the Audio
- Once we are satisfied with the preview, select OK to complete the editing.
Hence, we have changed the tempo of the audio. But, we may still require some other editing such as trimming, splitting & moving clips, adjusting the pitch of the audio. The Audacity provides a built-in plug-in for all of these operations. Let’s understand a few more tasks:
How to Trim an Audio Using the Audacity
Trimming audio is one of the essential tasks of audio editing. We may require to trim audio for several reasons, like we want to remove the unwanted part of the audio.
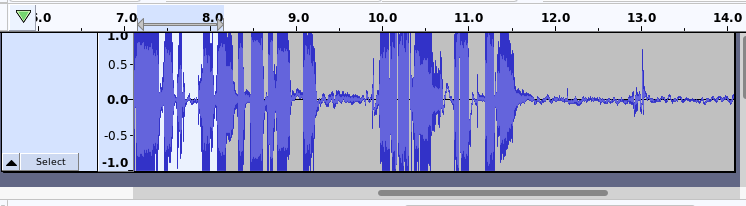
To Trim an audio clip, select it from the audio track by dragging the mouse:
Now, click on the cut option from the toolbar. To cut audio, click on the below icon from the toolbar:
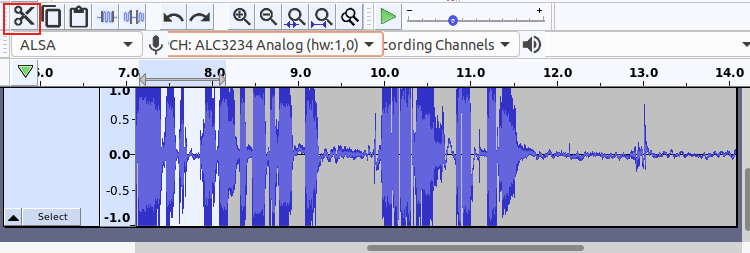
It will cut the selected audio. We can also copy and paste the clip by using the copy, paste tool, which is adjacent to the cut tool.
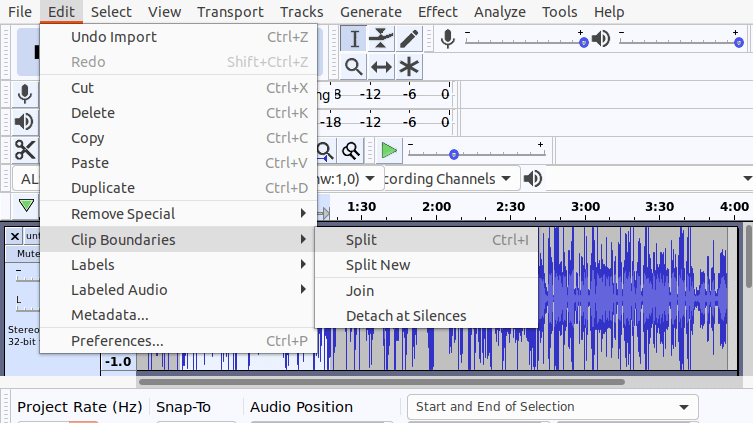
How to Split an Audio Clip
We may need to split a clip instead of trim. We can easily split an audio clip using Audacity. It is useful for separating the audio into multiple clips or moving a clip to another track.
Audacity supports a built-in tool for splitting an audio clip.
Follow the below steps to split an audio clip:
- Select the Audio clip where you want to split the track
- Navigate to Edit > Clip Boundaries > Split menu OR hit the Ctrl+I keys.
- Now, we have a separate audio clip, move it along the timeline.
- To move it, cut and paste it to the timeline or on to another track.
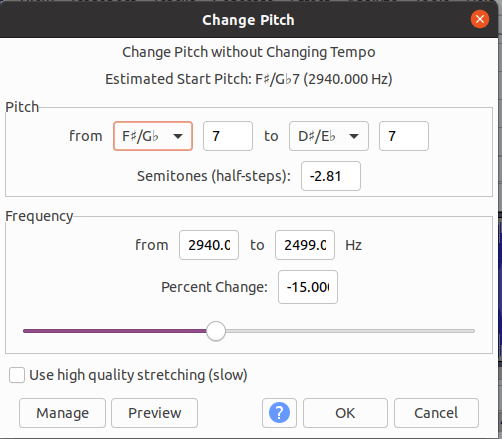
How to Change the Pitch of an Audio
The pitch is also an integral part of the audio. The pitch is an auditory sensation; it specifies the audio frequency. We can make the audio in a heavy or low voice by adjusting its pitch. Mostly, it is used to change the voice tone. It defines the sound wave.
- To change the pitch of the audio, follow the below steps:
- Select the portion of the audio clip or entire audio
- Navigate to Effects > Change Pitch menu.
- Adjust the Pitch values to make the voice tone heavy or low
- Preview the Audio
- Once we are satisfied with the preview, select OK to complete the editing.
Now, we can save this file in different formats using the Save and Export options.
Mp3 Encoding
One major issue faced by the users is not being saved the file in MP3 format, which is no doubt Globally the most used audio format. This is because the mp3 standard is a proprietary technology, and Audacity relied on Third-parties libraries to handle the MP3 encoding.
But, Nowadays, Audacity has overcome this issue. Now, it provides a built-in tool for saving the files in MP3 format. However, the audio files should be saved in Wav format if the sound quality is our main concern.
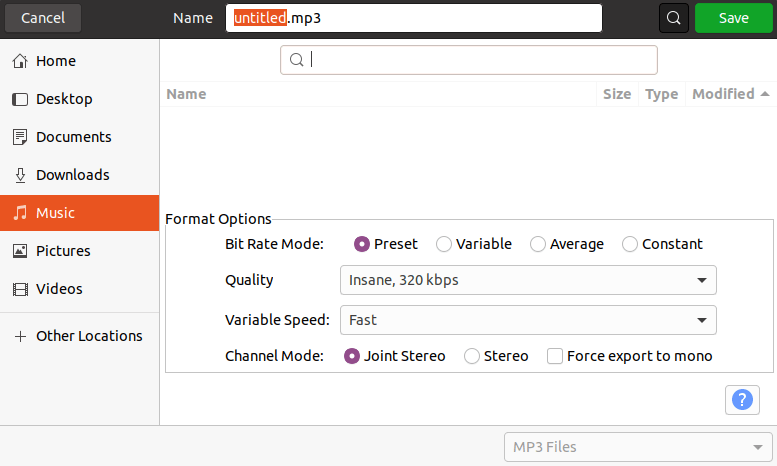
To save a file in MP3 format, follow the below steps:
- Select the audio clip or entire audio that you want to save
- Click File > Export-> Export as MP3 menu.
- Specify the File Name with .mp3 extension
- Select the “File Options” button below the file name text field
- Specify the file options such as bitrate (320kbps to 128 ) and other properties
- Now, click on the Save option given in the top right corner of the save window.
Hence, we are all done with some basic tasks of audio editing. Now, explore its more features for other editing tasks by navigating to its menus.
Conclusion
Audacity is a great tool for basic audio editing tasks. After all, it’s a free tool, so if you want a tool for the basic level of editing, the Audacity life-saver tool for you. If you are a professional editor and want a next-level audio editor go for any premium tool. It is a recommended tool for beginners and YouTubers.