Azure Virtual Machine Scale Set & Auto Scaling
Virtual Machine scale sets
The scale sets are Azure compute resources that can be used to deploy and manage identical VMs. They are designed to support virtual machine auto-scaling. VM scale sets can be created using the Azure portal, JSON templates, and REST APIs. To increase or decrease the number of VMs in the scale set, we can change the capacity property and redeploy the template. A virtual machine scale set is created inside VNET, and individual VMs in the scale set are not allocated with public IP addresses.
Any virtual machine that we deploy and is the part of the virtual machine scale set will not be allocated with a public IP address. Because sometimes, the virtual machine scale set will have a front end balancer that will manage the load, and that will have a public IP address. We can use that public IP address and connect to underlying virtual machines in the virtual machine scale set.
Virtual Machine Auto Scaling
Autoscale enables us to dynamically allocate or remove resources based on the load on the services. You can specify the maximum and the minimum number of instances to run and add or remove VMs based on a set of rules within the range.
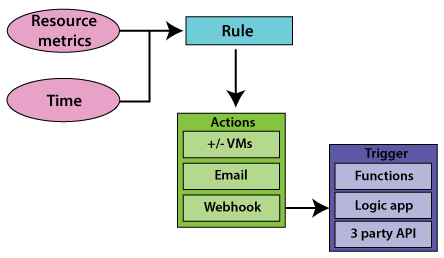
The first step in auto-scaling is to select a metric or time. So, it can be a metric based auto-scaling, or it can be a schedule based auto-scaling. The metrics can be CPU utilization, etc., and the time can be like the night at 6 o’clock till morning 6:00, we want to reduce no of servers. We can have a schedule based auto-scaling. In case if we’re going to reach according to load, then we can use metric based auto-scaling.
The next step in the auto-scaling is to define a rule with the condition. For example – if the CPU utilization is higher than 80 percent, then spin off a new instance. And once the condition is met, we can carry some actions. The actions can be adding or removing virtual machines, or it can be sending email to a system administrator, etc. We need to select whether it is a time-based auto-scaling or metric-based, and we need to choose the metric. We define the rule and actions that need to be triggered when the condition in that rule is satisfied.
Horizontal and Vertical scaling
- Horizontal scaling: The increasing or decreasing the number of VM instances. It auto-scales horizontally and sometimes called as Scale-out or Scale in scaling.
- Vertical scaling: In this, we keep the same numbers of VMs but make VM more or less powerful. Power is measured as memory, CPU speed, disk space, etc. It is limited by the availability of larger hardware within the same region and usually requires a VM to start and stop. This is sometimes called Scale up or scale downscaling. Below are the steps to achieve vertical scaling.
- Setup Azure automation account
- Import the Azure Automation Vertical scale runbooks into our subscriptions.
- Add a webhook to our network.
- Add an alert to our Virtual Machine.
- We can also scale web apps and cloud services.
Metrics for Autoscaling
- Compute metrics: The available metrics will depend upon the installed operating system. For windows, we can have a processor, memory, and logical disk metrics. For Linux, we can have processor, memory, physical & network interface metrics.
- Web Apps metrics: It includes CPU & memory percentage, Disk & HTTP queue length, and bytes received/sent.
- Storage/ Service bus metrics: We can scale by Storage queue length, which is the number of messages in the storage queue. Storage queue length is a particular metric, and the threshold applied will be the number of messages per instance.
Tools to implement Auto Scale
- We can use the Azure portal to create a scale set and enable auto-scaling based on a metric.
- We can provision and deploy VM scale sets using Resource Manager Templates.
- ARM templates can be deployed using Azure CLI, PowerShell, REST, and also directly from Visual Studio.
Scaling Azure Virtual Machine
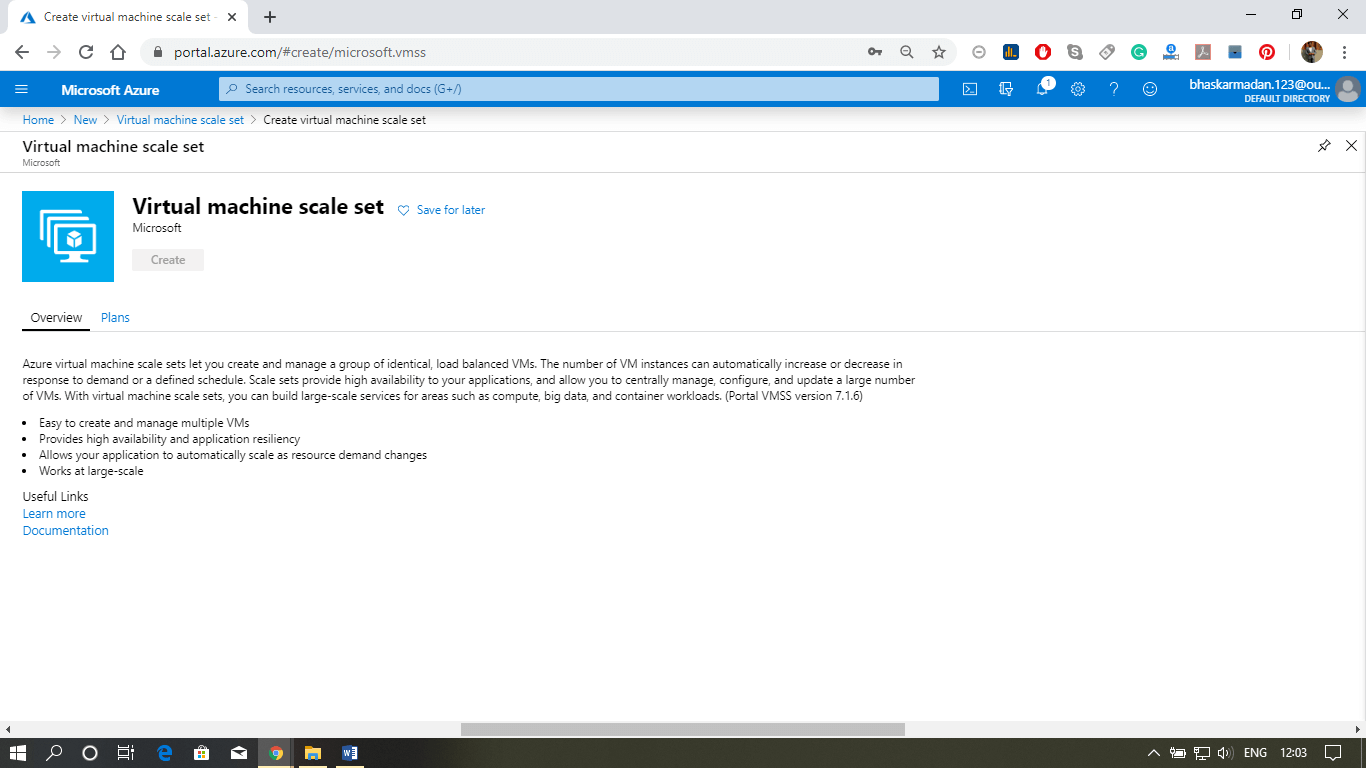
Step 1: Go to Azure Marketplace and type in the Virtual Machine scale set. Then click on Create.
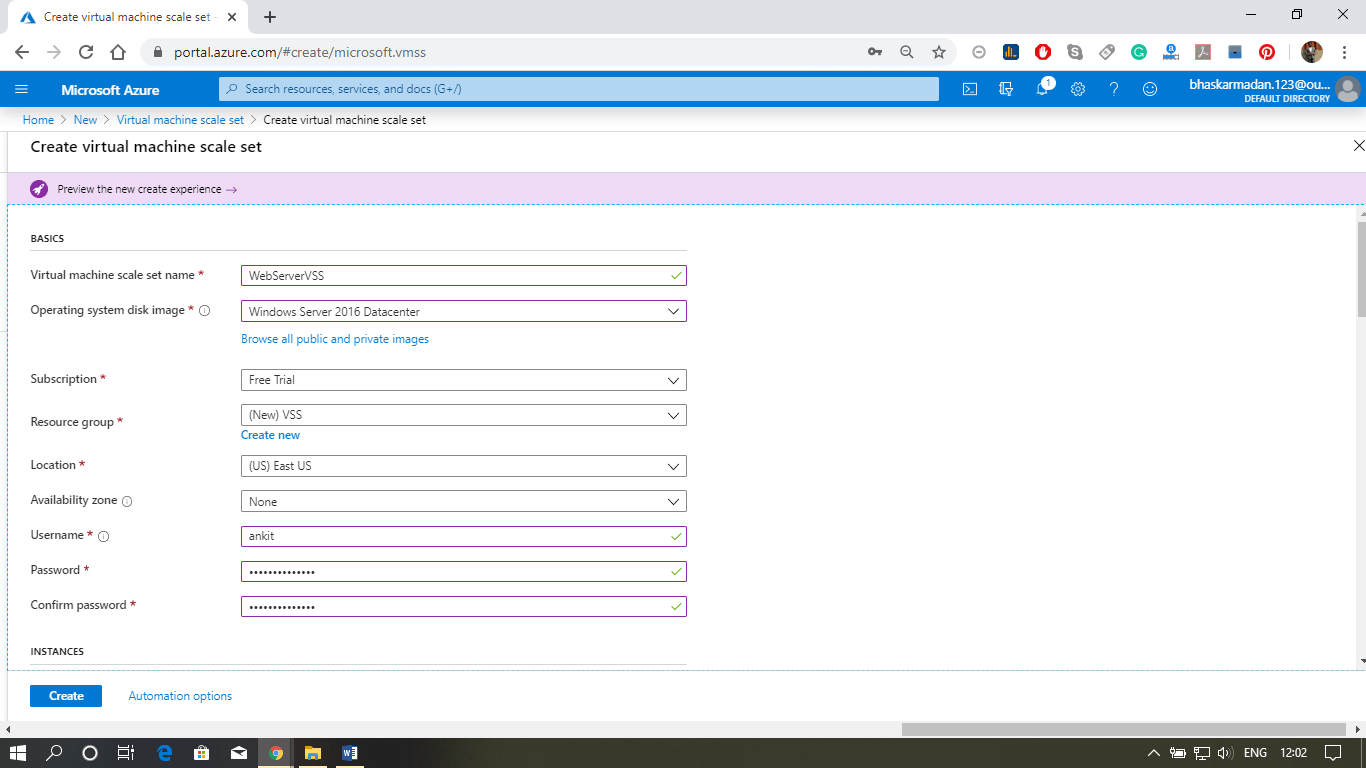
Step 2: We need to give a name to this scale set. And fill all the other required details, as shown in the figure below. Then click on create.
Step 3: Now, your Virtual Machine scale set is successfully deployed. To view VMSS, you can go to resources.
Step 4: Now, click on scaling. Provide an auto-scale setting name. And select the resource group.
Step 5: Scroll Down, and you will find two ways to auto-scale. First, click on “add a rule? for auto-scaling based on the metric. We are going to scale our virtual machine if the average percentage of CPU utilization is above 70 percent.
Step 6: Now, select the time and date based scaling, where you can scale when you need more space. And the last thing is Notify, where you get notified whenever the auto-scaling gets triggered.