Drop Shadow in Photoshop
Shadows in the images make them beautiful and attractive. Realistic shadows around objects make them look professional and genuine. With the help of Photoshop tools, we can easily apply shadows in our images and around the objects. We don’t need any hardware and lighting equipment to give the shadow to our objects.
We can also apply drop shadow on text to make it attractive and focused. However, it is not a piece of cake to properly add your shadows with the objects. In few cases, the shadows will be hidden behind the layers. But, by practice & patience, you can get what you want. We can set true shadows and lightning to provide our object with a professional look.
In Ecommerce graphics, it is necessary to highlight the product to attract users. So it will be very useful to apply shadows and enhance the lightning of the product to attract more users and make them add the product to the cart.
In modern website development, the containers are used with a light shadow to highlight them. The entire process needs practice time and a good understanding of how shadows work.
In this section, we will discuss what the drop shadows are? How it works, and how to apply it to different objects and text.
What Are Drop Shadows Used For?
The essential use of the drop shadow is to simulate 3D depth in a 2D image. We can do this by setting the offset shadow behind the object to focus and indicate that it is hovering from its background.
We can apply a drop shadow by applying the layers styles and effects in Photoshop. To add a drop shadow to an image or text, select the required layer and click on the “FX” icon at the bottom of the layer panel. Now, select the Drop Shadow option from the given layer styles to apply it to the image or text layer. It will open a dialogue box to add additional settings such as size, position, and the softness of the shadow.
From this window, we can select from various effects to improve the view of the drop shadow in our object. We can choose a simple black shadow or spice it up with attractive colors. Thus, we can easily customize the shadow for our object.
We are going to explain a stepwise process to create and customize the drop shadow; also, we will explain few tips which will be helpful for customizing the shadows to match your envision.
How to Add Drop Shadow in Photoshop
Following are the steps to add drop shadow in Photoshop on an image:
- Open the Image
- Create a background layer
- Select Layer Style
- Apply Drop Shadow
- Save Image
Let’s understand the above steps in detail:
Drop Shadow to an Image
Step1: Open Image
To add a drop shadow to an image, first, we need to open the image in Photoshop. To open the image in Photoshop, press the Ctrl+O key. It will open the file explorer, select the file from your file system and press open to continue.
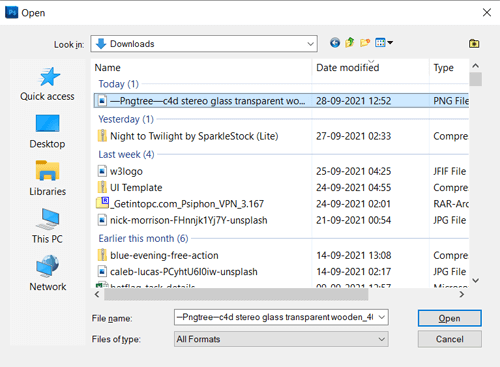
It will open the image in the Photoshop workspace. We are using a PNG image with transparent background for a clear view of the effect. You can choose any image; the drop shadow filter will be applied in the same manner. Now, our workspace will look as follows:
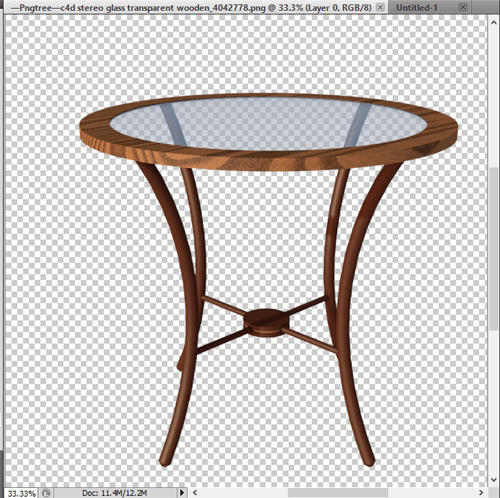
We have chosen a table image without a shadow effect. We will apply the shadow effect on this image so that it looks like in a realistic environment.
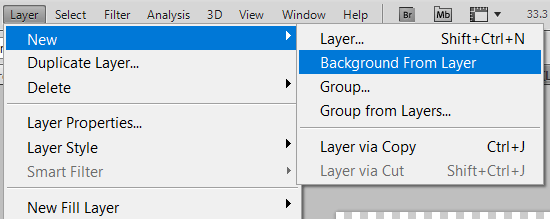
Step2: Create a background layer
Now, we will create a background layer; you can also open a background image according to your requirement. We will create a simple white background. To create a new layer, press the Ctrl + Shift + N keys; It will open a dialogue window to specify the layer name and layer color. Do not confuse the term layer color; here, the layer color specifies the stripe color, which denotes the layer, not the layer’s background colour.

Click OK to create a new layer. Once we create a layer, it will be reflected in the layers panel given at the bottom-right of the workspace window as our document is transparent, so it will create a new transparent layer. To make it a background layer select this layer and navigate to Layer-> New -> Background from Layer menu. Once we select the option, it will make this layer as a background layer with white background. If you want to change the background color of the layer, double click on it to unlock it and apply the color that you want.
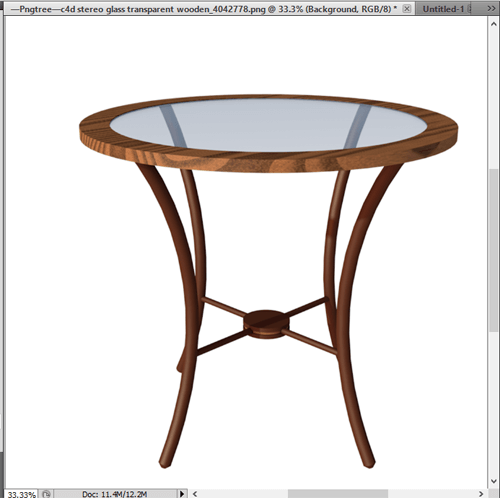
Now, our image document will look like as follows:
However, this step can be skipped if you don’t want to keep a background layer. Now, we can apply the shadow effect to this layer.
Step3: Select Layer Style
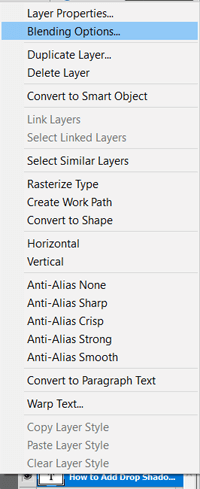
To apply a drop shadow, select the blending options to apply a layer style from that layer options. First, select the layer where we want to apply the drop shadow effect, then right-click on that layer, and open the layer menu options.
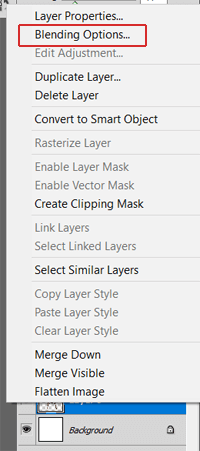
To apply a layer style, open the blending options by selecting them from the menu. It is 2nd option from the top in the layer menu options. It will open a new window having the layer style option. Select the drop shadow option from this window.
Step4: Apply Drop Shadow
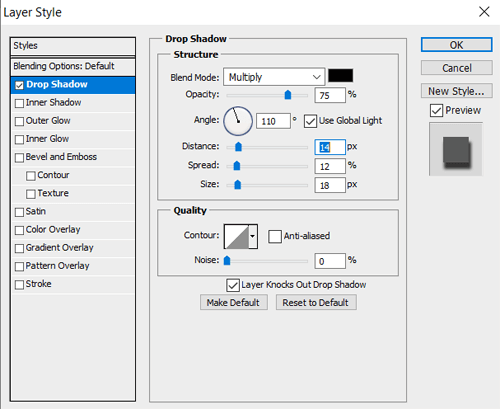
Select the drop shadow option from the given style options in the blending options window. It is 1st option on the menu.
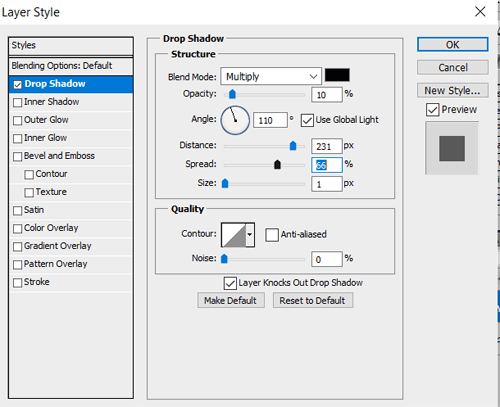
After selecting this option, it will show the drop shadow options to customize the shadow to meet your envision.
We can adjust the shadow structure and quality by setting the values from this window. To customise the shadow effect, we can set the color, distance, spread, size, and noise values. We can also have a preview of the shadow while applying.
Once we are done with the applying effect, we can save the image in the required image format. Our image will look as follows:
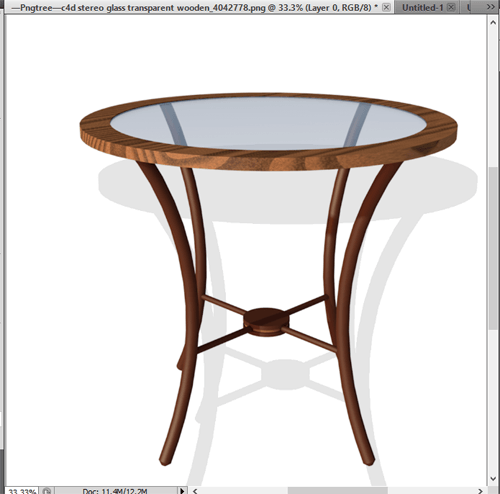
From the above image, we have applied a shadow effect on the image. Now, it looks like placed in a real-world environment.
Step5: Save Image
Now, save the image in any of the required image formats supported by Photoshop. We can save it in different image formats such as Jpg, Png, Gif, etc. We can also save it in PSD format to keep the file work with layers so that we can edit it later if needed.
To save it in PSD format, press the Ctrl+S key combination and to save it in any other format, press the Ctrl+Shift+S or Ctrl+Shift+Alt+S for saving as web options. Specify the file name and format and save it in your local storage.
Drop Shadow to Text
We can also add the drop shadow to the text, just like an image. The steps are the same for the text also. We have to create a text layer and apply the shadow effect on the text layer. Let’s understand how to apply a drop shadow to text.
Step1: Create a Text Layer
The first step is to create a new text layer; we can create a new layer to add a new text layer or add to an existing document. We are adding the text to the existing image. You can create a new document if the image is not required in your case.
To create a new document, press the Ctrl+N key combination. It will open a dialogue window to specify document size and background color. Specify the document size and color press OK to create a new document.
Now create a text layer by pressing the T key; it will activate the text tool. Now, click on the document where you want to add the text to the image.
Now, add some text to our image to add the shadow to it.
We can update the text size, color, font family and other settings using the top options bar. It contains different options to customize the text.

Once we finalized the text format, we can apply the drop shadow to our text. The text layer will be reflected in our layers panel given at the bottom right to the workspace.

To add the drop shadow, make the text layer active by clicking on it.
Step2: Select the Layer Blending Options
Now, right-click on the text layer to open the layer menu options and select the blending options from the menu.
It will open a dialogue window having the layer style options. Select the drop shadow option from this menu to apply the drop shadow on the text.
Step3: Apply Drop Shadow
We can apply the drop shadow to our text using this layer style window. To apply the shadow, select the drop shadow option given at the top of this window’s menu options.
After selecting this option, it will show the drop shadow options to customize the shadow to meet your envision.
We can adjust the shadow structure and quality by setting the values from this window. To customise the shadow effect, we can set the color, distance, spread, size, and noise values. We can also have a preview of the shadow while applying.
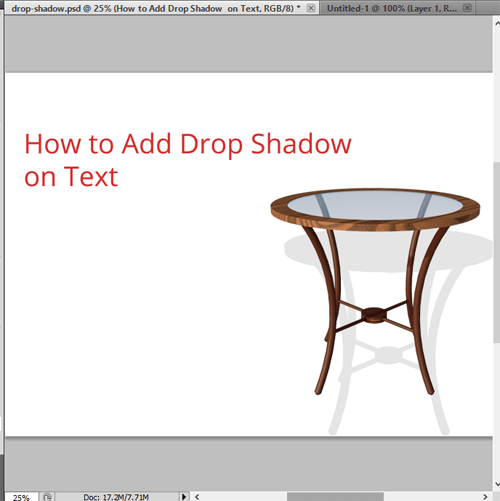
Once we are done with the applying effect, we can save the image in the required image format. Our image will look as follows:
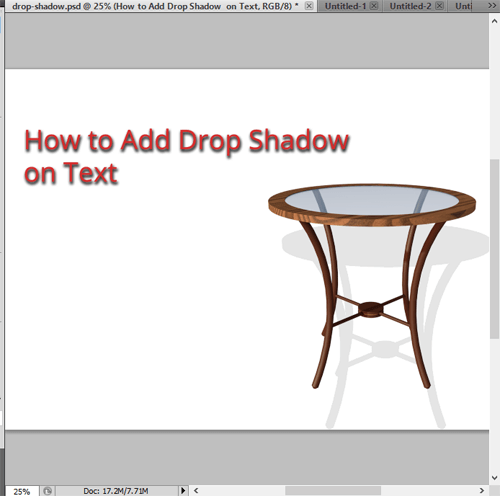
In the above image, we applied a drop shadow effect to highlight the text from the background. Similarly, you can use your custom shadow effect to make your text more attractive.
How to Apply Best Drop Shadow Settings
Before applying the drop shadow effect, we should consider which types of shadow will be a good suit for our image. Basically, shadows are two types which are cast shadows and form shadows. The difference between both the shadows is the shadow positions. Let’s understand what cast shadows and form shadows are?
Cast Shadow
The cast shadow reflects the object on the surface, which looks like a different object. It is typically around the main object. Shadow of a wall on the ground is an example of a cast shadow.
The purpose of the cast shadow is to show a distinction between the shadowed part of an object and the main object.
Form Shadow
The form shadow is a reflection of an object opposite to the light source. However, there are few other parameters that define the cast shadow and form shadow. Following are the parameters that define the cast shadow and form shadow.
- The light direction of the object
- Light distance from the object
- Available light sources
To understand the complete work procedure of the shadow, we have to understand how the shadow works. Usually, cast shadows are blurrier and lighter because they are more focused on the object.
Difference between Drop Shadow and Cast Shadow
Adding a realistic shadow to an object is pretty much a complicated and realistic task. The cast shadow is a reflection of the object on the surface, which looks like a different object. It is typically around the main object. Shadow of a wall on the ground is an example of a cast shadow.
Comparatively, adding a drop shadow is a straightforward process than adding a cast shadow.
A cast shadow represents a rough shadow having the same size and dimension as the object. So we have to adjust the cast shadow in a 3D dimension. To adjust the cast shadow properly, we have to follow the above-discussed process efficiently to make it look realistic and professional.
Cast Shadows are very useful for designing the e-commerce products as it enhances the view of the product. We can attract users by making the product image beautiful.
Comparatively, cast shadows are used for an object to make it attractive the shadow direction and size do not matter in it.
Summary:
Shadows in the images make them attractive. Realistic shadows around objects make them look professional and genuine.
We have discussed applying a drop shadow to an object or text to make it attractive. Now, we can easily apply the shadows to our image by following the above-discussed steps. Further, we have discussed the tips for applying a drop shadow to objects.
You can apply other layer styles to make your content beautiful. For other styling options, visit the detailed tutorial on Layer styles and effects in Photoshop.