How to password protect a Word document
Password protection helps you to protect your document safe and secure from unauthorized access. Password-protected documents can’t be accessed or read by anyone without entering the password. In Microsoft Word, passwords are case-sensitive and generally within the range of 15 characters.
Note 1: Always remember your Word document password because if you forget your password, Microsoft Word can’t be able to recover your password.
Note 2: Do not share the password-protected Word document in the mail along with the password-protected file.
If your data inside the Word document is sensitive, you can follow the below steps to make your Word document password-protected –
Note: Using the below-mentioned steps, you can enable password protection in Word 2007, 2010, 2013, 2016, 2019, and Office 365.
Step 1: Double-click on the Word document that you want to protect.
Step 2: Click on the File tab at the top left corner of the screen.

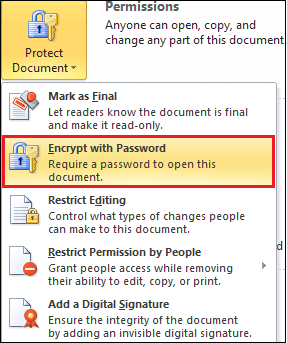
Step 3: Go to the Info tab and click on the Protect Document option.

Step 4: The following window will appear on the screen in which click on the Encrypt with Password.
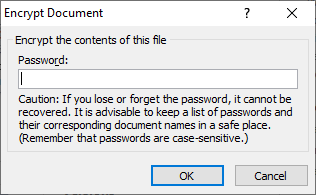
Step 5: A small Encrypt Document window will appear on the screen. Enter the password to protect your document and then click on the OK button.
Note: Try to use a memorable and complex password.

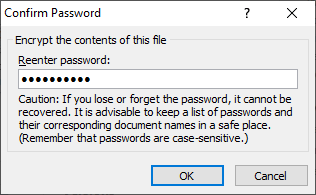
Step 6: A Confirm Password window will appear on the screen. Confirm your password by typing the password again and click on the OK button.
Step 7: Save the Word document and close it.
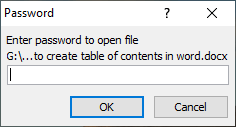
Once you complete the above-mentioned steps, every time when you open the password-protected document, you will always see a dialog box for entering the password to decrypt the protected document’s content, as shown in the below screenshot.

Note: Once you are setting the password for Word document, it is impossible to open and view it without entering the password, so always make sure that you keep the password in a safe place.
Note: In Microsoft Office 2016, the default encryption method is AES-256.
Note: Using the above steps, you can also enable password protection in Microsoft Excel as well as Microsoft PowerPoint.
How to remove a password from the Word document
Microsoft Word also allows you to unlock the password-protected Word document.
There are the following easiest steps that you can use to remove password from your Word document –
Step 1: Open the password-protected Word document.
Step 2: Type the password and click on the OK button to access the Word document.
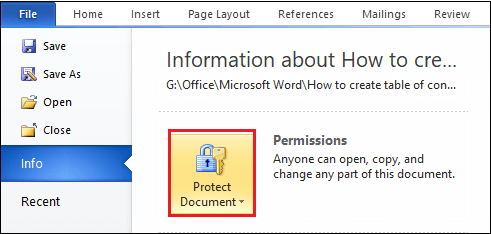
Step 3: Click on the File tab at the top left corner of the screen.

Step 4: Go to the Info and click on the protect document option.
Step 5: The following window will appear on the screen. Click on the Encrypt with Password option.

Step 6: An Encrypt Document window appears on the screen. Remove the previous password by pressing the backspace key from the keyboard and click on the OK button at the bottom on the screen.
Step 7: Click on the Close tab. Once you click the close tab, a dialog box will appear on the screen in which click on the save button to save the file and make changes in the password protection.
Now, when you open the document, you can see that document is open without showing the enter password dialog box.