How to Save Excel File
MS Excel is currently one of the most commonly used spreadsheet software worldwide. It has a distinct range of powerful features. Whenever we create a new workbook in Excel and put the data in it, we must save it so that we don’t need to start from the beginning when something unexpected (i.e., power failure, shut down, application close, etc.) happens. We can open a saved Excel file and start working from the same position where we left earlier.
Therefore, it is crucial to know how to save an Excel file to access, modify, or share it easily. In this article, we are discussing few simple methods to understand how to save Excel files locally on the computer. The tutorial is created using MS Excel 2013. However, the process is the same for other versions. MS Excel 2013 or later allows us to save an Excel file to the cloud using OneDrive. Moreover, few other options (such as export, share workbook, etc.) make working with Excel more effective.
Save and Save As
Before discussing the methods, let us first understand the difference between ‘Save‘ and ‘Save As‘ commands as Excel offers these two basic options to save a file.
- Save: When we create a new file or edit an existing file, we typically use the ‘Save’ command (shortcut – Ctrl + S) to keep certain changes in a current file. This command is used most by people to save excel files as they keep working on the same file and save the changes accordingly. When we use the ‘Save’ command, we are only required to enter a file name and choose a location for once. Once we have chosen the file name and the location, we can save the changes just by clicking on the ‘Save’ button. This will keep all the corresponding changes to the same file with the same file name and location.
- Save As: When we use this command, Excel creates a copy of the workbook and keeps the original file intact from the changes made to the file. Additionally, we get an option to enter a new name and choose the desired location for the copied version of a workbook. We can also use the same location for saving the copy of a file; however, the file name must be different. In case the file name and location are the same, the file extension must be different for using this command to save an Excel file.
Now, let us discuss the steps of saving excel file using both options:
Using ‘Save’ command to save Excel File
In most cases, Quickly saving an Excel file can prevent hard work from being lost. We must save a file in a specific location so that we can find it later. We can make changes to the existing file and use the same command (Save command) to keep the file updated according to the applied changes.
We can follow the steps discussed below to save Excel file using the ‘Save’ command:
- First, we need to launch Excel software to create a new file.

Here, we can enter the desired data. - After we have entered all the data and completed the work, we need to click on the ‘File‘ tab from the top navigation bar.
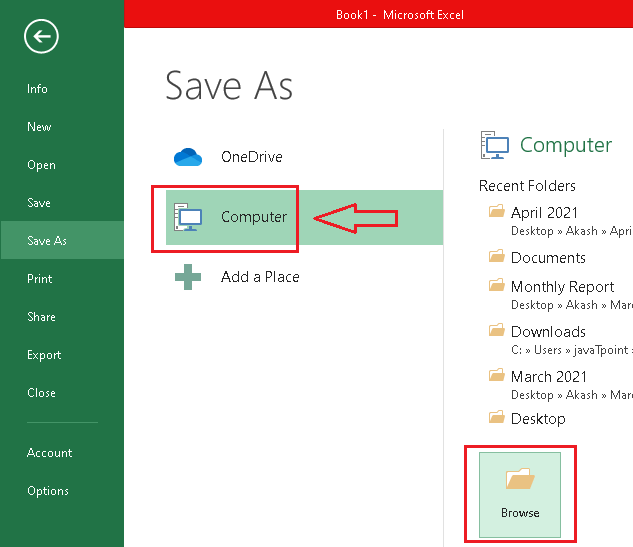
- Here, we are required to click on the ‘Save‘ button from the left panel:
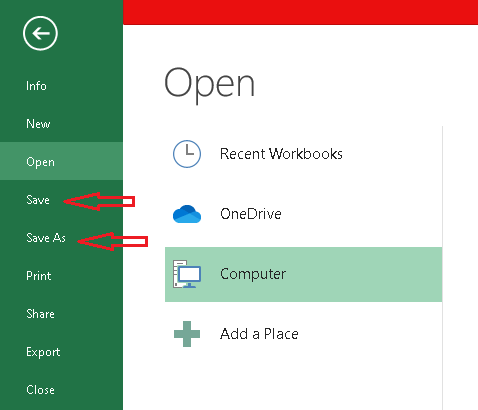
- Next, we can select whether we want to save the file locally (our case) or to a cloud. To save an Excel file on a computer, we can select ‘Computer‘. We can choose a specific location using the ‘Browse‘ button to save it on a computer. In case we want to save the file to the cloud, we can select the ‘OneDrive‘. One must have an OneDrive account to use a cloud feature.
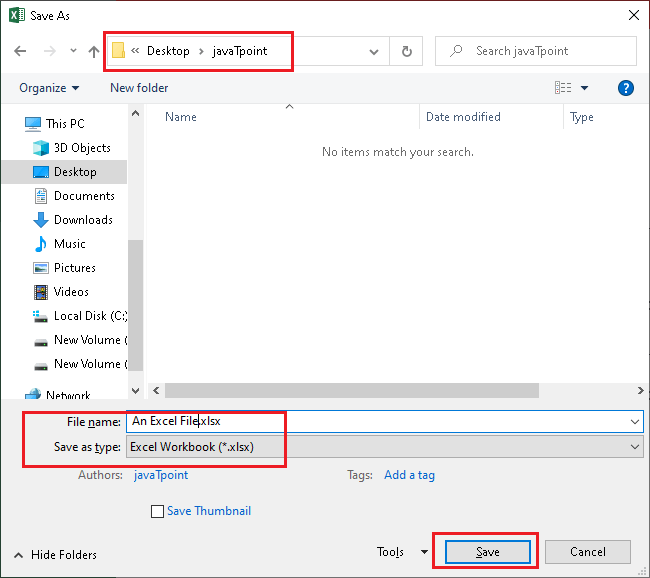
- After that, a new window appears. Here, we are required to choose the desired name for the file and the file type. Once the file name, file type, and location have been selected, we need to click on the ‘Save‘ button. An excel file will be saved in a selected location with a selected name and the file type. Moreover, we can change the location for a file to be saved. Besides, if we are working on an existing file and use the ‘Save’ option, there will be no window for selecting the name and the location. In this case, the changes will be saved in the existing file with the same location.


Note: We can also access the Save command from the quick toolbar or by pressing the shortcut ‘Ctrl +S’ through the keyboard.
Using ‘Save As’ command to save Excel File
In case we want to save an Excel file to a different location or want to save it by adding more data without affecting the existing one, we can use the ‘Save As’ option. It is mainly used to create a copy of an Excel file while keeping the original file intact from the changes. For instance, suppose we have an Excel file ‘Data1’; we can create the file ‘Data2’ using the ‘Save As’ option after making some changes in a Data1 file. This will eventually create a Data2 file with the updated data, and Data1 will still be the same as earlier. Moreover, the content of the Data2 file can be changed accordingly.
Following are the steps using which we can save Excel files through the ‘Save As’ command.
- First, we need to open an existing Excel file and make changes to it if required.
- Next, we are required to click on the ‘File‘ tab from the top navigation panel.
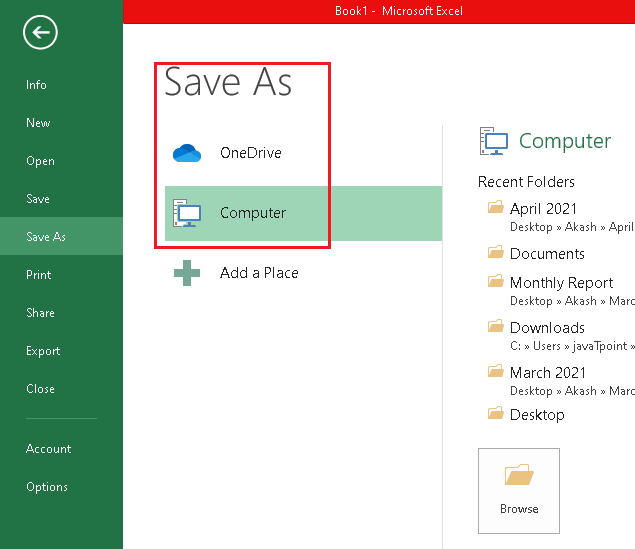
- On the next screen, we are required to select the ‘Save As‘ option.
- Like the ‘Save’ command, we need to choose whether we want to save the Excel file locally or on the cloud. To save an Excel file to a computer, we can select ‘Computer‘ otherwise ‘OneDrive‘.
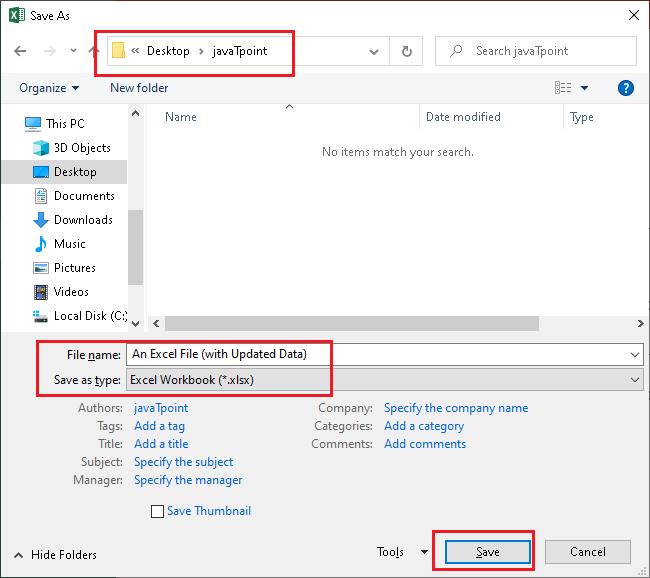
- After selecting the desired location, we need to enter a ‘file name’ and then select the ‘file type’ from the drop-down menu. Once we have completed the last step and filled in all the details, we need to click on the ‘Save‘ button. This will save all the changes to a new file in a selected location with the selected file name and the file type.


Note: The ‘Save As’ is not only limited to be used with the existing files. This command can also save a newly created excel file to a particular location in the desired file type and file name.
Exporting a workbook
Apart from the above two methods of saving an Excel file, we can also export the Excel file to save it as some specific file formats. However, this method is mostly used to save excel files in a PDF format. But, we can also export to other formats accordingly.
Export a workbook as a PDF
Using this method, we can save an Excel file in a PDF format. Exporting a workbook in a PDF format is mainly beneficial when sharing the file with someone who does not have Excel software installed. Additionally, PDF allows others to view the document but does not allow them to edit the content.
The following are the steps to export a workbook as PDFs:
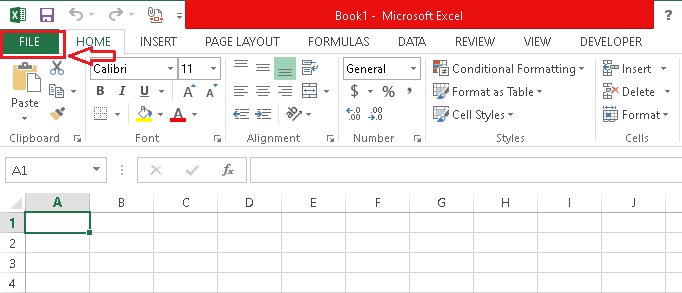
- First, we need to select the ‘File‘ tab from the top navigational panel.
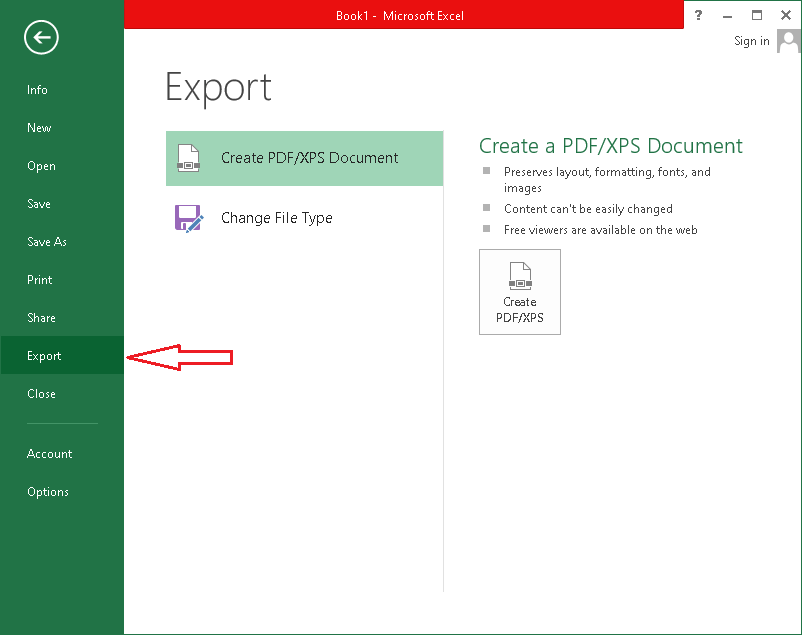
- Next, we are required to select the ‘Export‘ option from the left sidebar.
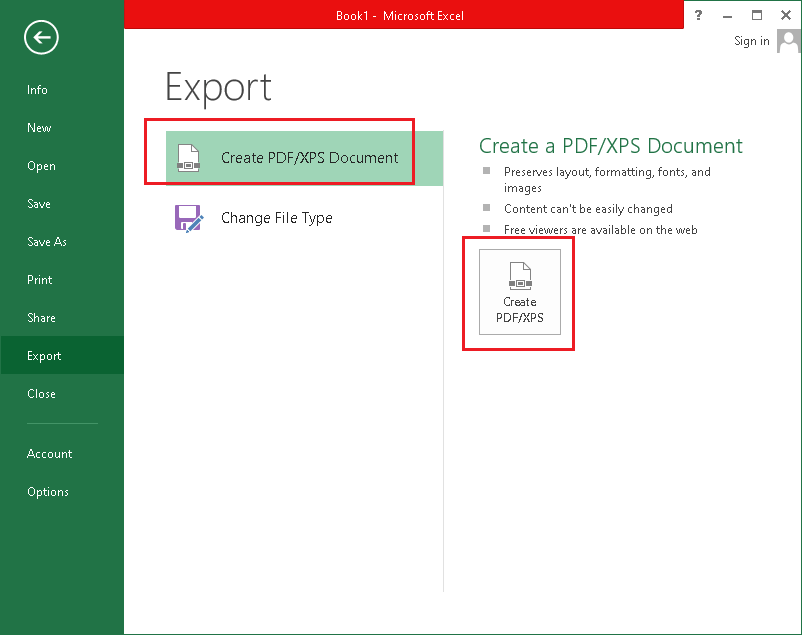
- On the next screen, we need to select the option ‘Create PDF/XPS Document‘ and then ‘Create PDF/XPS‘.
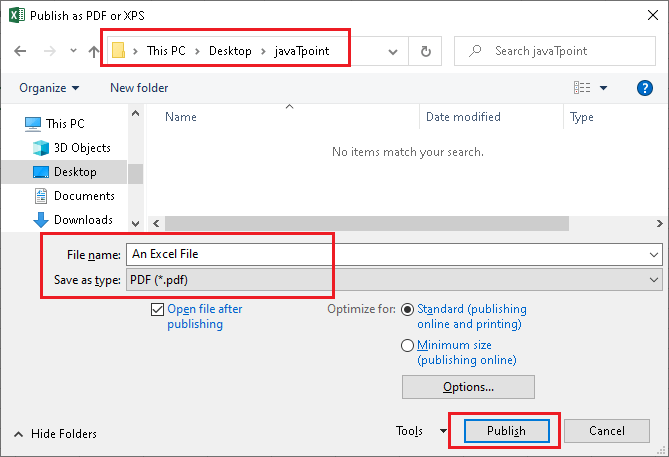
- After that, we will get the new window to enter the name for the PDF file and select the location to save it on the computer. Once we are done with the last step, we can then click on the ‘Publish‘ button to save an Excel file in a PDF format.
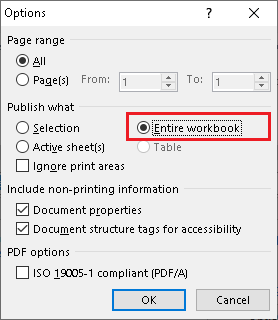
As per the default settings of Excel, the export feature only saves the active worksheet. In case we have several worksheets and want to export all of them, we need to click on the ‘Options‘ button and select the ‘Entire Workbook‘ option. The ‘Options’ window looks like the following image:
It is important to note that whenever we export or save an excel file in a PDF format, we must check the workbook data after it is saved. This is important because the formatting in PDFs generally does not appear accurate. In such a case, we need to adjust the formatting in the Excel file using the Page Layout section and then follow the entire process again to save it with proper formatting. This applies to all the worksheets in a workbook.
Export a workbook to other file formats
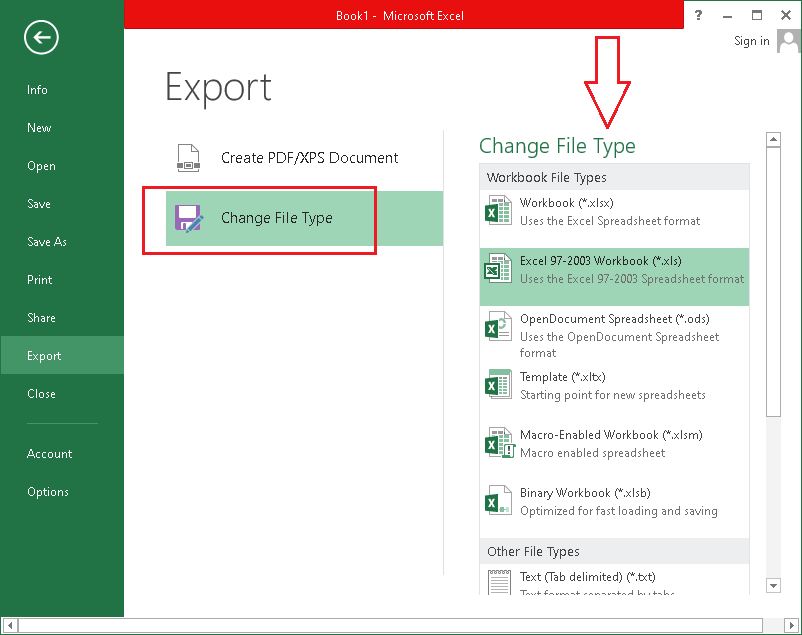
Using the Export feature in Excel, we can also save an Excel file or workbook in many other file formats/types instead of just PDFs. This method can also save an Excel file in ‘Excel 97-2003 workbook (.xls)‘, which is mainly beneficial for older versions of Excel. Therefore, we can easily share files created in the latest Excel version with those using earlier versions of Excel. Other popular file formats that are available with the export feature are .CSV, .ODS, .XLSB, .XLTX and many more.
The following are steps to export the workbook to other file types:
- First, we are required to select the ‘File‘ tab from the top panel.
- After that, we are required to click on the ‘Export‘ button from the left sidebar.
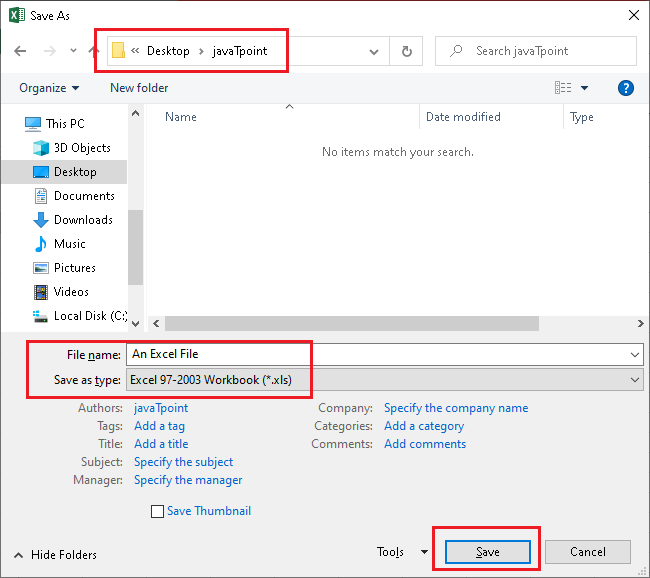
- Next, we are required to choose the option ‘Change File Type‘ from the new window. After that, we will get a list of all the file formats supported under the Export feature. Here, we can select the desired file type and proceed to the next step. To select the desired file format, we can either use double-click on its name or single-click on its name and then click on the ‘Save As‘ button from the bottom.
- On the next window, we are required to enter the desired name for a file to be saved. Additionally, we can change the location for the file where we want to save it. We can also use the ‘Save as Type’ drop-down menu to change the file type to save an Excel file in various other file formats. Once we are done selecting the name and location, we can click on the ‘Save‘ button to save an Excel file in a particular format and location.