Integration testing
Integration testing is the second level of the software testing process comes after unit testing. In this testing, units or individual components of the software are tested in a group. The focus of the integration testing level is to expose defects at the time of interaction between integrated components or units.
Unit testing uses modules for testing purpose, and these modules are combined and tested in integration testing. The Software is developed with a number of software modules that are coded by different coders or programmers. The goal of integration testing is to check the correctness of communication among all the modules.
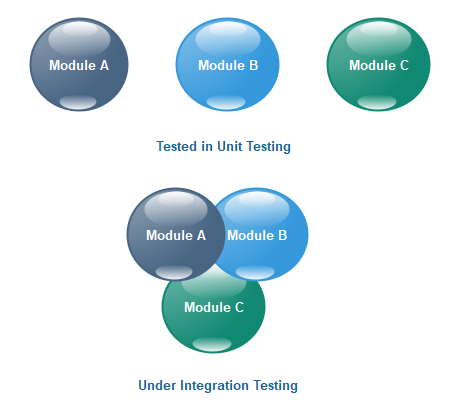
Once all the components or modules are working independently, then we need to check the data flow between the dependent modules is known as integration testing.
Let us see one sample example of a banking application, as we can see in the below image of amount transfer.

- First, we will login as a user P to amount transfer and send Rs200 amount, the confirmation message should be displayed on the screen as amount transfer successfully. Now logout as P and login as user Q and go to amount balance page and check for a balance in that account = Present balance + Received Balance. Therefore, the integration test is successful.
- Also, we check if the amount of balance has reduced by Rs200 in P user account.
- Click on the transaction, in P and Q, the message should be displayed regarding the data and time of the amount transfer.
Guidelines for Integration Testing
- We go for the integration testing only after the functional testing is completed on each module of the application.
- We always do integration testing by picking module by module so that a proper sequence is followed, and also we don’t miss out on any integration scenarios.
- First, determine the test case strategy through which executable test cases can be prepared according to test data.
- Examine the structure and architecture of the application and identify the crucial modules to test them first and also identify all possible scenarios.
- Design test cases to verify each interface in detail.
- Choose input data for test case execution. Input data plays a significant role in testing.
- If we find any bugs then communicate the bug reports to developers and fix defects and retest.
- Perform positive and negative integration testing.
Here positive testing implies that if the total balance is Rs15, 000 and we are transferring Rs1500 and checking if the amount transfer works fine. If it does, then the test would be a pass.
And negative testing means, if the total balance is Rs15, 000 and we are transferring Rs20, 000 and check if amount transfer occurs or not, if it does not occur, the test is a pass. If it happens, then there is a bug in the code, and we will send it to the development team for fixing that bug.
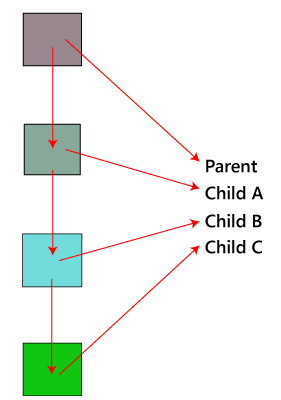
Note: Any application in this world will do functional testing compulsory, whereas integration testing will be done only if the modules are dependent on each other. Each integration scenarios should compulsorily have source→ data→destination. Any scenarios can be called as integration scenario only if the data gets saved in the destination.
For example: In the Gmail application, the Source could be Compose, Data could be Email and the Destination could be the Inbox.
Example of integration testing
Let us assume that we have a Gmail application where we perform the integration testing.
First, we will do functional testing on the login page, which includes the various components such as username, password, submit, and cancel button. Then only we can perform integration testing.
The different integration scenarios are as follows:
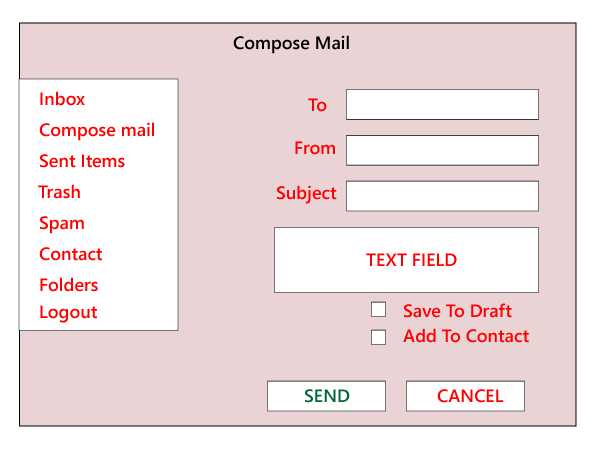
Scenarios1:
- First, we login as P users and click on the Compose mail and performing the functional testing for the specific components.
- Now we click on the Send and also check for Save Drafts.
- After that, we send a mail to Q and verify in the Send Items folder of P to check if the send mail is there.
- Now, we will log out as P and login as Q and move to the Inbox and verify that if the mail has reached.
Secanrios2: We also perform the integration testing on Spam folders. If the particular contact has been marked as spam, then any mail sent by that user should go to the spam folder and not in the inbox.
Note: We will perform functional testing for all features, such as to send items, inbox, and so on.
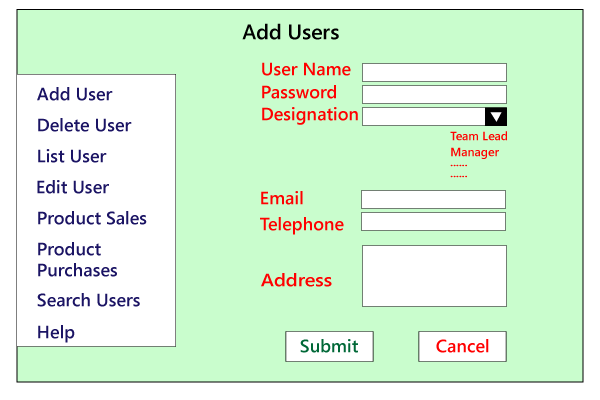
As we can see in the below image, we will perform the functional testing for all the text fields and every feature. Then we will perform integration testing for the related functions. We first test the add user, list of users, delete user, edit user, and then search user.
Note:
- There are some features, we might be performing only the functional testing, and there are some features where we are performing both functional and integration testing based on the feature’s requirements.
- Prioritizing is essential, and we should perform it at all the phases, which means we will open the application and select which feature needs to be tested first. Then go to that feature and choose which component must be tested first. Go to those components and determine what values to be entered first.
And don’t apply the same rule everywhere because testing logic varies from feature to feature. - While performing testing, we should test one feature entirely and then only proceed to another function.
- Among the two features, we must be performing only positive integrating testing or both positive and negative integration testing, and this also depends on the features need.
Reason Behind Integration Testing
Although all modules of software application already tested in unit testing, errors still exist due to the following reasons:
- Each module is designed by individual software developer whose programming logic may differ from developers of other modules so; integration testing becomes essential to determine the working of software modules.
- To check the interaction of software modules with the database whether it is an erroneous or not.
- Requirements can be changed or enhanced at the time of module development. These new requirements may not be tested at the level of unit testing hence integration testing becomes mandatory.
- Incompatibility between modules of software could create errors.
- To test hardware’s compatibility with software.
- If exception handling is inadequate between modules, it can create bugs.
Integration Testing Techniques
Any testing technique (Blackbox, Whitebox, and Greybox) can be used for Integration Testing; some are listed below:
Black Box Testing
- State Transition technique
- Decision Table Technique
- Boundary Value Analysis
- All-pairs Testing
- Cause and Effect Graph
- Equivalence Partitioning
- Error Guessing
White Box Testing
- Data flow testing
- Control Flow Testing
- Branch Coverage Testing
- Decision Coverage Testing
Types of Integration Testing
Integration testing can be classified into two parts:
- Incremental integration testing
- Non-incremental integration testing
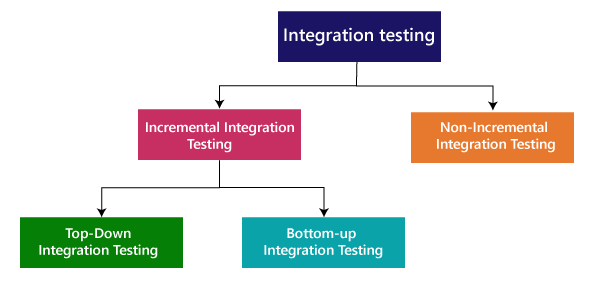
Incremental Approach
In the Incremental Approach, modules are added in ascending order one by one or according to need. The selected modules must be logically related. Generally, two or more than two modules are added and tested to determine the correctness of functions. The process continues until the successful testing of all the modules.
OR
In this type of testing, there is a strong relationship between the dependent modules. Suppose we take two or more modules and verify that the data flow between them is working fine. If it is, then add more modules and test again.
For example: Suppose we have a Flipkart application, we will perform incremental integration testing, and the flow of the application would like this:
Flipkart→ Login→ Home → Search→ Add cart→Payment → Logout
Incremental integration testing is carried out by further methods:
- Top-Down approach
- Bottom-Up approach
Top-Down Approach
The top-down testing strategy deals with the process in which higher level modules are tested with lower level modules until the successful completion of testing of all the modules. Major design flaws can be detected and fixed early because critical modules tested first. In this type of method, we will add the modules incrementally or one by one and check the data flow in the same order.
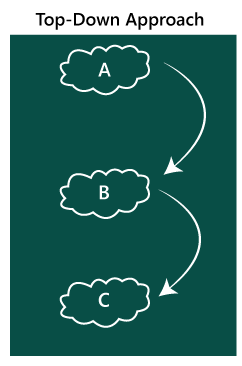
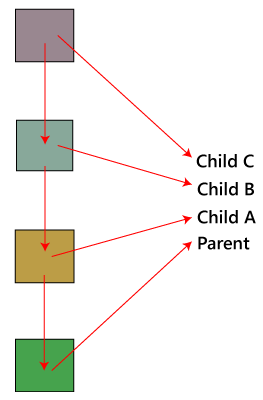
In the top-down approach, we will be ensuring that the module we are adding is the child of the previous one like Child C is a child of Child B and so on as we can see in the below image:
Advantages:
- Identification of defect is difficult.
- An early prototype is possible.
Disadvantages:
- Due to the high number of stubs, it gets quite complicated.
- Lower level modules are tested inadequately.
- Critical Modules are tested first so that fewer chances of defects.
Bottom-Up Method
The bottom to up testing strategy deals with the process in which lower level modules are tested with higher level modules until the successful completion of testing of all the modules. Top level critical modules are tested at last, so it may cause a defect. Or we can say that we will be adding the modules from bottom to the top and check the data flow in the same order.
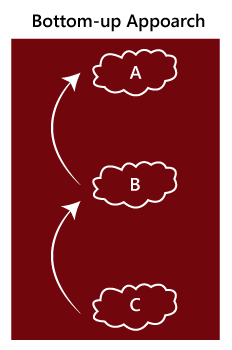
In the bottom-up method, we will ensure that the modules we are adding are the parent of the previous one as we can see in the below image:
Advantages
- Identification of defect is easy.
- Do not need to wait for the development of all the modules as it saves time.
Disadvantages
- Critical modules are tested last due to which the defects can occur.
- There is no possibility of an early prototype.
In this, we have one addition approach which is known as hybrid testing.
Hybrid Testing Method
In this approach, both Top-Down and Bottom-Up approaches are combined for testing. In this process, top-level modules are tested with lower level modules and lower level modules tested with high-level modules simultaneously. There is less possibility of occurrence of defect because each module interface is tested.
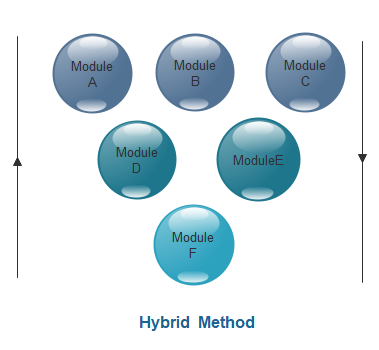
Advantages
- The hybrid method provides features of both Bottom Up and Top Down methods.
- It is most time reducing method.
- It provides complete testing of all modules.
Disadvantages
- This method needs a higher level of concentration as the process carried out in both directions simultaneously.
- Complicated method.
Non- incremental integration testing
We will go for this method, when the data flow is very complex and when it is difficult to find who is a parent and who is a child. And in such case, we will create the data in any module bang on all other existing modules and check if the data is present. Hence, it is also known as the Big bang method.
Big Bang Method
In this approach, testing is done via integration of all modules at once. It is convenient for small software systems, if used for large software systems identification of defects is difficult.
Since this testing can be done after completion of all modules due to that testing team has less time for execution of this process so that internally linked interfaces and high-risk critical modules can be missed easily.
Advantages:
- It is convenient for small size software systems.
Disadvantages:
- Identification of defects is difficult because finding the error where it came from is a problem, and we don’t know the source of the bug.
- Small modules missed easily.
- Time provided for testing is very less.
- We may miss to test some of the interfaces.
Let us see examples for our better understanding of the non-incremental integrating testing or big bang method:
Example1
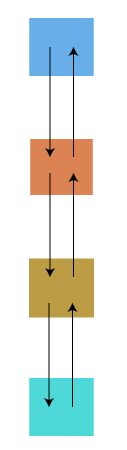
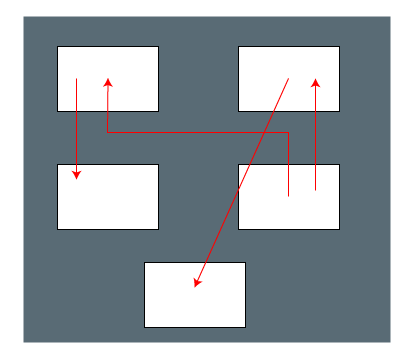
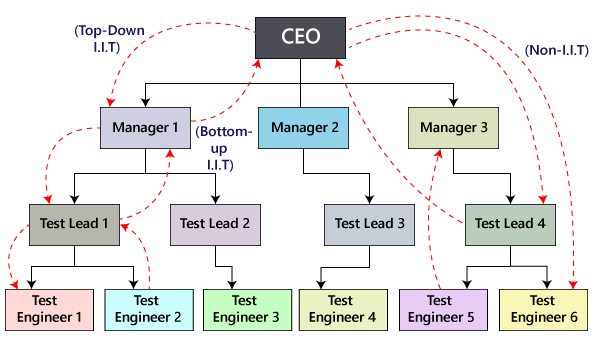
In the below example, the development team develops the application and sends it to the CEO of the testing team. Then the CEO will log in to the application and generate the username and password and send a mail to the manager. After that, the CEO will tell them to start testing the application.
Then the manager manages the username and the password and produces a username and password and sends it to the test leads. And the test leads will send it to the test engineers for further testing purposes. This order from the CEO to the test engineer is top-down incremental integrating testing.
In the same way, when the test engineers are done with testing, they send a report to the test leads, who then submit a report to the manager, and the manager will send a report to the CEO. This process is known as Bottom-up incremental integration testing as we can see in the below image:
Note: The combination incremental integration testing (I.I.T) and non-incremental integration testing is known as sandwich testing.
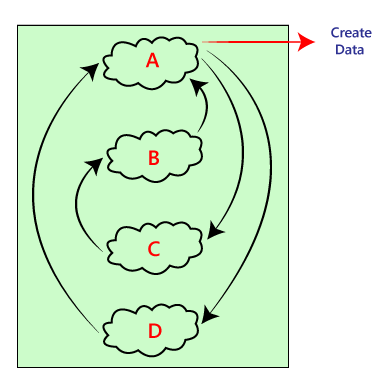
Example2
The below example demonstrates a home page of Gmail’s Inbox, where we click on the Inbox link, and we are moved to the inbox page. Here we have to do non- incremental integration testing because there is no parent and child concept.

Note
Stub and driver
The stub is a dummy module that receives the data and creates lots of probable data, but it performs like a real module. When a data is sent from module P to Stub Q, it receives the data without confirming and validating it, and produce the estimated outcome for the given data.
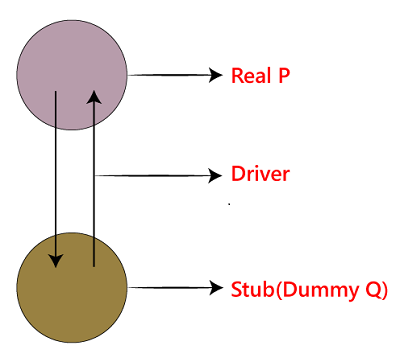
The function of a driver is used to verify the data from P and sends it to stub and also checks the expected data from the stub and sends it to P.
The driver is one that sets up the test environments and also takes care of the communication, evaluates results, and sends the reports. We never use the stub and driver in the testing process.
In White box testing, bottom-up integration testing is ideal because writing drivers is accessible. And in black box testing, no preference is given to any testing as it depends on the application.