Ionic AdMob
AdMob is a Google advertising platform for mobile apps, which makes it easy for developers to earn money from their mobile applications. It provides high-quality monetary ads. It allows developers to promote their apps quickly. It can also maximize the value of every impression by combining global advertiser demand, innovative ad formats, and advanced app monetization technology. It is available for both Android and iOS applications.
Although the advertisement is not always the best way to earn money, it is the easiest way to earn some money from mobile applications or websites. In this tutorial, we are going to learn how we can add Google AdMob to an Ionic application. Here, we will cover two types of the advertising platform, which are banner ads and interstitial ads.
Banner Ads
Banner ads display rectangular ads that can be anchored to the top or bottom of the screen. It occupies a portion of an app’s layout, which can refresh automatically after a specified period of time. It means the users will see a new ad at regular intervals, even they are staying on the same screen in the app.
Interstitial Ads
Interstitial Ads provide rich interactive full-page ads for users in mobile apps. These types of ads are designed to be placed between the content. It shows static or video ads that can appear at natural breaks or transition points, and creating engaging brand experiences without disrupting the app experience.
If you want to use advertisements in your app, you need to have an account on Google AdMob. So, if you haven’t account on the AdMob, first create it on the AdMob. Now, let us see step by step how to use AdMob into the Ionic app.
Step 1: Create a new project. You can learn how to create a project in Ionic 4 from here. You can skip this step if you already had an Ionic project.
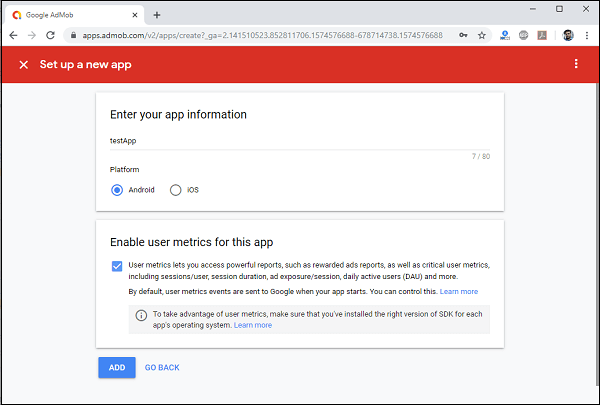
Step 2: Create a Google AdMob account. To display advertisements in the application, you need to set-up the AdMob account. If you haven’t created the AdMob account, click here. Now, logged in into the AdMob console. Then, first, you need to add your application as below screen.
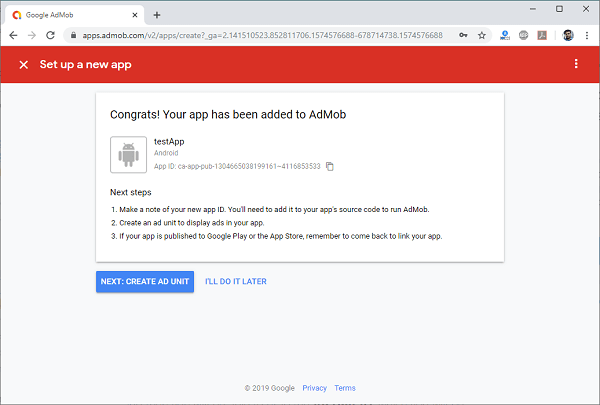
Once your app is successfully added to Google AdMob, you will get the following screen.
Step 3: Once you create the Ionic App, you have to navigate to your project and install the following AdMob Cordova plugin using the below command. This command will install the Cordova plugin and the Ionic Native package.
To find the API id, go to AdMob Console->App->your App-> App Setting->App Info.
Step 4: Next, open the app.module.ts file and import the AdMob plugin. Also, we need to set up this plugin in the providers as below.
After adding the AdMob plugin as a provider, we will be able to inject it anywhere that we need in our application.
Step 5: Let us create a Banner Advertisement. For this, you need to go to AdMob Console->yourApp->AdUnits, then the following screen appears.
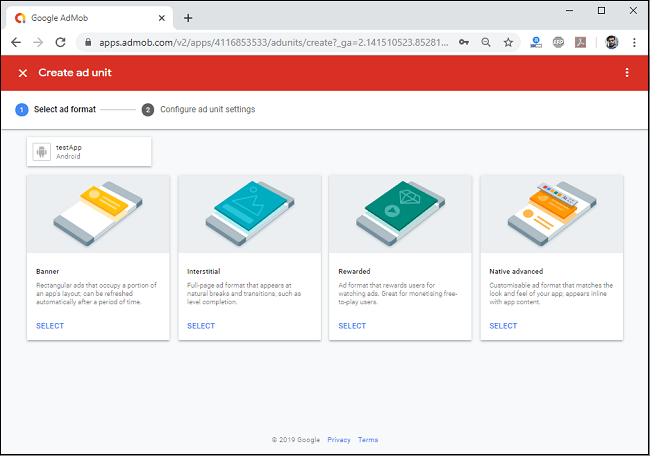
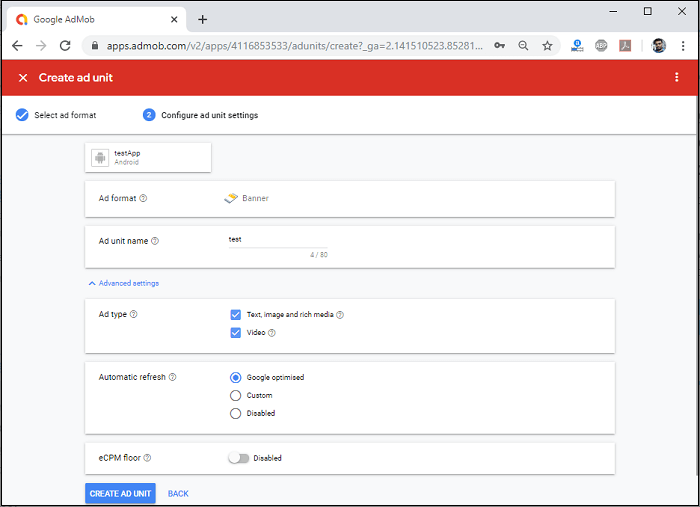
Now, select Banner and add the following details as like given image.
Step 6: Open home.page.ts file and add the following code snippets. Once the Banner is created, it will display at the bottom of your application.
Step 7: Next, open home.page.html and insert the following code. It is responsible for the user interface.
Step 8: Now, run the app. You will get the ads at the bottom of the application.
Step 9: Again, if you want to create ads for the full page, then select Interstitial and add the following code snippets in the home.page.ts file. Once the Interstitial is created, it will display on the full screen of your application.
Step 10: Next, open home.page.html and insert the following code. It is responsible for the user interface.
Step 11: Now, run the app. You will get the ads on the full screen of the application.