Photoshop Brush Tool
The Brush tool in Photoshop is used to paint over the image canvas. It is one of the most powerful and basic tools in Photoshop. It is just like a traditional drawing tool. We can apply colors and strokes to the brush tool.
The brush tool provides several options, such as size, color, hardness, etc., to control its behavior. These options can be found at the option bar available just above the workspace.
It simply adds the shape mark on the layers. We can simply add paint using the brush tool by dragging the mouse over the image canvas. Also, we can control the opacity and define the blending mode and flow of this tool.
In this section, we will explain how to use the brush tool and customize its behavior.
How to activate Brush Tool?
We can press the B key or select the brush icon from the toolbox given left to the workspace to activate the brush tool.
To activate the brush tool from the toolbox, click on the below icon in the toolbox:

How to Use Brush Tool?
The brush tool is pretty straightforward to use. We can use it simply like a paintbrush on a sheet of paper. First, we need to activate the brush tool by pressing the B key.
Before drawing, we need to customize the brush tool for better use. The brush option bar has several options to customize.

Let’s understand how to customize it.
Size & Hardness
We can adjust the size of the brush by clicking on the below icon from the option bar:
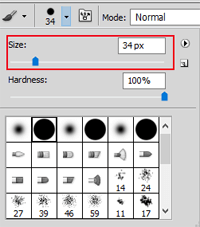
By dragging the slider, we can increase or decrease the brush size.
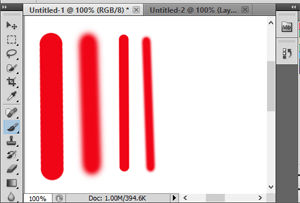
Also, from the same screen, we can define the hardness of the brush. The hardness will define the opacity of the brush. The below image contains some lines with different brush sizes and hardness.
Mode
The mode option lets us define the blending modes. We can select any of the blending modes from the available drop-down list.
Opacity
The opacity defines the transparency of the color. The lower opacity, the more transparent the drawing will be.
After defining all the above values, we can start drawing with the brush tool. The brush tool uses the current active background color. So if you want to change the brush’s color, you can change it from the below color icon available at the bottom of the toolbox:

Predefined Brushes
There are several predefined brushes available in the Brush Presets panel. We can select any of the available brush styles from this panel.
To explore the brush presets panel, navigate to the Window-> Brush Presets menu. It will open the following panel:
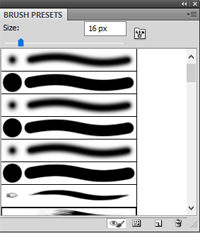
From the above panel, we can select any of the brushes by clicking on them. We can also create a new brush from this panel by selecting create new brush icon from the bottom icon list.
The Brush panel
The brush panel allows us to define some advanced settings of the brush. It can be accessed by navigating to the Window-> Brush menu or press the F5 key. The brush panel looks as follows:

From this panel, we can define some advanced settings such as shape, smoothing, texture, etc., of the brush.