Initializing a RESTful Web Services Project with Spring Boot
Step 1: Download the Spring Tool Suite (STS) from https://spring.io/tools3/sts/all and extract it.
Step 2: Launch the STS.
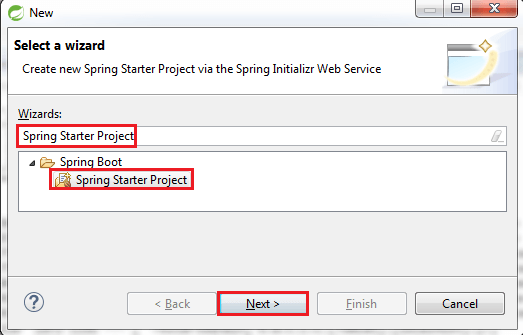
Step 3: Click on File menu -> New -> Spring Starter Project ->

If the Spring Starter Project is not enlisted, then click on Other at the bottom of the menu. A dialog box appears on the screen. Type Spring Starter Project in the Wizards text box and click on the Next button.
Step 4: provide the name, group, and package of the project. We have provided:
Name: restful-web-services
Group: com.tutoraspire
Package: com.tutoraspire.server.main
Click on the Next button.

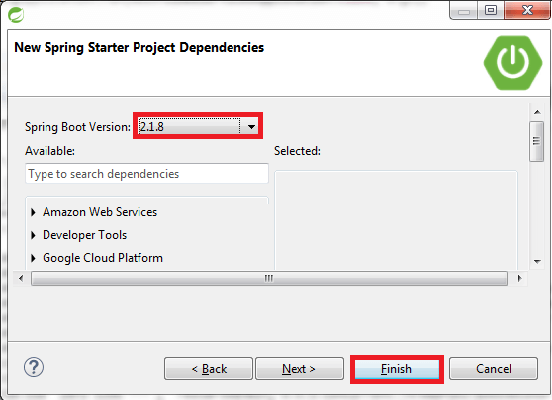
Step 5: Choose the Spring Boot Version 2.1.8.
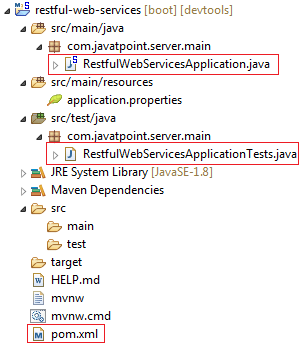
Step 6: We can see the project structure in the project explorer window.
Step 7: Go to the Maven Repository https://mvnrepository.com/ and add Spring Web MVC, Spring Boot DevTools, JPA, and H2 dependencies in the pom.xml. After adding the dependencies, the pom.xml file looks like the following:
pom.xml
Step 8: Now open the RestfulWebServicesApplication.java file and Run the file as Java Application.
It does not perform any service but ensures that the application is running properly.
Output

Creating a Hello World Service
Step 1: Create a new class with the name HelloWorldController in the package com.tutoraspire.server.main.
Step 2: Whenever we create a web service, we need to define two things Get method and the URI. Now create the helloWorld() method which returns the string “Hello World.” If we want to tell the spring MVC that it is going to handle the REST request, we have to add @RestController annotation. Now it becomes a rest controller which can handle the Rest request.
The next thing we have to do is create a mapping for the method. Add @RequestMapping annotation just above the helloWorld() method. The HelloWorldController looks like the following:
We can also improve the above code by using the @GetMapping annotation instead of @RequestMapping. Here the method specification is not required.
Step 3: Run the RestfulWebServiceApplication. It displays the string Hello World on the browser.
Enhancing the Hello World Service to Return a Bean
In this section, we are going to generate a bean for the method helloWorld().
Step 1: Create a helloWorldBean() method in HelloWordController.java file. Map the URI to “/hello-world-bean” and return HelloWorldBean.
HelloWorldController.java
Step 2: Create a class HelloWorldBean.
Step 3: Generate Getters and Setters.
Right-click -> Source -> Generate Getters and Setters -> check the box -> Ok
Step 4: Generate toString()..
Right-click -> Source -> Generate toString().. -> Ok
HelloWorldBean.java
Step 5: Launch the HelloWorldController. The URL of the browser changes to localhost:8080/hello-world-bean.
It returns the message “Hello World” in JSON format.