Selenium with C# Tutorial
In this section, we will learn how to create a Selenium test script in the C# programming language with the help of Visual Studio and NUnit Framework.
In this tutorial, we will learn the following topics:
- Explain Selenium?
- What is C#?
- Why is C# useful for automation testing?
- Selenium with C#
- Configure Selenium with Visual Studio in C#
- Configure Selenium using NUnit in Visual Studio
Explain Selenium?
Selenium is one of the most important automation testing tools because it supports multiple programming languages like Java, Python, C#, Ruby, Perl, and PHP, etc.
And to automate the test scripts in various browsers like Google Chrome, Firefox, Safari, Internet Explorer, and Opera on different operating systems such as Windows, Mac, Linux.
Selenium supports other testing tools such as TestNG and JUnit to manage the test case and to generate the test reports.
For more detailed about Selenium, refers to the below link:
https://tutoraspire.com/selenium-tutorial
What is C#?
C# is an object-oriented programming language, which runs on the .Net framework, and it is pronounced as C-sharp.
C# language is developed to run the CLR, which stands for Common Language Runtime.
In C#, we can break the program into parts with the help of functions; that’s why it is also called a structured programming language.
For further details about C# language, refer to the below link:
https://tutoraspire.com/c-sharp-tutorial
Why is C# useful for automation testing?
- C# is useful for automation testing because it allows the automation test engineer to develop an application with the help of Visual Studio on the .Net framework.
- C# is another programming language that also supports the binding with Selenium.
- And this language binding will be updated along with the java program.
- C# IDE is Visual Studio, which gives faster development and debugging experience as compared to java’s Eclipse.
- C# has a lot of inbuilt functions, which make the development fast.
Selenium with C#
In this section, we will understand how to download, install the Visual Studio and configure Selenium with Visual Studio, NUnit Framework and execute the test scripts in Visual Studio using C# programing language.
To use selenium with C#, follow the below process:
- Configure Selenium with Visual Studio in C#
- Configure Selenium using NUnit in Visual Studio
Configure Selenium with Visual Studio in C#
Following are the process, to configure Selenium with visual studio in C#:
- Download and install C# IDE (Visual Studio)
- Create a new project in Visual Studio
- Add References in Visual Studio
- Write a Selenium test script using C#
- Run Selenium test script in Visual Studio
Download and install Visual Studio
Visual Studio is a C# IDE [Integrated Development Environment], which is used to develop applications on various platforms like Windows, Mac, etc.
Here, we are downloading and installing the Visual Studio for Windows platform.
Download Visual Studio
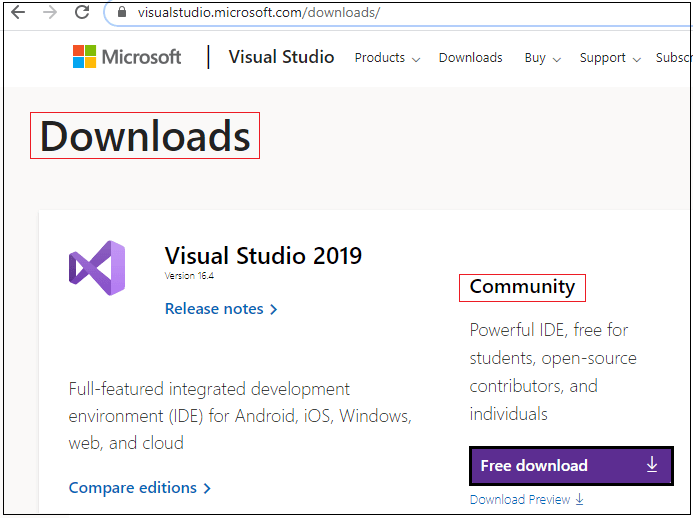
To download the latest version of Visual Studio for Windows platform, refer to the below link: https://visualStudio.microsoft.com/downloads/
- Once we clicked on the above link, in the Downloads section, we will click on the Free Download button under the Community area as we can see in the below screenshot:
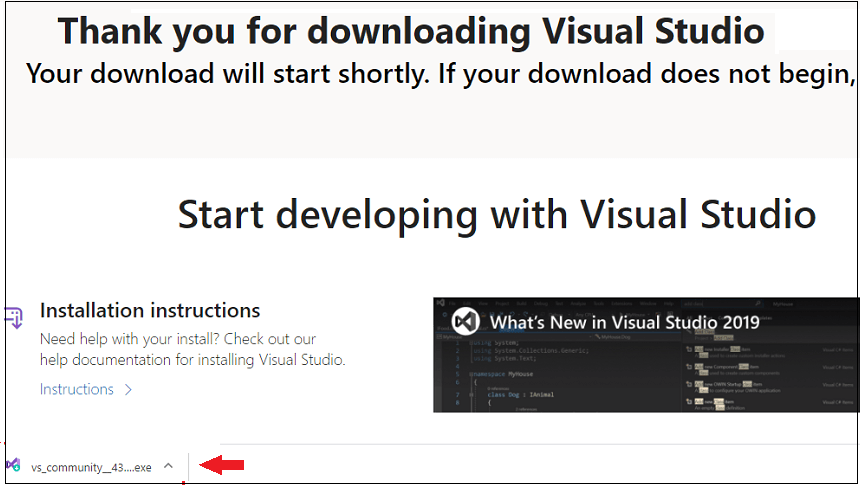
- Once we clicked on the Free Download button, it will download the exe file of the visual Studio.
- After that, open the downloaded exe file as we can see in the below screenshot:
Install Visual Studio
After downloading the Visual Studio for Windows platform, we will be ready to install it.
To install the Visual Studio, follow the below process:
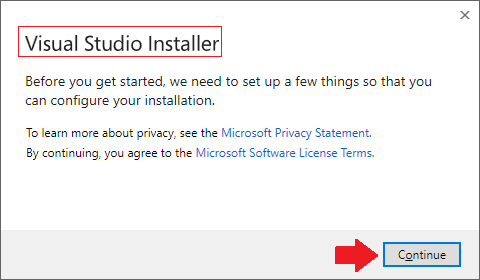
- Once we double-click on the downloaded executable file, the Visual Studio Installer window will appear on the screen, where we clicked on the Continue button for further process as we can see in the below screenshot:
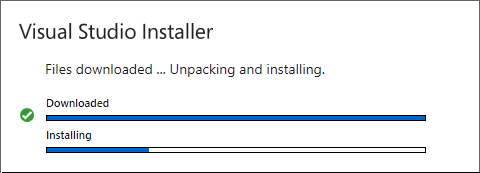
- After clicking on the continue button, it will start installing the files for the visual Studio.
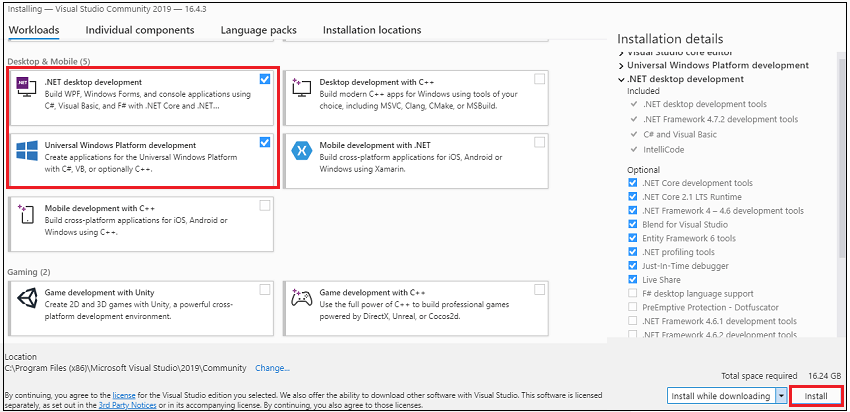
- Once this process is done, installing -visual Studio-community 2019-16.4.3 window will appear on the screen where we select the Universal Windows Platform development and .Net desktop development options under the Desktop & Mobile section.
- And click on the Install button as we can see in the below screenshot:
- The installation process will take some time to install because the file size is big as we can see in the below screenshot:

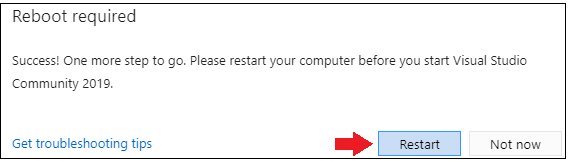
- When the installation process is done, we will click on the Restart button before starting the visual Studio.
- Once the system is rebooted (restart), we will search “Visual Studio 2019” on the Start menu and double-click on it.
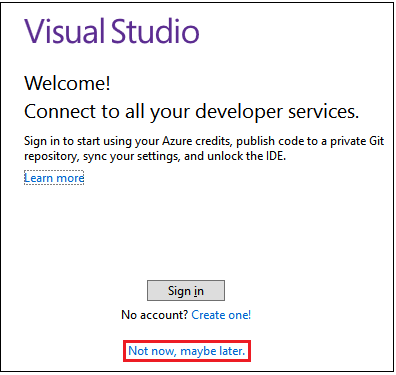
- The following pop-up will appear on the screen, and we will click on the Not now, maybe later if we do not have an account as we can see in the below screenshot:
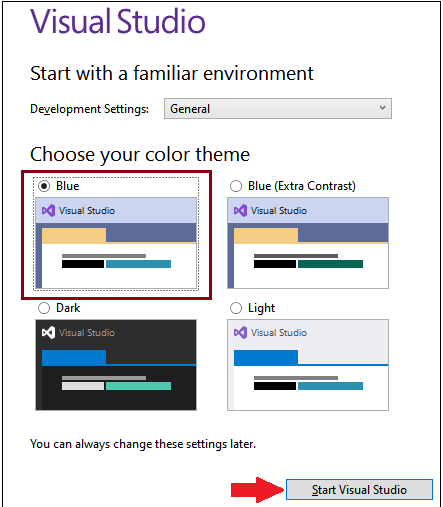
- In the next window, we can select the theme for the Visual Studio.
- After selecting the theme of the Visual Studio, click on the Start Visual Studio button as we can see in the below image:
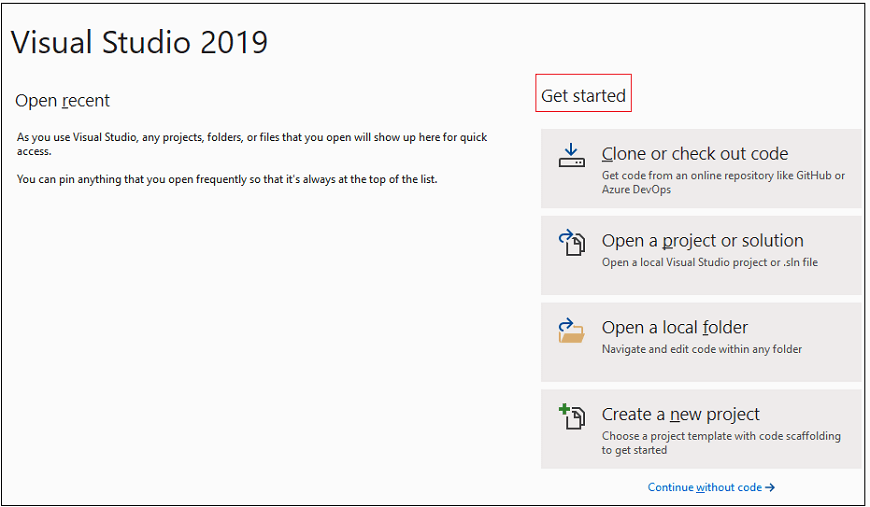
- And we got the Get started window of Visual Studio.
Create a new Project
Once the installation is done, we are ready to create a new project on the Visual Studio.
To create a project on the Visual Studio, follow the below process:
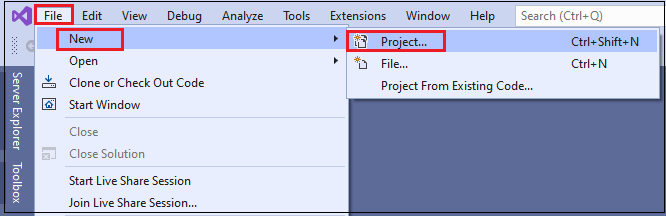
- Right-click on the File menu, go to New and select Project option in the given pop-up menu as we can see in the below screenshot:
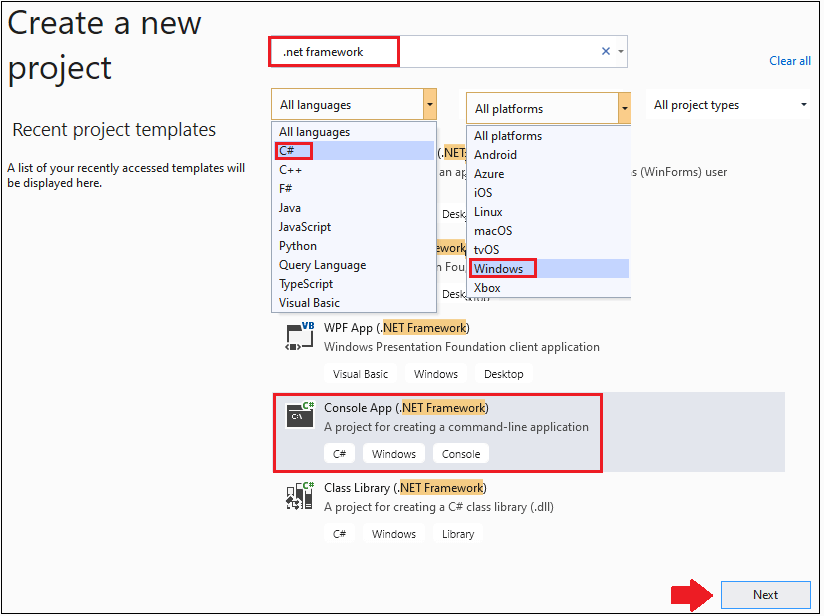
- Create a new project window will appear on the screen, where we will select C# language in the All language drop-drown menu.
- Then, select Windows platform options from All platforms drop-down list.
- And search for .net Framework template in the search field, and select Console App (.NET Framework) from it.
- After that, click on the Next button as we can see in the below screenshot:
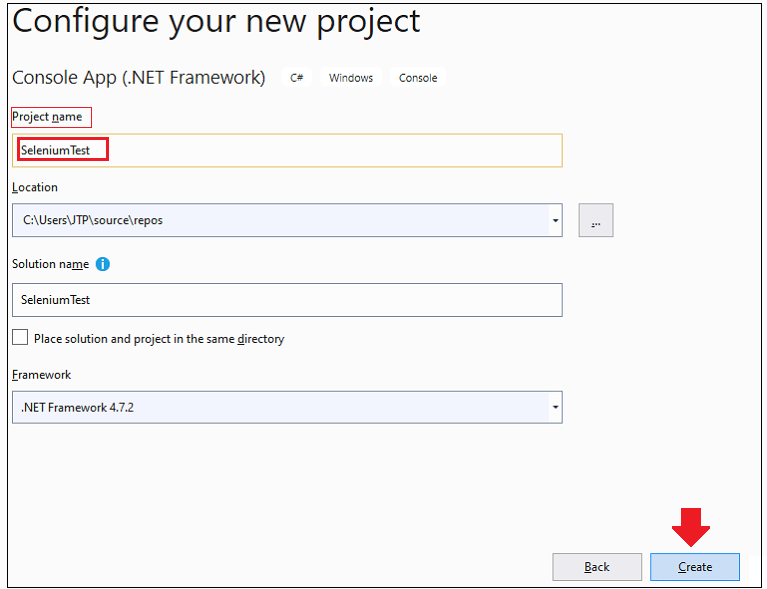
- Once we clicked on the next button, Configure your new project window will appear on the screen, where we will provide our Project name [SeleniumTest], and clicking on the Create button as we can observe in the below screenshot:
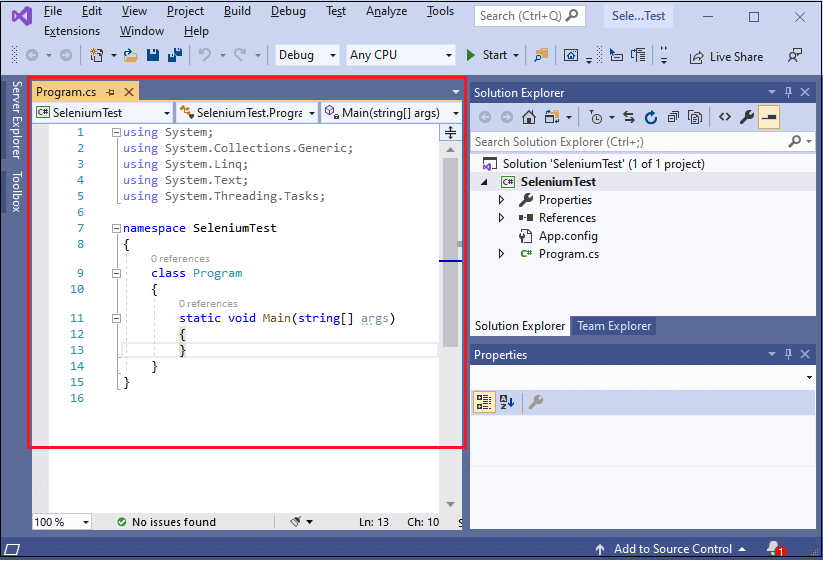
- Once the project is successfully created, the following window will appear on the screen:
Add References in Visual Studio
Once the project creation is done, we will add the References of Selenium WebDriver and Chrome driver with the help of the NuGet Package Manager in the Visual Studio.
Add Selenium WebDriver References
Follow the below process, to add references of Selenium WebDriver in Visual Studio:
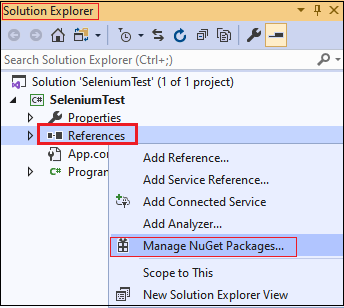
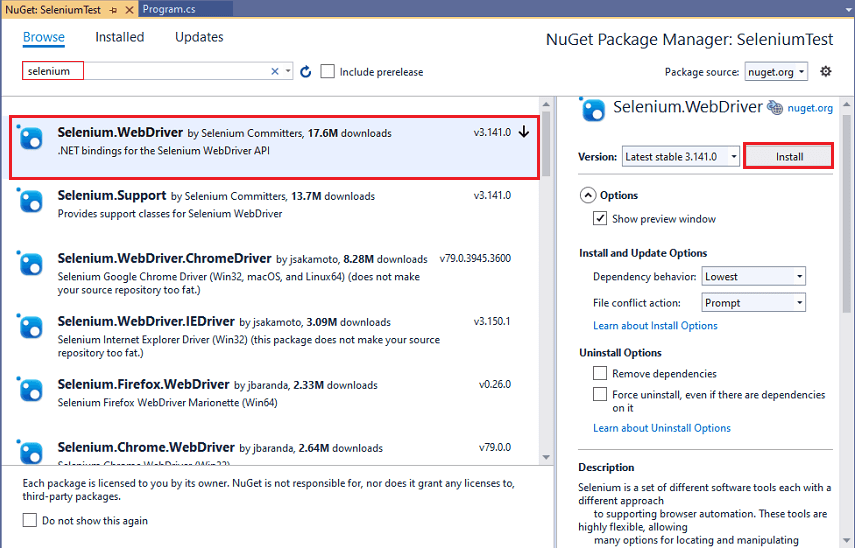
- In the Solution Explorer, right-click on the References and select Manage NuGet Packages option in the given pop-up menu as we can see in the below screenshot:
- The Manage NuGet Packages window will open, where we will search Selenium and select the WebDriver, and click on the Install button as we can see in the below image:
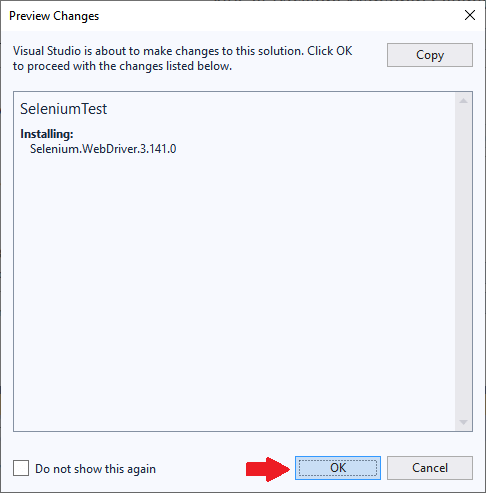
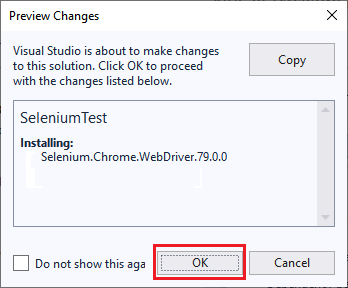
- Then, click on the OK button in the Preview change window as we can see in the below image:
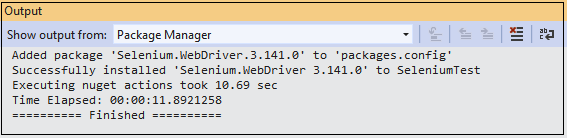
- Once the package got successfully installed, it will give the below output message.
Add Chrome Driver References
Follow the below process, for adding the references to the Chrome Driver in Visual Studio:
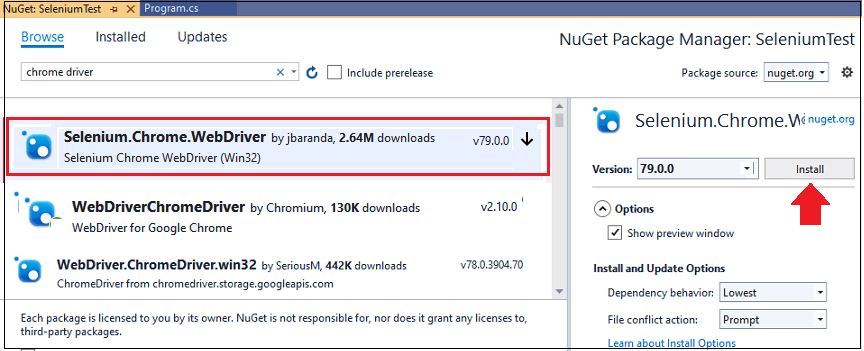
- To perform an action on the chrome browser, we will be again right-clicking on the References and select Manage NuGet Packages option from the pop-up menu.
- Then search chrome driver in the search field, and select the Chrome.WebDriver and click on the Install button as we can see in the below image:
- And, click on the Ok button in the Preview Changes window for further process.
- After adding the Selenium WebDriver and Chrome driver References in the Visual Studio, we are ready to write our test script in the C# Programming language.
Write a Selenium test script using C#
To write a Selenium test script using C# Programming language, follow the below steps:
| Steps | Actions | Input | Expected Result |
|---|---|---|---|
| 1. | Create reference for the browser | The reference for the browser should be created. | |
| 2. | Navigate to the Google home page. | https://www.google.com/ | The Google home page must be displayed. |
| 3. | Identify the Google search text box and pass the value. | tutoraspire tutorials | The Google search box should be identified, and the value should be entered. |
| 4. | Identify and Click on the Google search button. | The Google search button should be identified, and clicked. | |
| 5. | Close the Browser. | The Browser should be closed. |
We are creating our test scripts step by step to give you a complete understanding of each component in detail.
Step1
To create a reference for the browser, we will follow the below process:
Note: To declare the interface: prefix “I” before the interface name. Like as we can see in the below table that in C#, we put “I “before interface (IWebDriver), whereas, in java, there is no need to put “I “before the interface (WebDriver) name.
| C# | Java |
|---|---|
| IWebDriver | WebDriver |
| IWebElement | WebElement |
Here the sample code:
- While writing this above line of code, we encounter the below error:
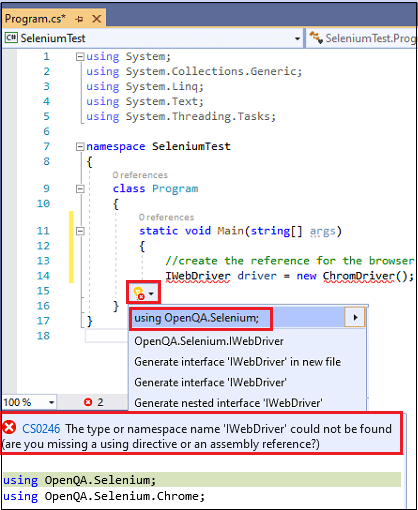
- To overcome this error, we will use the below statement, which helps us to add the Selenium reference.
- While adding the reference of the chrome driver, it will give the below error:
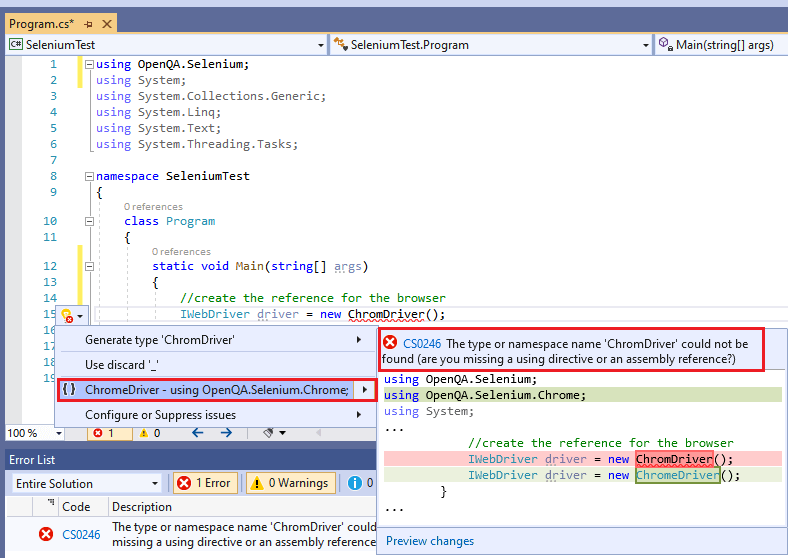
- And to resolve this error, we will use the below statement in our code.
Step2
In this step, we are going to navigate https://www.google.com/ URL in the browser.
And the sample code is as below:
Note: GoToUrl() method is used to navigate the URL.
Step3
To identify the Google search box, follow the below process:
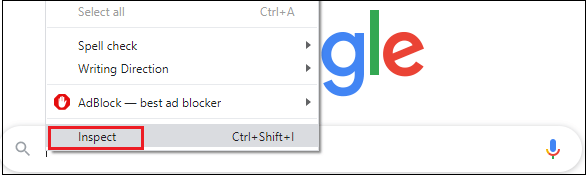
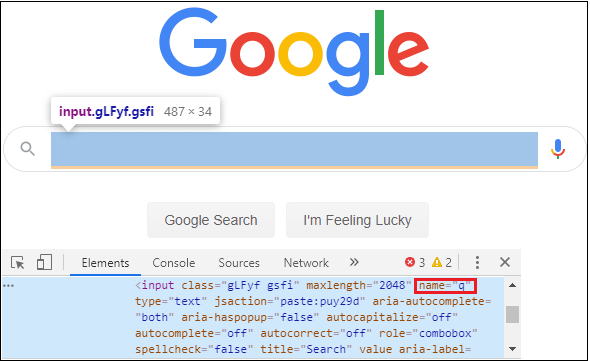
In this step, we are trying to locate the Google search text box with the help of its Name attribute.
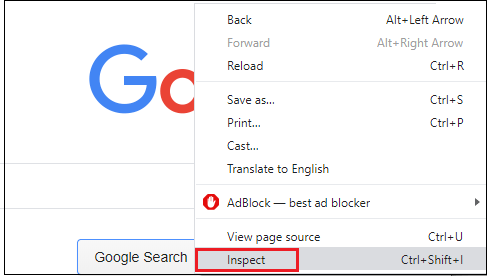
- Right-click on the Google search text box, and select the Inspect option in the pop-up menu as we can see in the below image:

- The developer tool window will be launched with all the specific codes used in the development of the Google search text box where we will copy the value of its Name attribute that is “q“.
- And the sample code is as below:
Step4
In this step, we are passing the value in the Google search box.
Here the sample code:
Step5
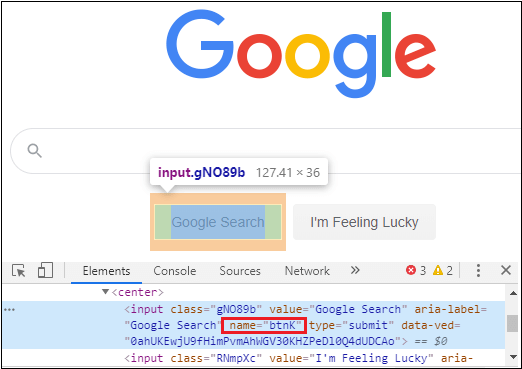
To identify the Google search button, follow the below process:
- Right-click on the Google search button, and select the Inspect option from the given pop-up menu as we can see in the below image:
- The developer tool window will be launched with having all the specific codes used in the development of the Google search button.
- Then, copy the value of its name attribute that is “btnK” as we can see in the below image:
- And, the sample code is as following:
Step6
In the last step, we will close the browser after the completion of all the actions performed on the browser.
Here the sample code:
Our final test script will look like this after completing all the test scenarios.
Run the Test Script
Once we are done with writing the Selenium test script, we will run our test script.
Follow the below process, to run the test script:
- Click on the Start button to execute the Programcs file as we can see in the below image:

- The execution process will be started, after clicking on the Start button as we can see in the below image:

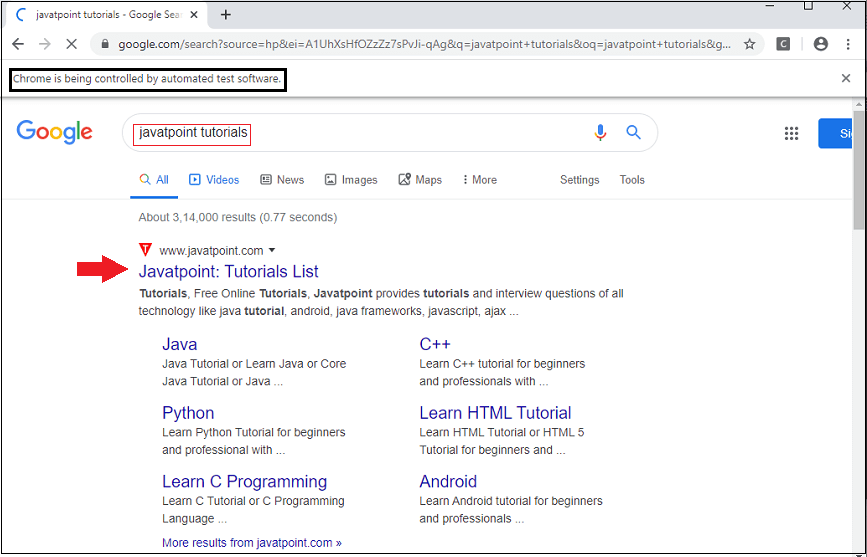
- The above test script will launch the Google Chrome browser and automate all the test scenarios.
Configure Selenium using NUnit in Visual Studio
Before writing the test script with the help of NUnit, we will understand NUnit Framework, downloading and installing the NUnit Framework in Visual Studio
- What is NUnit Framework?
- Download the NUnit3 Test Adapter
- Adding the References for NUnit
- Create a NUnit class
- Write Selenium test script using NUnit
- Execute the test script
What is NUnit Framework?
NUnit is a unit testing framework for all .Net languages. It is open-source software, and it has been completely redesigned to take advantage of many new features .Net language.
It also supports a wide range of .Net languages platforms.
Download the NUnit3 Test Adapter
The NUnit3 Test Adapter is an extension that allows us to run the NUnit test inside the Visual Studio.
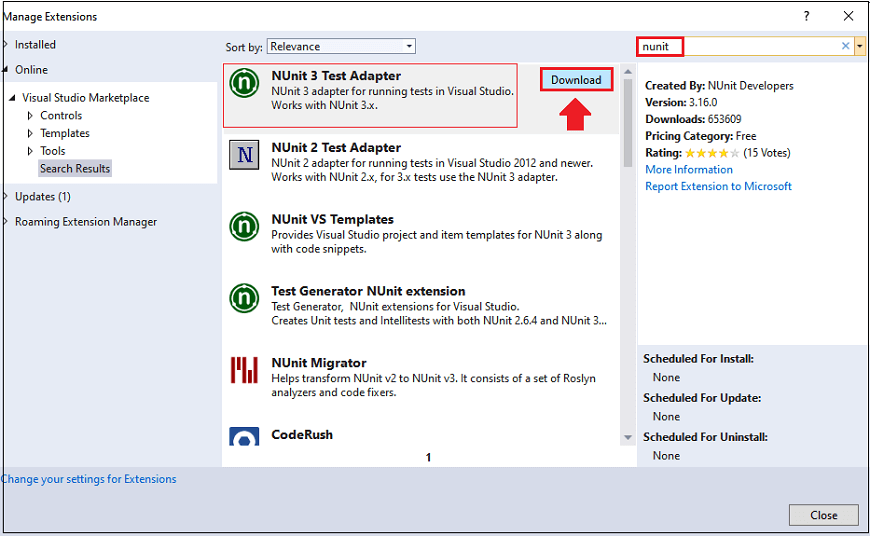
To download the NUnit3 Test Adapter in the Visual Studio, follow the below steps:
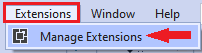
- First, go to the Extensions and select the Manage Extensions option in the Visual Studio.
- The Manage Extensions window will appear on the screen, where we will search for NUnit, and click on the Download button for NUnit 3 Test Adapter as we can see in the below screenshot:
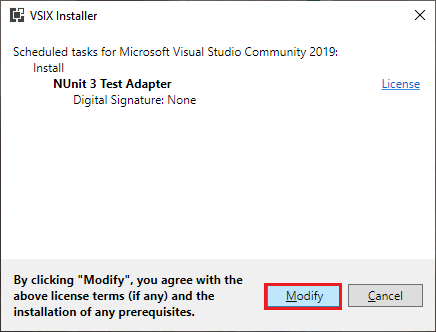
- Once we clicked on the Download button, it will ask us to close our Visual Studio to modify the changes, and then click on the Modify button as we can see in the below screenshot:
- Once we clicked on the Modify button, it gets start installing and modifying the NUnit 3 Test Adapter.
- When all the modifications are completed, we got the below window:
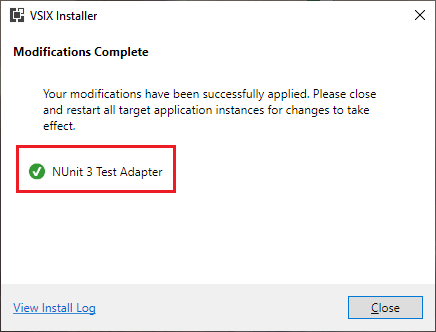
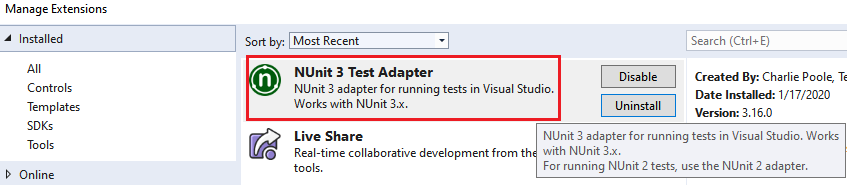
- As we can see in the Manage Extensions window, the NUnit 3 Test Adapter is successfully installed.
- Once we are done with the NUnit 3 Test Adapter installation process, we will add the references for NUnit.
Adding the References for NUnit
To add the reference for NUnit, follow the below process:
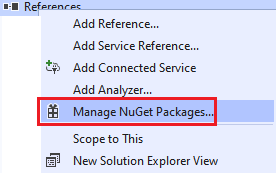
- Right-click on the References in Solution Explorer, and select the Manage NuGet Packages option in the given pop-up menu.
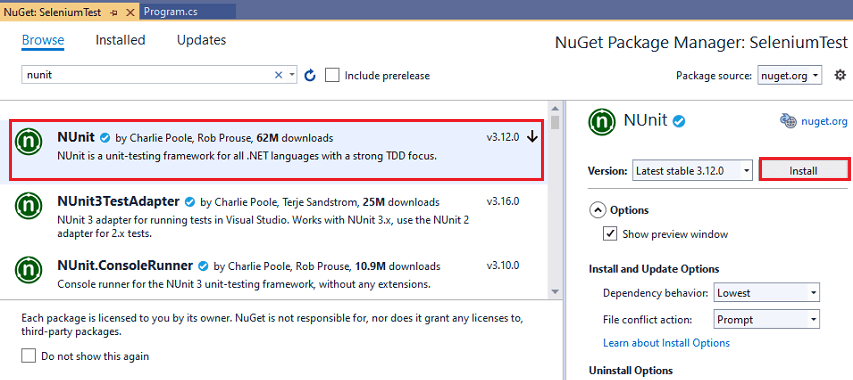
- In the Manage NuGet packages window, we will search for NUnit in the search field, and select the first option as NUnit, and click on the Install button as we can see in the below screenshot:
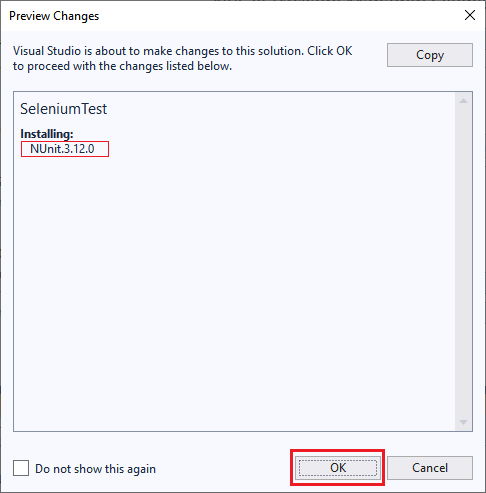
- Once we clicked on the Install button, Preview changes window will appear on the screen where we clicked on the OK
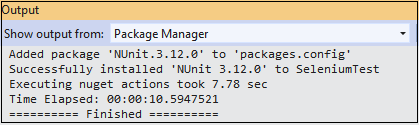
- Once the package got successfully installed, we will get the below output message.
Create NUnit Class
To create a NUnit class in the Visual studio, follow the below process:
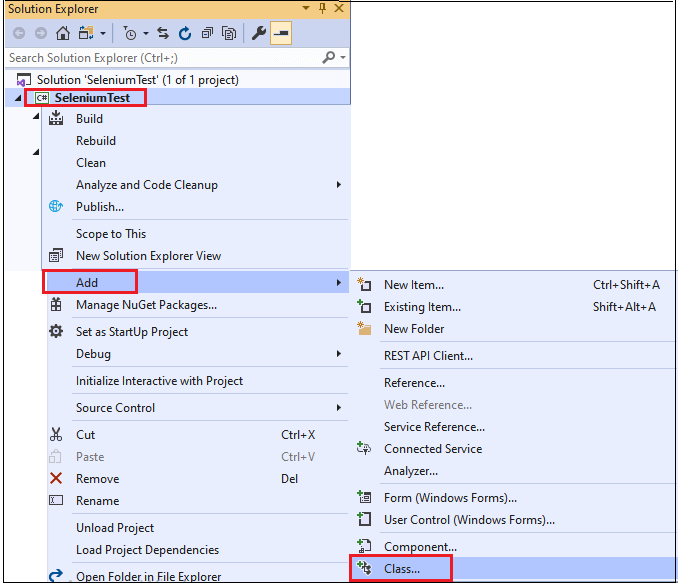
- Right-click on the SeleniumTest project, then go to Add and select Class option from the given pop-up menu.
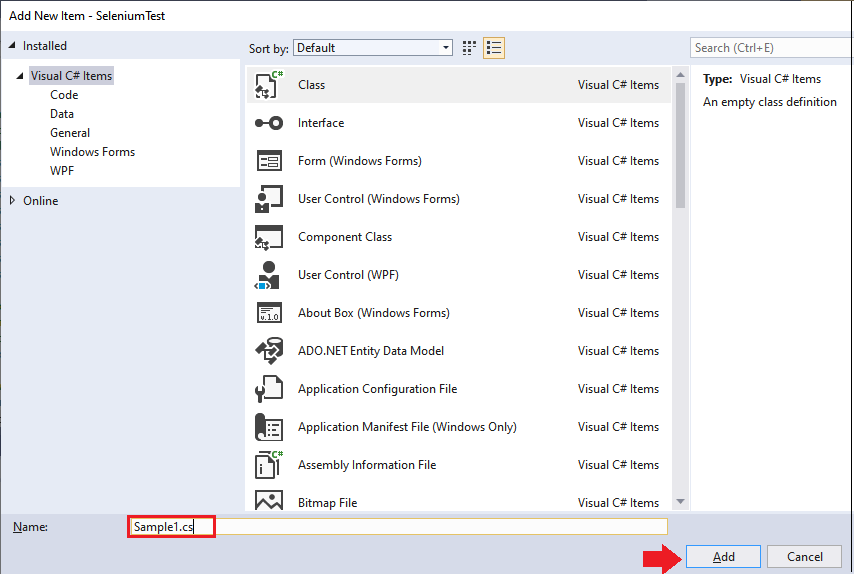
- The Add New Item window will appear on the screen, where we will provide the class name as Sample1, and click on the Add button as we can see in the below screenshot:
- Once we clicked on the Add button, below window will appear on the screen:
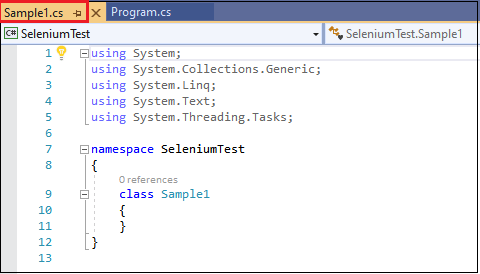
- After creating the class successfully, we are ready to write our test script using NUnit.
Write Selenium Test Script using NUnit
To write a Selenium test scripts using NUnit, follow the below process:
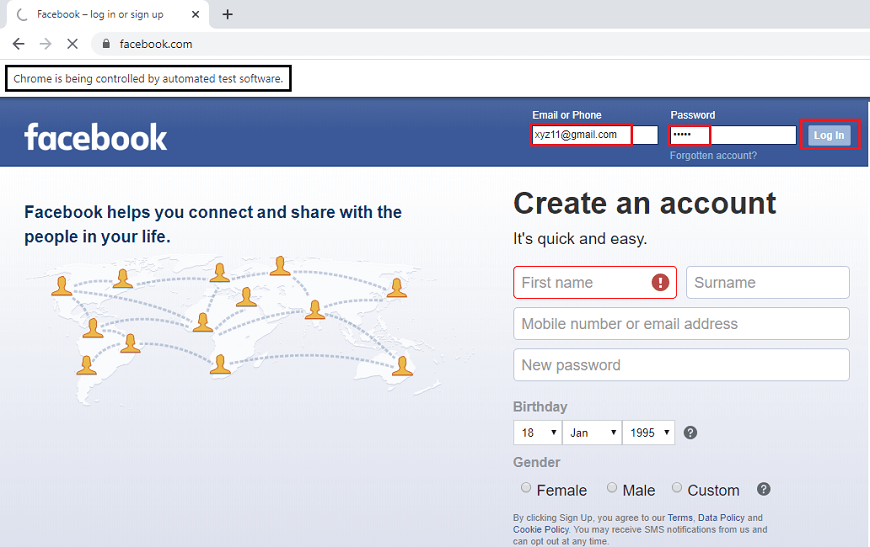
For our testing purpose, we will perform Login operation on the Facebook Application.
| Steps | Actions | Input | Expected Result |
|---|---|---|---|
| 1. | Open the Google Chrome browser. | The Google Chrome browser should be opened. | |
| 2. | Navigate to the Facebook login page. | https://www.facebook.com | The Facebook login page must be displayed. |
| 3. | Identify the username text box and pass the value. | [email protected] | The username text box should be identified, and the value should be entered. |
| 4. | Identify the password text box and pass the value. | Password=####### | The Password text box should be identified, and the value should be entered. |
| 5. | Identify the Log in button and click it. | The Login button should be identified and clicked. | |
| 6. | Close the browser. | The browser should be closed. |
We are creating our test script step by step to give you a complete understanding of how we write the test script with the help of the NUnit framework in Visual studio.
Step1
To access the Google Chrome browser, we will create the IWebDriver as a global variable.
Here the sample code:
Note:
Global variable: The Global variable is declared outside any function which is accessible to all functions throughout the program.
We will divide our code into different parts while writing the code using NUnit with the help of NUnit test methods like:
- For Open the browser: Initialize
- Perform browser operations: ExecuteTest
- Close the browser: EndTest
Example:
Step2
In the next step, we will navigate to the given URL under the Initialize() method.
Here the sample code:
Step3
In this step, we will identify the username text box of the Facebook login page under the ExecuteTest() method.
Follow the below process:
- Right-click on the username text box, and click on the Inspect Element as we can see in the below screenshot:
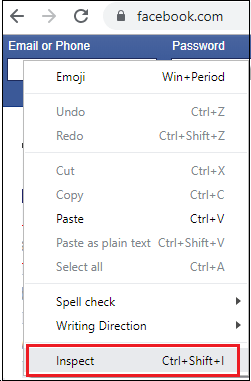
- The developer tool window will open having all the specific codes, which are used in the development of the username text box.
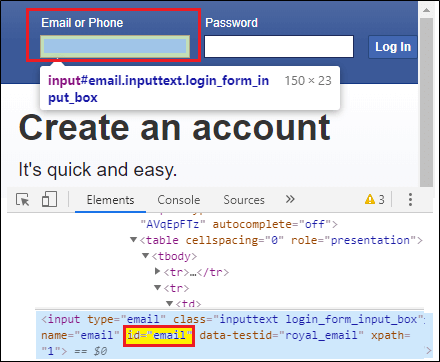
- Copy the value of its id attribute as “email” and paste it into the code.
Here the sample code:
Step4
After that, we will identify the password text box of the Facebook login page, so for this follow the below process:
- Right-click on the password text box, and click on the Inspect Element option in the pop-up menu as we can see in the below image:
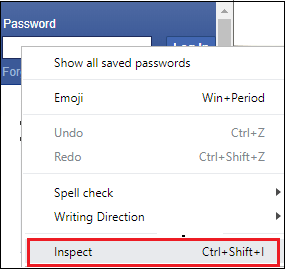
- It will launch a developer tool window that contains all the specific codes, which are used in the development of the password text box.
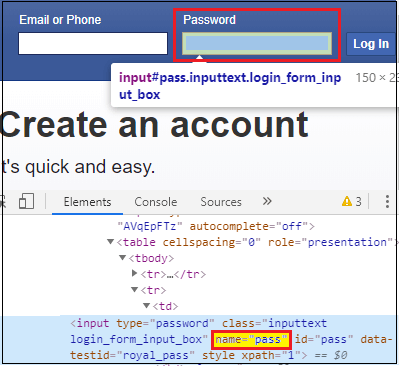
- Copy the value of its name attribute as “pass” and paste it into the code.
Here the sample code:
Step5
Once we identified the username or password textbox, we will find the Log in button and perform click operation.
- Right-click on the Log in button, and select the Inspect option from the given pop-up menu as we can see in the below image:
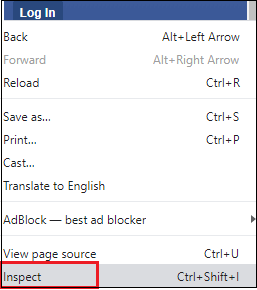
- The developer tool window will be launched with having all the specific codes, which are used in the development of the log in button as we can see in the below screenshot:
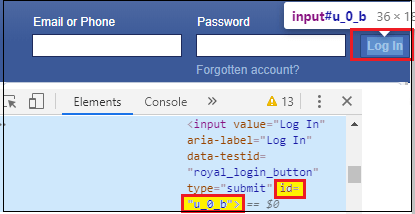
- Copy the value of its Id attribute “u_0_b” and paste it into the code.
Here the sample code:
Step7
In the last step of our test script, we will close the browser under the EndTest() method.
Here, the sample code for closing the browser:
After combining all steps together, our script will look like this:
Note: In the above code, use your Facebook id at place: [email protected] and password: ########
Execute the Test Script
To run the test scripts, follow the below process:
- Go to the Test in the toolbar and select Test Explorer as we can see in the below screenshot:
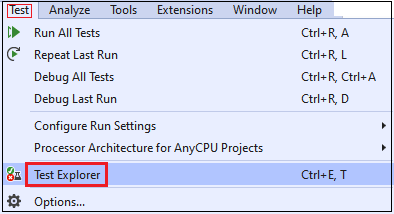
- The Test Explorer window will appear on the screen, to view all the available tests, we have to build our solution.

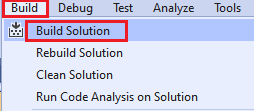
- To build the solution, go to Build and select Build Solution from given pop-up menu as we can see in the below screenshot:
- Once we have done with the Build solution, we cannot see our Tests on the test explorer window because we did not add the NUnit attributes.
- The NUnit provides some inbuilt attributes, but here we are using SetUp, Test, and TearDown
- So, we will add Test attribute in our code just like below:
Note:
Test attribute: It is used to mark the methods as callable from the NUnit test runner.
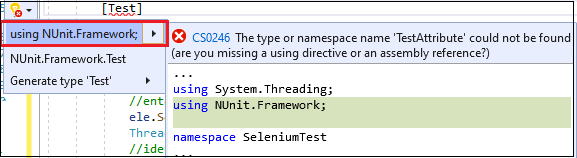
- While adding the Test attribute, it will give the below error.
- To overcome this error, we will use the reference of the NUnit framework as we can see in the below image:
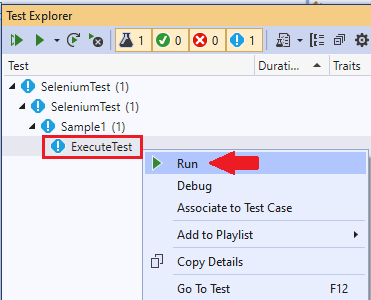
- Now, we go to the Test Explorer and Build the solution once again, and we will get the ExecuteTest on the Test Explorer
- After that, we will Run the selected test as we can see in the below image:
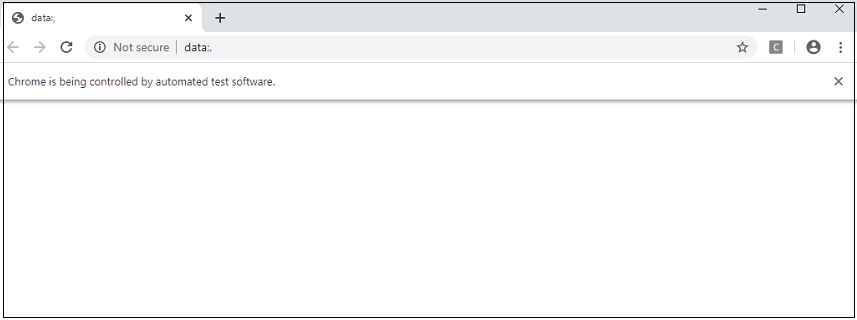
- After running the test script, It will able to open the browser as we can see in the below screenshot:
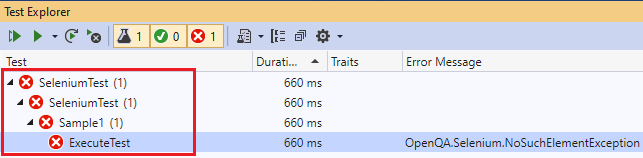
- The test will Fail because we have not called the Initialize method anywhere in the code.
- So we need to tell NUnit Framework by adding two more attributes called SetUp and TearDown into the code.
Note:
SetUp: The SetUp attribute is used to identify a method to be called immediately; each test runs.
TearDown: this attribute is used to identify a method that is to be called immediately after each test is executed. And this method is guaranteed to be called, even if an exception is thrown.
Our final code will look like this after adding all three attributes:
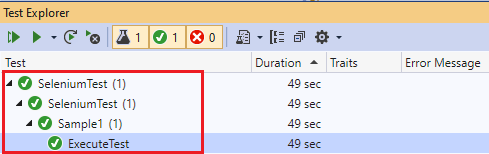
- After that, once again, do the build solution and run the selected test.
- Our test got passed in the Test Explorer window as we can see in the below screenshot:
- And the above test script will launch the Google Chrome browser and automate all the test scenarios as we can see in the below screenshot:
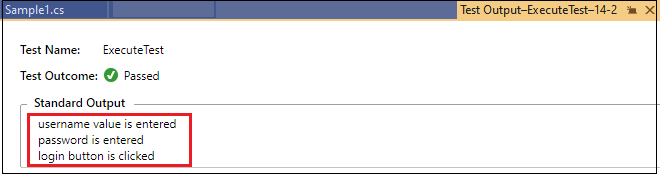
- Or if we want to see the output, we will pass some value and see the output by clicking on the output link.
- And we can see the output for all the operations that we perform on the console as we can see in the below screenshot: