Selenium with Python Tutorial
In this tutorial, we will learn how to run a Selenium test script using Python Programming language.
Before going further in this tutorial, first, we will understand some essential points which will help us to implement test scripts in Python.
- What is Selenium?
- Why we use Selenium for automation testing?
- What is Python?
- Why is Python useful for automation testing?
- Selenium with Python
- Configure Selenium using Python
- Configure PyDev in Eclipse
What is Selenium?
Selenium is an open-source testing tool, which means it can be downloaded from the internet without spending anything. Selenium is a functional testing tool and also compatible with non-functional testing tools as well.
For further information about Selenium, refer the below link: https://tutoraspire.com/selenium-tutorial
Why we use Selenium for automation testing?
Selenium is one of the most popular automation testing tools. Here automation testing is a process of converting any manual test case into the test scripts using automation tools such as Selenium.
Following are some aspects that, why we prefer Selenium for automation testing:
- The Selenium test scripts can be written in any programming languages like Java, Python, C#, Ruby, Perl, as so on.
- The Selenium test scripts can be executed in many operating system platforms such as Windows, Mac, Linux, etc.
- And the test scripts can be implemented on different browsers like Google Chrome, Mozilla Firefox, Internet Explorer, Safari, etc.
- The Selenium testing tool can be associated with other testing tools such as TestNG, Junit for managing the test cases, and generating test reports.
- To achieve continuous testing, Selenium is integrated with Maven, Jenkins, and Docker testing tools.
What is Python?
- Python supports the Object-Oriented Programming approach to establish the applications. It is simple and easy to learn and provides lots of high-level data structures. It is an open-source language.
- It is a high-level and interpreter scripting programing language.
- Python makes the development and debugging fastbecause there is no compilation step included in Python development.
For further details about Python language, refer the below link: https://tutoraspire.com/Python-tutorial
Why is Python useful for automation testing?
- Python is very useful for automation testing because it supports multiple programming patterns.
- Python has many built-in testing frameworks such as Pytest and Robot, which covers the debugging and faster workflow.
- It is an interpreted language means the interpreter implements the code line by line at a time that’s makes debugging easy.
- Python is Cross-platform Language; that’s why it can run on different platforms like Windows, Linux, UNIX, and Macintosh,
- Python can be easily implemented with other programming languages such as C, C++, JAVA, etc.
Selenium with Python
There are two ways to run a Selenium test scripts with the help of Python:
- Configure Selenium using Python
- Configure PyDev in Eclipse.
Let us see how we configure Selenium with the help of Python programing language:
Configure Selenium using Python
There are following steps to configure Selenium using Python:
- Download and install Python on Windows
- Install Selenium libraries in Python
- Download and install PyCharm
- Create a new project and write the Selenium test script
- Run and validate the test scripts.
Download and install Python for Windows
In this section, we will see how we download and install the Python for Windows platform.
Download the Python
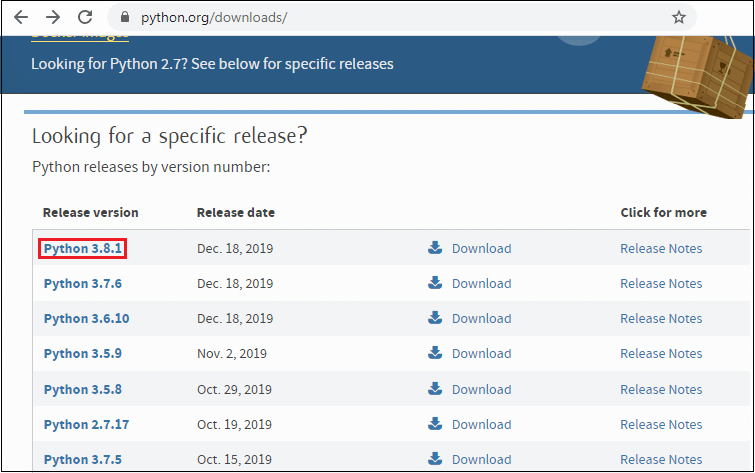
To download the latest version of Python for Windows Platforms, refer the below link: https://www.Python.org/downloads/
- Once we clicked on the above link, the latest Release version list is shown, where we clicked on the Python 3.8.1 version as we can see in the below screenshot:
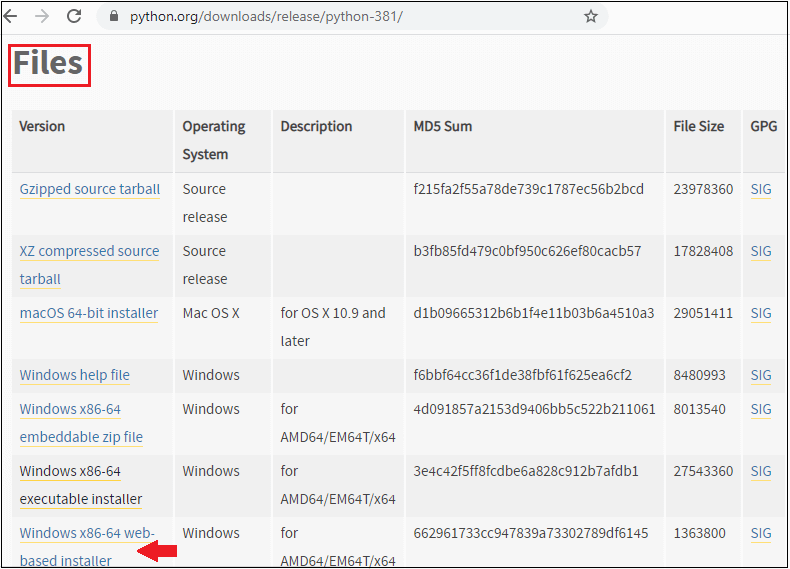
- The Python-3.8.1 version window will appear on the screen, then scroll the page little-bit and find the File section, and the click on the Windows x86-64 web-based installer link for the Windows operating system as we can see in the below screenshot:
Install the Python
After downloading the Python for Windows-64 bit, we will be ready to install the Python.
To install the Python, follow the below process:
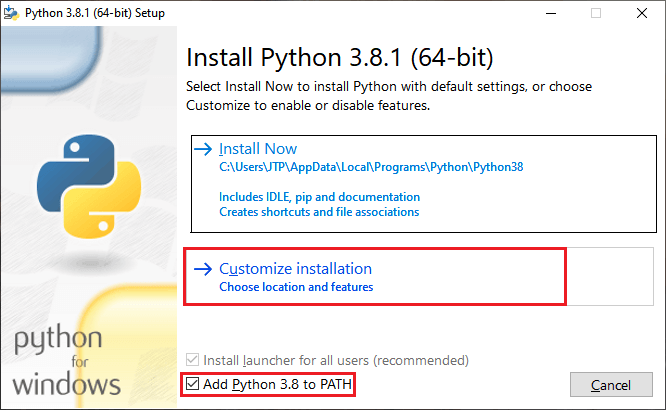
- Once we double-click on the downloaded executable file, the Python 3.8.1(64-bit) setup window will appear on the screen, where we have two options available to install the Python, which are:
- Install Now
- Customize installation
- We will click on the Customize installation, and select Add Python 3.8 to path checkbox as we can see in the below image:
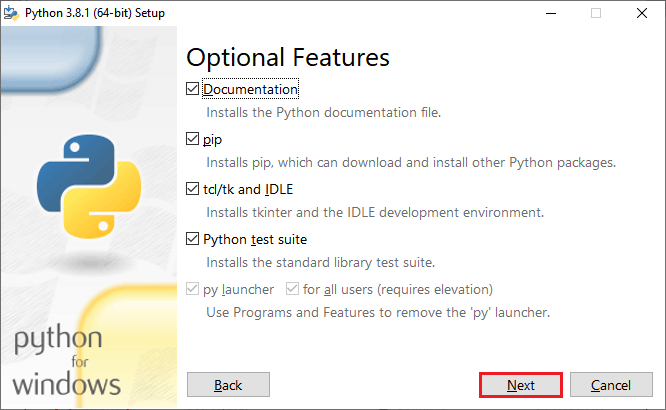
- After, click on the customize installation, the Optional Features will appear on the screen, where we can select and deselect the features according to our requirements.
- Then, click on the Next button, to proceed further as we can see in the below image:
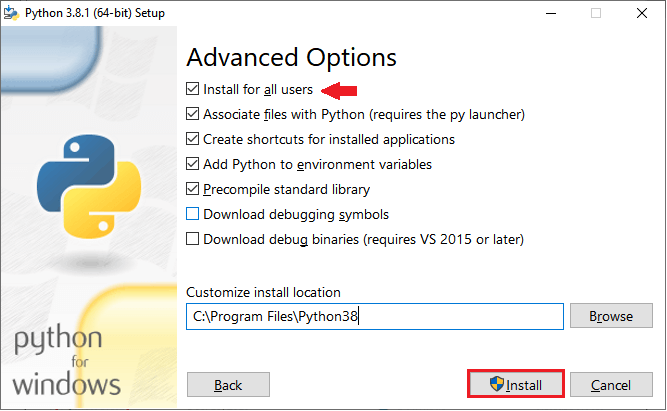
- Once, we clicked on the Next button; we have a list of Advanced Options available, where we can select the options based on our needs and also make sure that the Install for all users is selected.
- We can also customize the install location according to our convenience by clicking on the Browse
- After that, click on the Install button, to install the Python as we can see in the below screenshot:
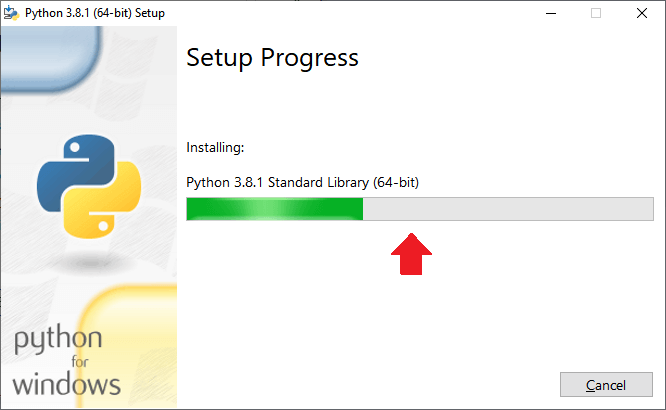
- The installing process is getting started after clicking on the Install button as we can see in the below screenshot:
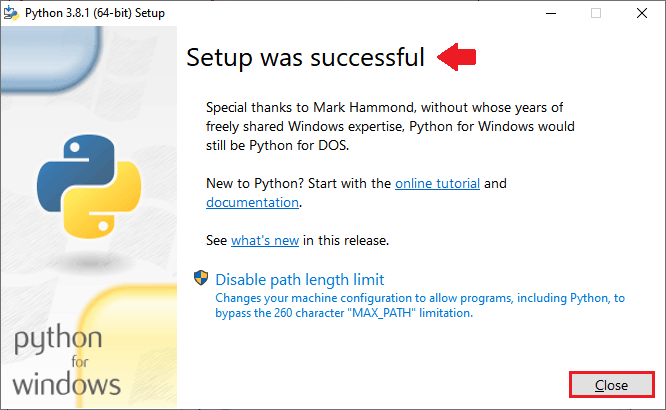
- When the installation is done, we got the confirmation message as Setup was successful, which means that the Python is installed successfully for the Windows operating system.
- Then, click on the Close button, to close the setup window as we can observe in the below screenshot:
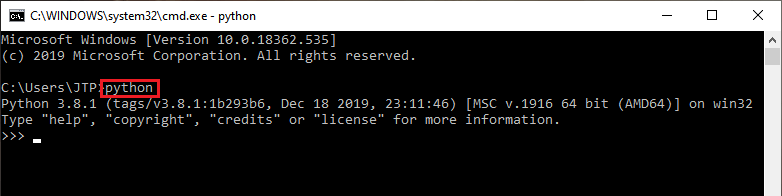
After that, we will check whether Python is installed successfully and working fine or not.
So for this, we will open our command prompt, and type the command as Python and press the Enter key, and it will open the Python interpreter shell where we can implement the Python program as we can see in the below image:
Installing the Selenium libraries in Python
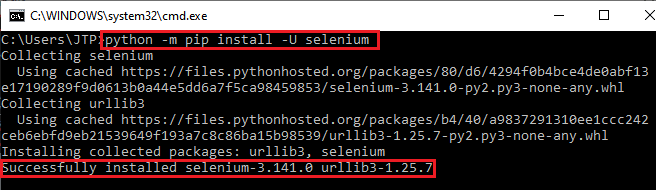
Once we successfully install the Python in our operation system, we will install the Selenium libraries.
For this, we will execute the following command in our command prompt:
And, this command will successfully install the latest Selenium package i.e., Selenium -3.141.0 added to the libraries as we can see in the below image:
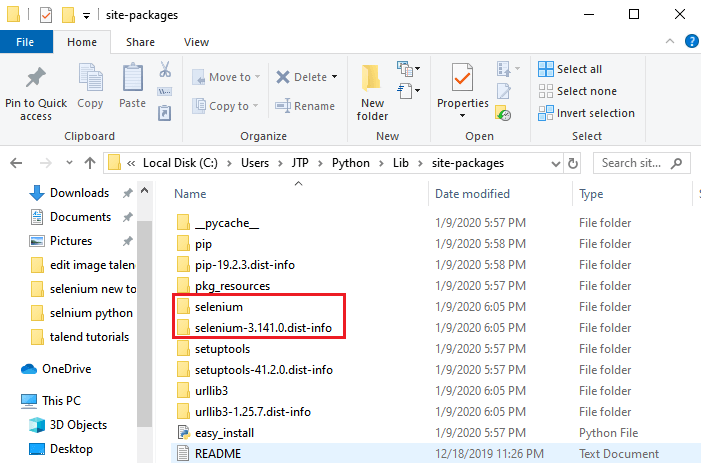
After that executing the above command, it will create the Selenium folder automatically having all the Selenium libraries as we can see in the below screenshot:
Download and install PyCharm
Once we successfully install the Selenium libraries into Python, we are ready to download Python IDE that is PyCharm.
To download the PyCharm, follow the below process:
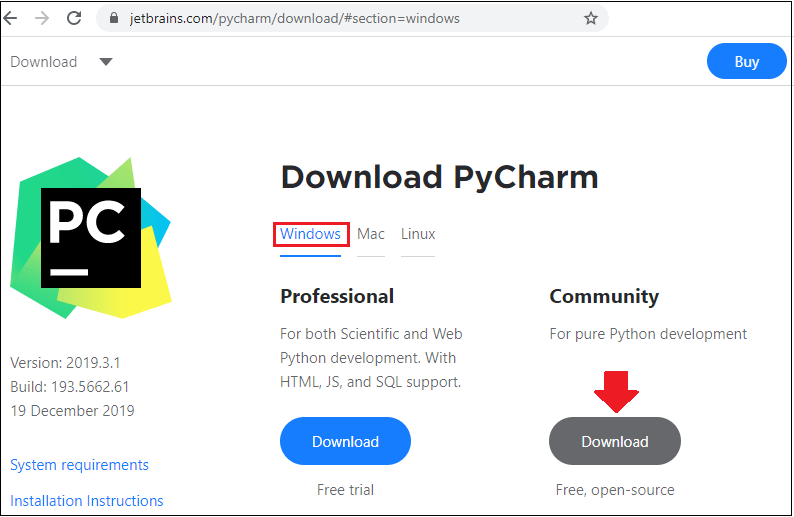
- Refer the below link, to download the PyCharm https://www.jetbrains.com/pycharm/download/#section=windows
- Once we clicked on the above link, we will get the below window, where will click on the Download button under the Community section for the Windows
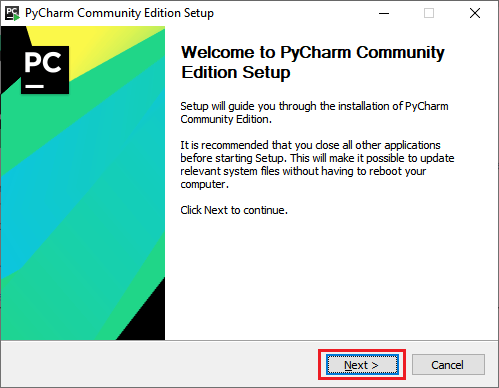
- After that, double-click on the executable file to install the PyCharm, and the PyCharm Community Edition Setup window will appear on the screen, where we click on the Next button to proceed further as we can see in the below image:
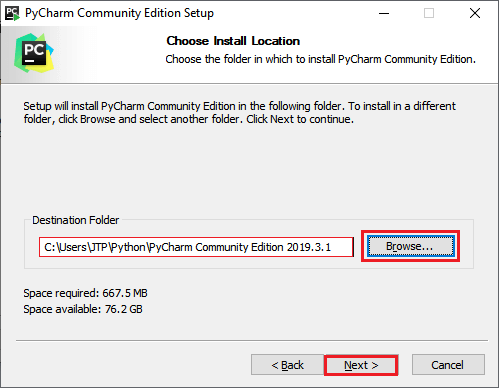
- In the next step, we can Choose Install location by clicking on the Browser button, then click on the Next button for further process.
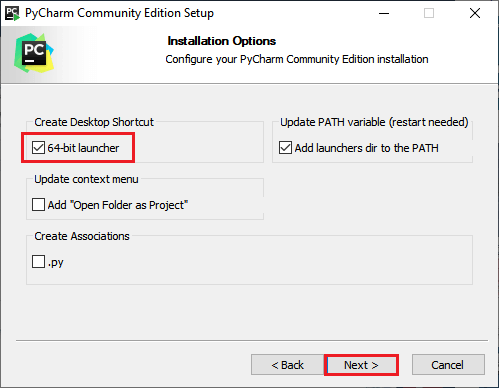
- In the next step, we have some Installation Options available, and we can select them based on our requirements.
- After that, click on the Next button as we can see in the below image:
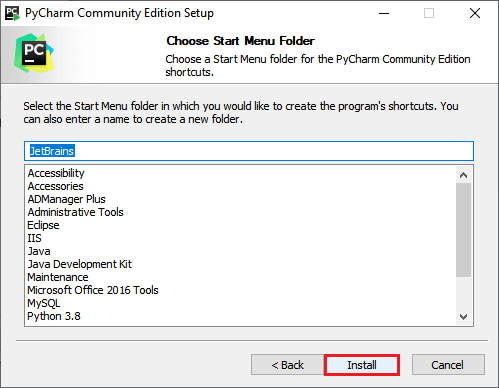
- Then, click on the Install button to install the PyCharm, as we can see in the below screenshot:
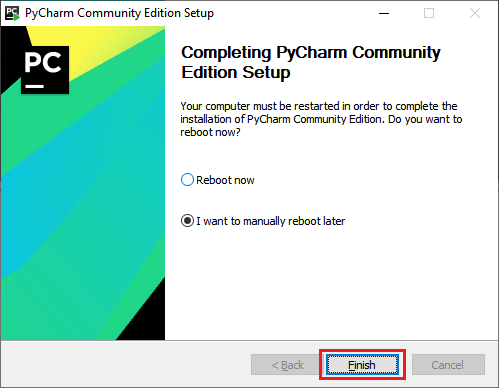
- As we can see in the below image, the installation process is getting started.

- Then, click on the Finish button to finish the installation process as we can see in the below image:
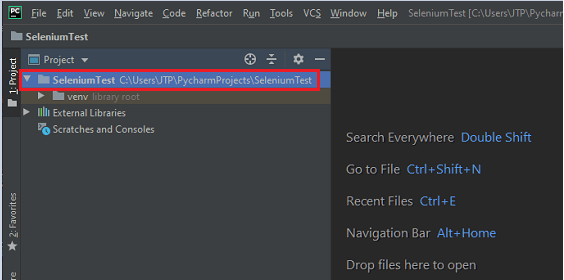
Create a new project and write the Selenium test script
Once we successfully install the PyCharm, we will open the PyCharm IDE for creating a new project.
Create a New Project in PyCharm
Follow the below process, to create a new project in PyCharm:
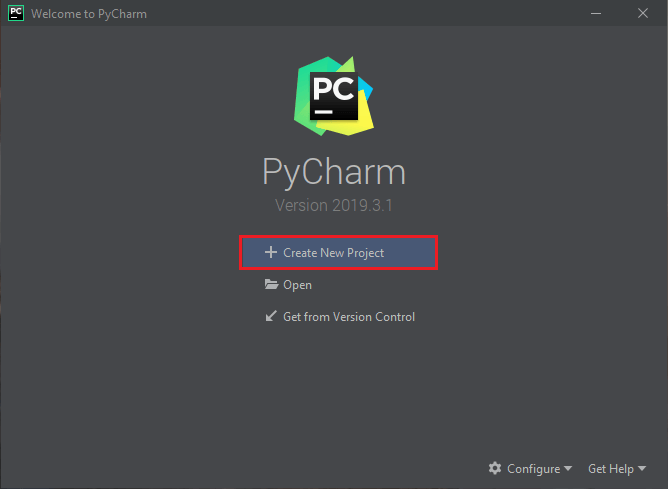
- First, open the PyCharm by Double-click on it, and click on the Create New Project as we can see in the below image:
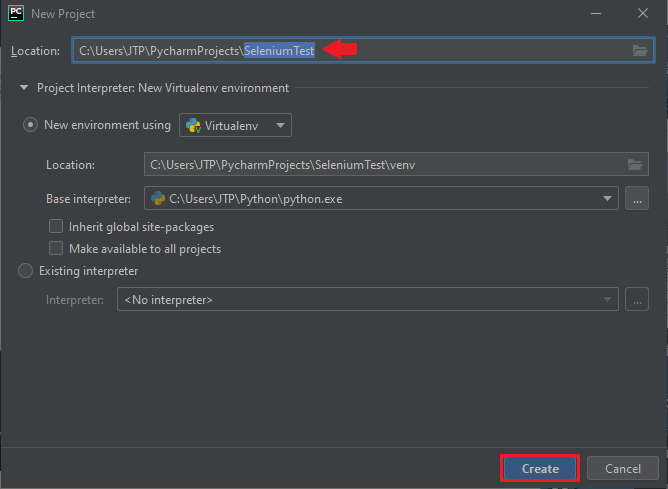
- After that, we will provide the project name as SeleniumTest, and click on the Create button as we can see in the below image:
- After clicking on the Create button, we will get the below window:
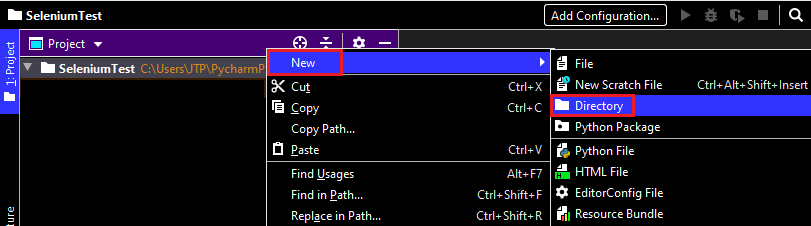
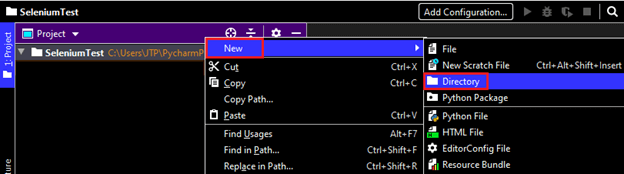
Adding Selenium Test Scripts
For adding the Selenium test scripts in the PyCharm, follow the below process:
- Right-click on the SeleniumTest project, then go to New, and we can add any of the options in the given list according to our requirements.
- But, here we are adding the Python file, so for this, we will add the Directory which helps us to manage them separately as we can see in the below screenshot:
- And, provide the Directory name, in our case we give it as Demo
- After that, press the Enter key as we can see in the below screenshot:
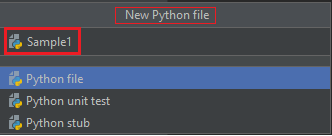
- After creating a Directory, we will right-click on the Demo Directory then go to New, and select Python File from the pop-up menu as we can see in the below image:
Demo → New → Python File
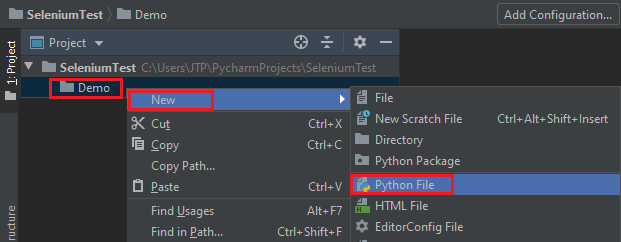
- And, we provide a name to python file as Sample1.
- Then, press the Enter key as we can see in the below image:
- After that, we got the IDE where we can create or write our Selenium test Scripts.
Write the Selenium test script
For our testing purpose, we will first go to the Google Home page and search tutoraspire from there.
We are creating our sample test script step by step to give you a complete understanding of how we write a Selenium test script in Python programming language.
For this, follow the below steps:
| Steps | Actions | Input | Expected Result |
|---|---|---|---|
| 1. | Import WebDriver from selenium. | The WebDriver should be imported. | |
| 2. | Open the Google Chrome browser. | The Google Chrome browser should be opened. | |
| 3. | Maximize the browser window. | The browser window should be maximized. | |
| 4. | Navigate to the Google home page. | https://www.google.com/ | The Google home page must be displayed. |
| 5. | Identify the Google search text box and pass the value. | tutoraspire | The value should be entered in the search text box. |
| 6. | Click on the Google search button. | The Google search button should be clicked. | |
| 7. | Close the Browser. | The Browser should be closed. |
Step1
In the first step, we will type the following statement to import the web driver:

Step2
After that, we will open the Google Chrome browser.
As we can see in the below screenshot, we have multiple types of browsers options available, and we can select any browser from the list like Chrome, Edge, firefox, Internet Explorer, opera, safari, etc.
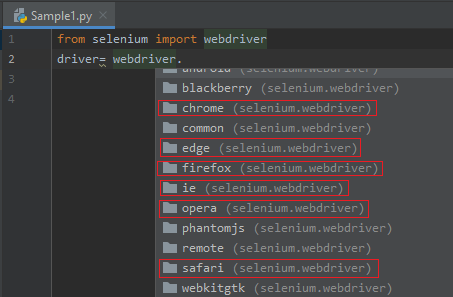
Following are the sample code for opening the Google Chrome browser:
Step3
In the next step, we will be maximizing our browser window size, and the sample code is as below:
Step4
Then, we will navigate to the given URL.
The sample code is as below:
Note: As we know that Python is a very easy language to write code because we don’t have to write multiple statements like as we did it java. Or if we want to comment out something, we just simply put a hash[#] in our statements, or we can directly press Ctrl+ Forward slash [/] from our keyboard.
Step5
In this step, we are trying to locate the Google search text box with the help of its Name attribute value.
- Right-click on the Google search text box, and select the Inspect option in the pop-up menu as we can see in the below image:
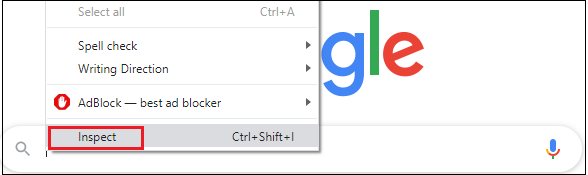
- The developer tool window will be launched with all the specific codes used in the development of the Google search text box.
- And, copy the value of its Name attribute, that is “q” as we can see in the below image:
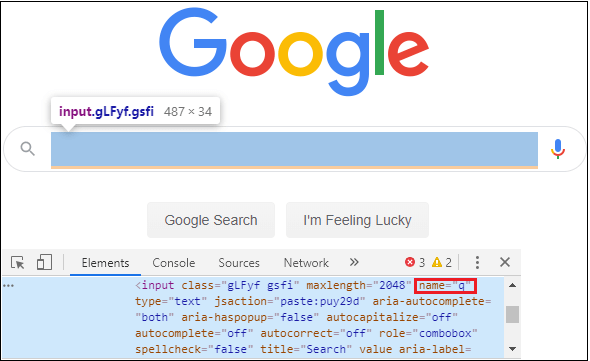
Here the sample code:
Step6
Once we identify the Google search text box, and we will identify the Google Search button.
So for this, follow the below process:
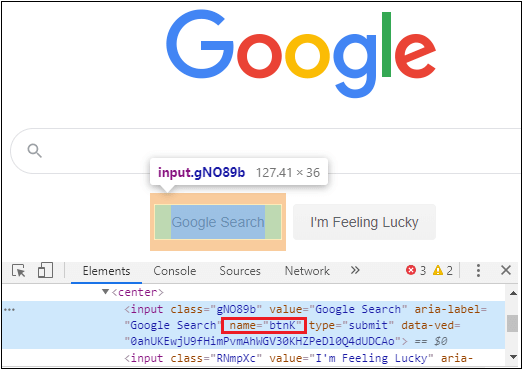
- Right-click on the Google searchbutton, and select the Inspect option from the given pop-up menu as we can see in the below image:
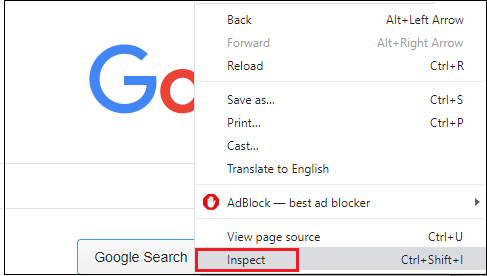
- The developer tool window will be launched with having all the specific codes used in the development of the Google search button.
- Then, copy the value of its name attribute that is “btnK” as we can see in the below image:
And, the sample code is as following:
Step7
In the last step, we are closing the browser.
And, the sample code for closing the browser is as follows:
Our final test script will look like this, after completing all the above steps:
Note:
Import time: Time is a Python module, which is used to handle the time-related tasks such as time.sleep().
from Selenium.webdriver.common.keys import Keys:
Here, we are adding Keys libraries from Selenium, like in the above code, we are using the Enter key instead of click() method to perform a particular scenario.
Run and validate the test scripts
Once we are done with writing the Selenium test script, we will run our test scripts.
Here we will run our test scripts in two ways:
- Run in Python IDE
- Run in Command Prompt
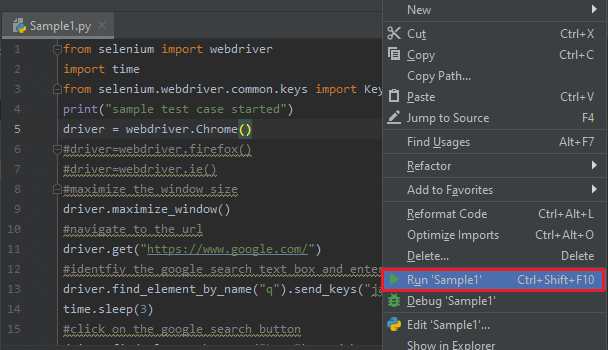
Run in Python IDE
So, for this first, we will see how to run the Selenium test script in Python IDE.
- Right-click on the code, and select Run ‘Sample1’ from the popup menu as we can see in the below screenshot:
- When we run this script it will give an exception because we don’t have the Chrome driver executable file as we can in the below image:
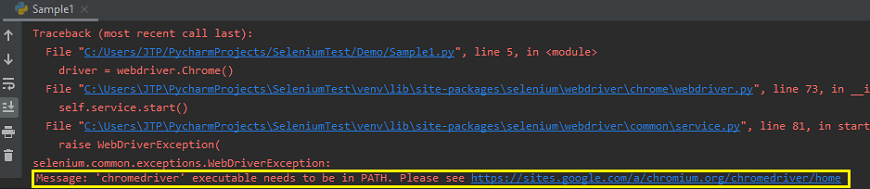
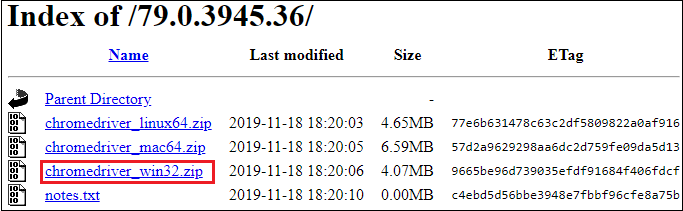
To overcome this exception, we will download the chrome driver executable from below link: https://chromedriver.storage.googleapis.com/index.html?path=79.0.3945.36/
- Once we click on the above link, we will click on the zip file based upon our operating system platform. Like we have Windows platform that’s why we clicked on thezip to download the Executable file as we can see in the below screenshot:
- After downloading the exe file, we can paste this file to the Python folder and unzip it.
- Then, we will create one more folder called libraries as Browsers in the Python IDE.
- Right-click on the Project(SeleniumTest) → New → Directory as we can see in the below screenshot:

- And, we will add all the driver’s executable files in the Browsers folder manually.
- For this, we will copy the chrome driver exe file from the Python folder, and paste in the Browser folder as we can see in the below image:

- Now go to PyCharm IDE, and copy the Absolute path of chromdriver.exe file as we can see in the below screenshot:

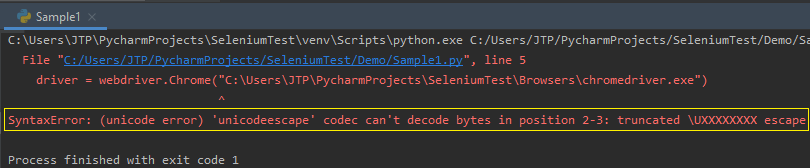
- Replace the statement “driver = webdriver.Chrome()” with a statement given below:
Note: Here, we will use “r” to overcome the Unicode error.
As we can see in the below screenshot, if we do not put r in the code, it will generate the Syntax Error.
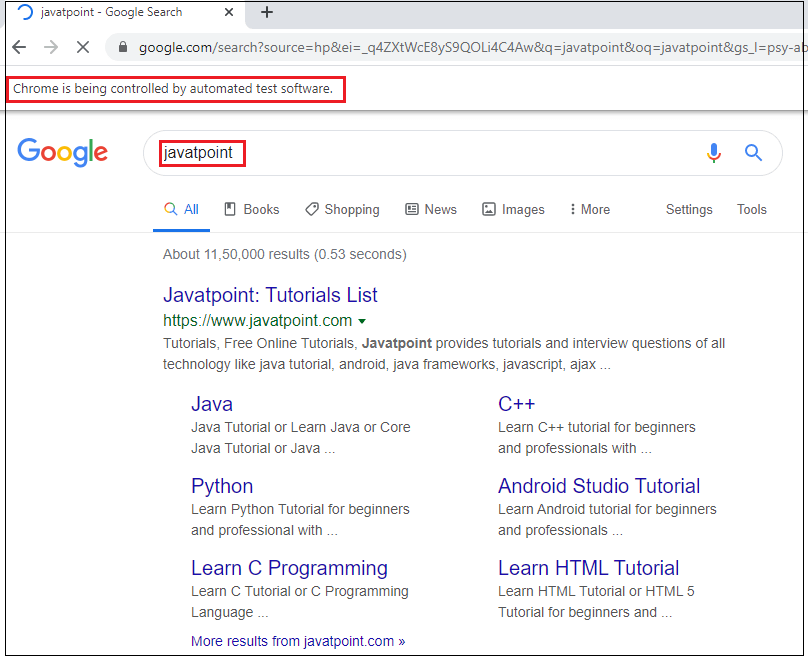
- After that, we will run the sample1 once again, and it will execute the code successfully as we can see in the below image:

The above test script will launch the Google Chrome browser and automate all the test scenarios.
Run in Command Prompt
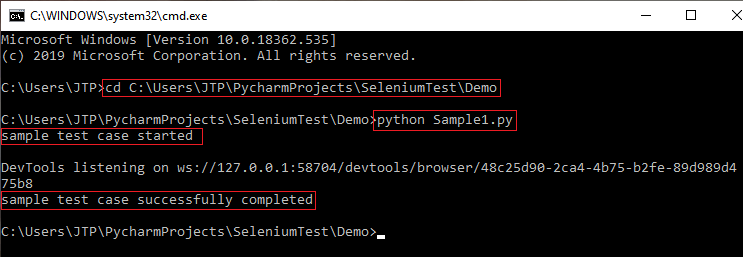
To run the above test script in the Command prompt, follow the below process:
- Copy the location of the Sample1.py file as we can see in the below image:

- And paste in the command Prompt, first go to the particular folder then enter the below command:
Python Sample1.py - Then, press the Enter key as we can see in the below screenshot that the sample test case stared.
- And after automating all the scenarios, it will show the message as a sample test case successfully completed.
Configure PyDev in Eclipse
This is another way to execute the Selenium test script using Python.
In this section, we will install PyDev in Eclipse, then implement the Selenium test scripts on it.
- Install PyDev
- Execute the Selenium test scripts using Python.
Install PyDev
To install the PyDev in Eclipse, follow the below process:
- PyDev installation
- Set the preference
- Create a new project
- Create a new package
- Create a PyDev Module
PyDev Installation
Before start installing PyDev in Eclipse, make sure that we already installed the latest version of Eclipse IDE.
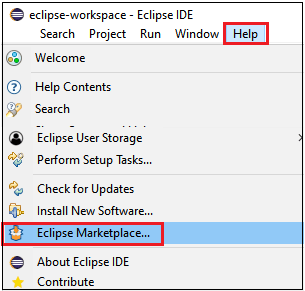
- Double-click on the Eclipse IDE software.
- Then, go to Help in the toolbar and select Eclipse Marketplace option in the given pop-up menu as we can see in the below screenshot:
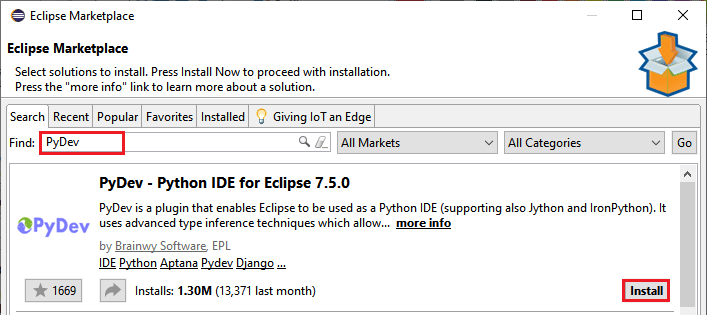
- Eclipse Marketplace window will open, and in the search area, we will type PyDev and press the Enter
- Then, click on the Install button as we can see in the below screenshot:
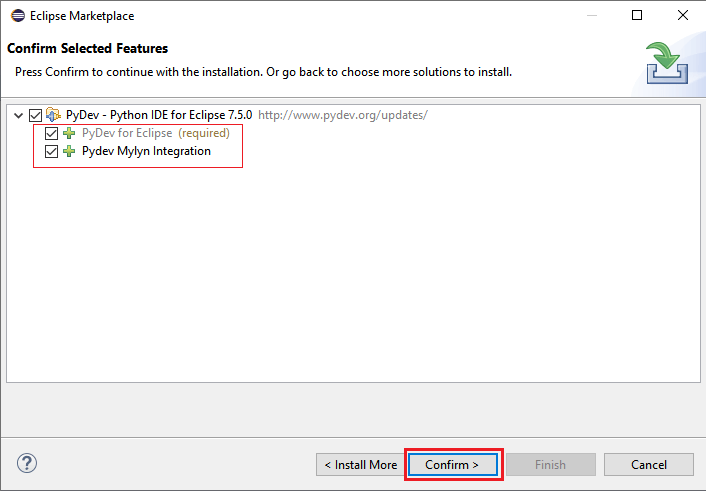
- Once we clicked on the install button; it will start the installation process and then click on the Confirm Button for further process as we can see in the below process:
- Then, select I accept the terms of the license agreements option and click on the Finish button to finish the installation process as we can observe in the below image:

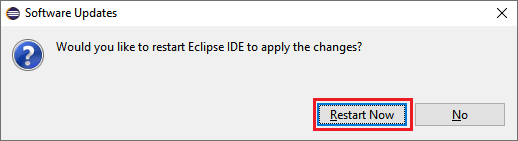
- Once the installation is done, restart your Eclipse IDE as we can see in the below image:
- After that, we will set the preference to use the Python project based on our requirements.
Set the Preference
To set the preference, follow the below process:
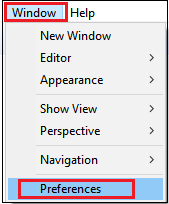
- Go to the Window option in the Eclipse Ide toolbar, then select the Preference option in the given list as we can see in the below image:
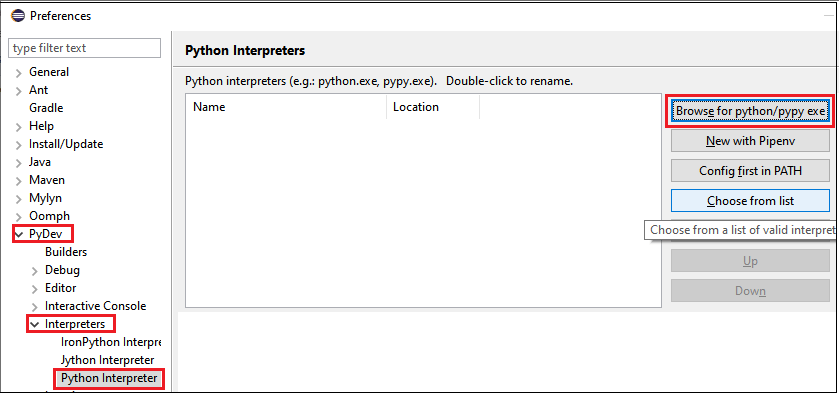
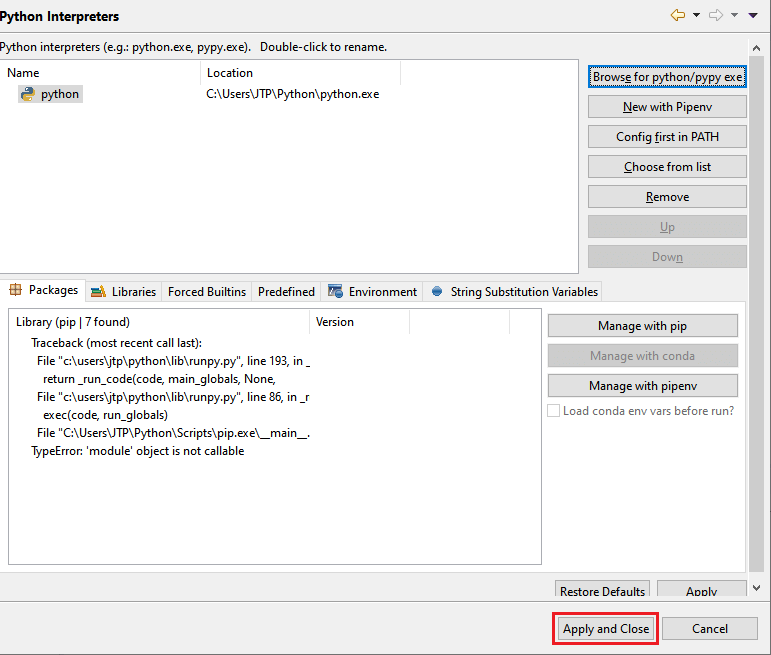
- The Preference Window will open where we will expand the PyDev then again expand the Interpreters and select the Python Interpreter from the given list. Click on the Browse for Python/pypy.exe option as we can observe in the below image:
PyDev → Interpreters → Python Interpreter
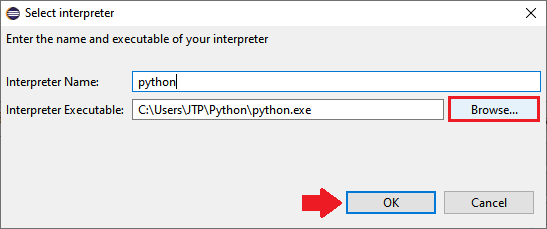
- Once we click on the Browse for Python/pypy.exe, we will provide the Interpreter Name and Executable file path of Python.
- For this, in the Select interpreter pop-up window, click on the Browse button, and browse the Executable file path of Python in our local system, and click on the OK button as we can see in the below Image:
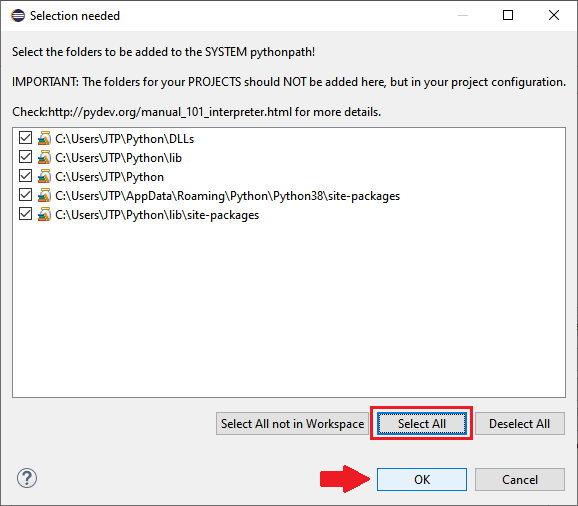
- After that, click on the Select All button, then click on OK button to select the folders as we can see in the below screenshot:
- Then, click on the Apply and Close button, to complete the setting preference process as we can see in the below screenshot:
- After setting the preference successfully, we will create a new project in Python.
Create a new project
To create a new project, follow the below steps:
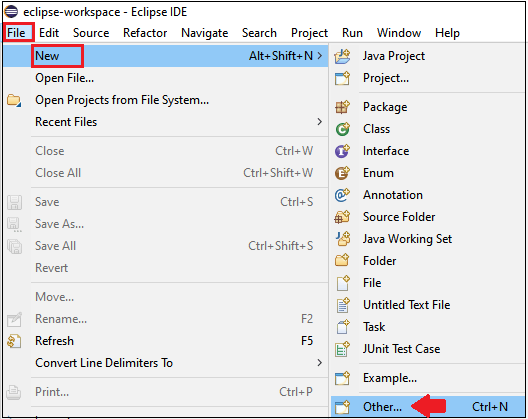
- Go to the File menu then go to New and select Other option in the popup menu as we can see in the below image:
File → New → Other
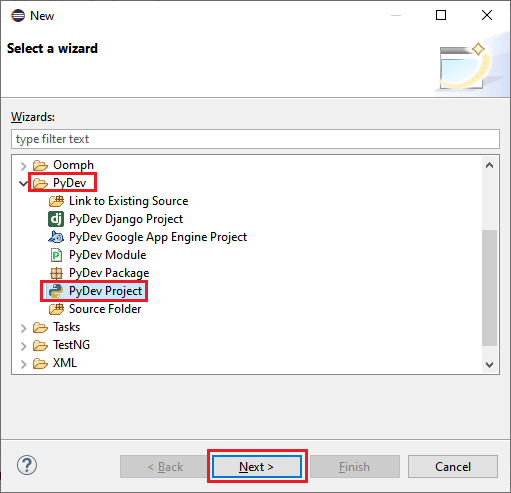
- Once the Other option is selected, [New] window will open where we will expand PyDev and choose PyDev Project, and click on the Next Button as we can see in the below image:
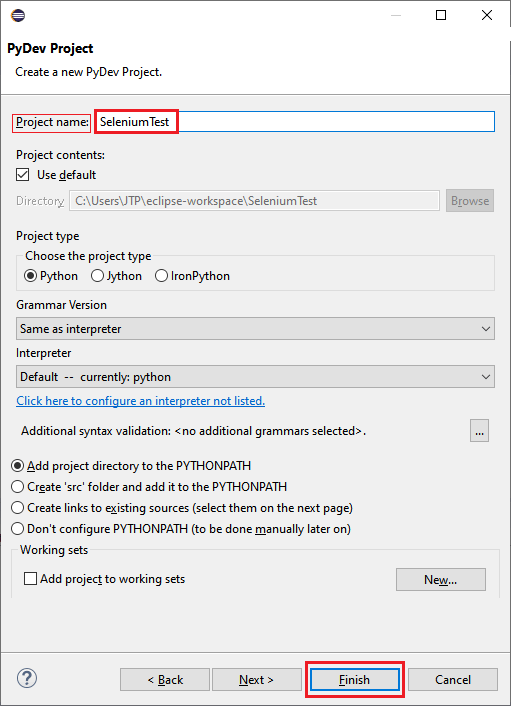
- Once we clicked on the Next button; we will provide the Project name and click on the Finish button as we can observe in the below image:
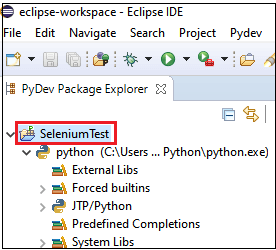
- The Python project is created in the Eclipse as we can see in the below image:
- When we are done with creating a Python project, we will create a new Python Package.
Create a New package
Follow the below process, to create a new package:
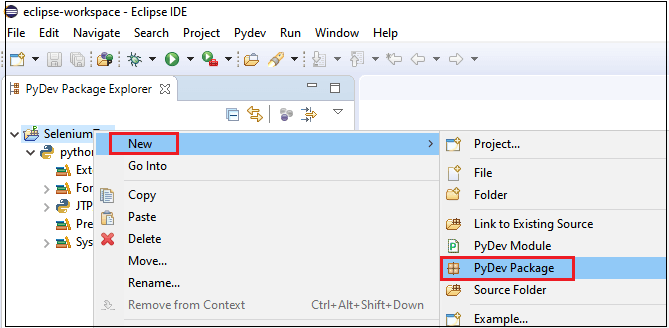
- Right-click on the newly created project(SeleniumTest), go to New, then select PyDev Package in the given Popup menu as we can see in the below image:
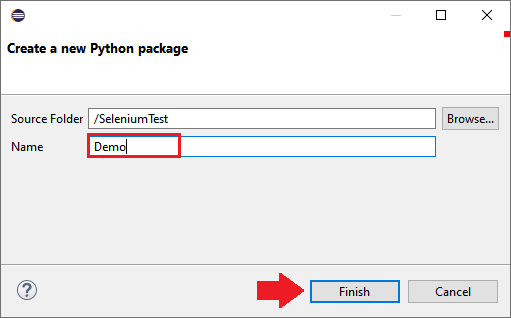
- Then provide the name of the PyDev Package, and click on the Finish Button as we can see in the below image:
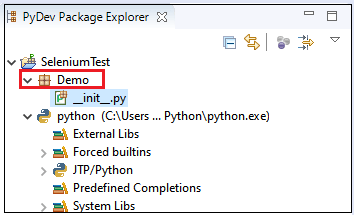
- As we can see in the below screenshot that the new package is created.
After creating a PyDev Package, we will create a PyDev module.
Create a PyDev Module
To create a PyDev module, follow the below process:
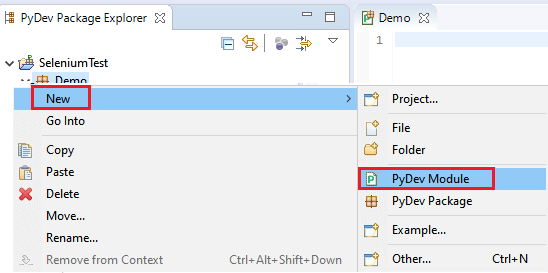
- Right-click on the newly created Package[Demo], then go to New and select PyDev Module from the given list as we can see in the below screenshot:
Demo → New → PyDev Module
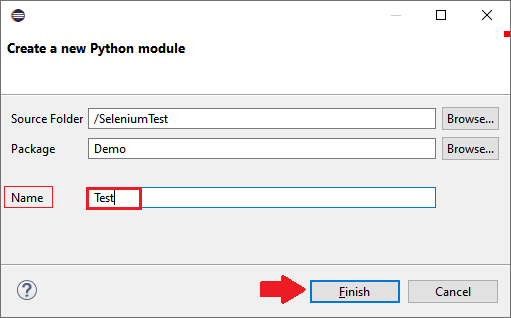
- Then give the PyDev Module name [Test], and click on the Finish button as we can observe in the below screenshot:
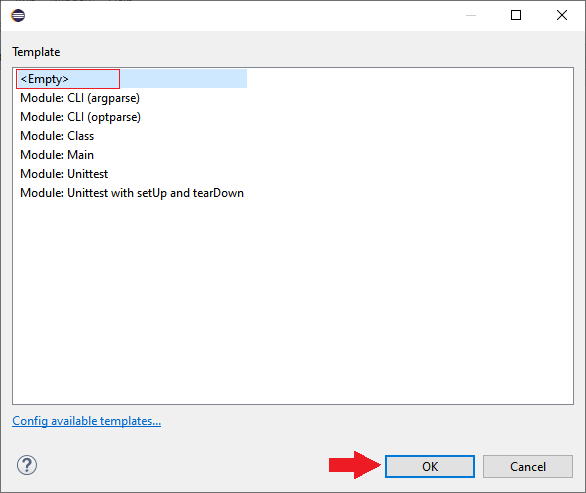
- After that, we will select the Empty template from the given list, and click on the OK button as we can see in the below image:
- Once we have done with creating a Python model, we are ready to write and execute our Selenium test scripts.
Write and Execute the Selenium test script
Write the Selenium test Script
For our testing purpose, we will perform a Login test on the Gmail application.
In this test, we will automate the below test scenarios:
| Steps | Actions | Input | Expected Result |
|---|---|---|---|
| 1. | Import web driver from Selenium. | Web driver should be imported. | |
| 2. | Open the Google Chrome browser. | The Google Chrome browser should be opened. | |
| 3. | Maximize the browser and delete all the cookies | The browser should be maximized, and cookies should be deleted. | |
| 4. | Navigate to the home page Gmail application. | https://www.gmail.com | The Gmail home page must be displayed. |
| 5. | Identify the username text box and pass the value. | [email protected] | The username text box should be identified and value should be entered in the username text box. |
| 6. | Click on the Next button. | The next button should be clicked. | |
| 7. | Identify the password text box and pass the value. | ####### | The password text box should be identified and value should be entered in the Password text box. |
| 8. | Click on the Next button. | The next button should be clicked. | |
| 9. | Close the Browser. | The Browser should be closed. |
Follow the below steps:
Step1
In the first step, we will import the web driver with the help of the following statement:
Step2
After that, we will open the Google Chrome browser.
- To launch the Google Chrome or any other browser (Firefox, ie, etc.), we need to download the executable files of the Chrome driver from the given link: https://sites.google.com/a/chromium.org/chromedriver/downloads
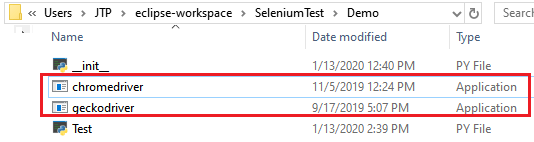
- Then, paste the downloading exe file in the Python package (demo) to overcome the exceptions as we can see in the below screenshot:
The sample code is as below:
Step3
In the next step, we maximize and delete all the cookies of the browser window.
Here the sample code:
Step4
In this step, we will navigate to the Gmail application URL.
The sample code is as below:
Step5
Once we navigate to the URL of the Gmail application, we will identify the username text box and passing the value of it.
To identify the username text box, follow the below process:
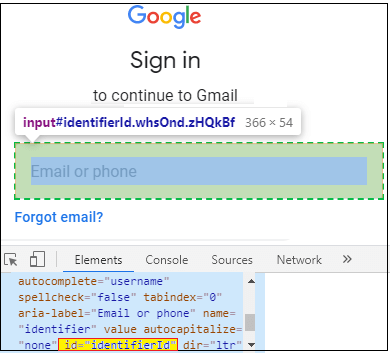
- Right-click on the username text box.
- And select the Inspect option in the given pop-up menu as we can see in the below screenshot:
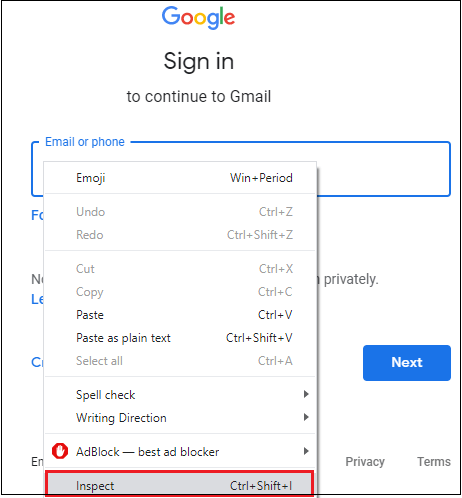
- The developer tool window will open with all the specific codes used in the development of the usernametext box.
- Then, copy the value of its id attribute that is: identifierId as we can see in the below image:
- And, here the sample code:
Step6
In this step, we will identify the Next button and click on it.
To identify the Next button, follow the below process:
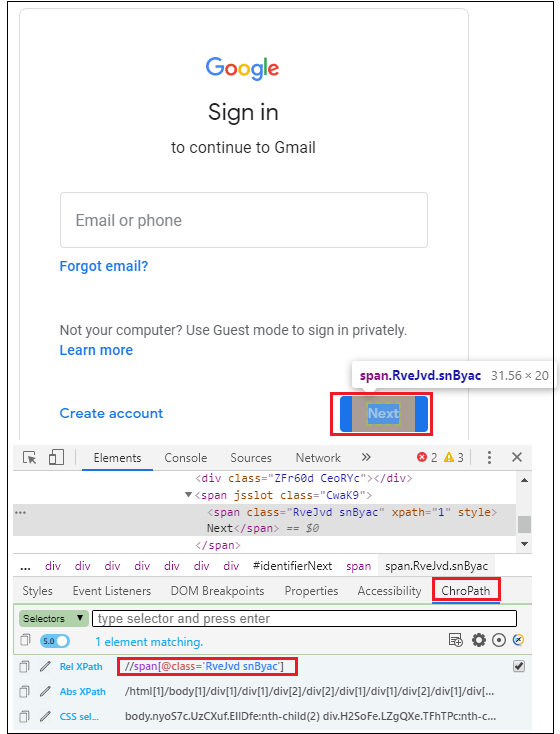
- Right-click on the next button, and click on the Inspect option in the given pop-up menu as we can see in the below image:
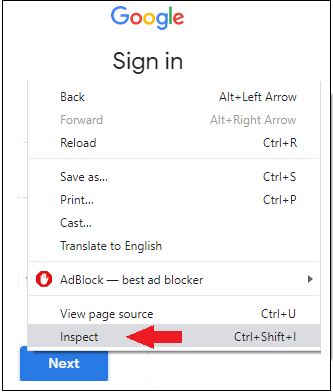
- The developer tool window will open with all the specific codes used in the development of the Next
- And, copy the value of its absolute XPath that is: //span[@class=’RveJvd snByac’] from the chropath section as we can see in the below image:
- Here the sample code:
Step7
In this step, we will identify the password text box and pass the value of it.
To identify the password textbox, follow the below process:
- Right-click on the password text box, and click on the Inspect Option from the given pop-up menu as we can see in the below screenshot:
- The developer tool window will open with all the specific codes used in the development of the password text box.
- And, copy the value of name attribute, i.e., password as we can see in the below image:
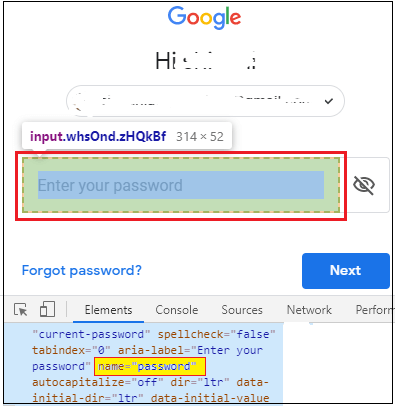
Here the sample code:
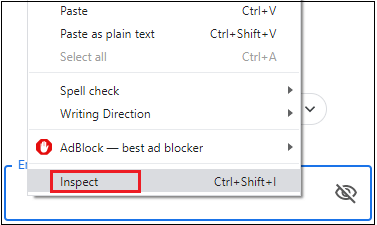
Step8
In this step, we will identify the Next button and click on it.
To identify the Next button, follow the below process:
- Right-click on the next button, and click on the Inspect option in the given pop-up menu as we can see in the below image:
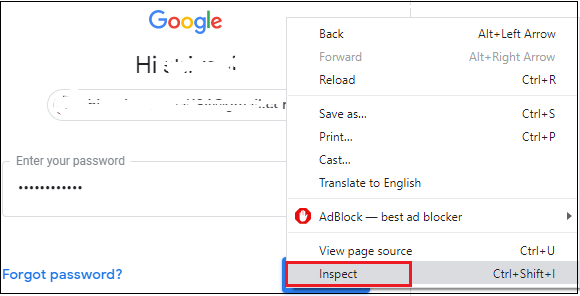
- The developer tool window will open with all the specific codes used in the development of the Next
- Copy the value of its absolute XPath that is: //span[contains(text(),’Next’)] from the chropath section as we can see in the below image:
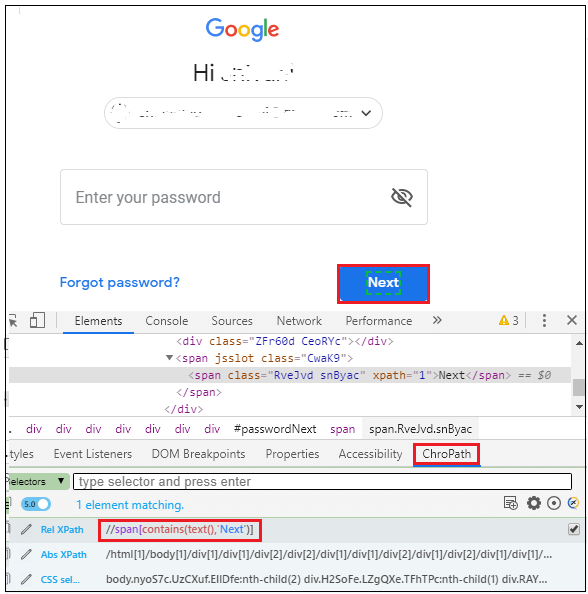
Here the sample code:
Step9
In the last step of the test script, we will close the browser.
Here the sample code:
And, our final test script will look like this after writing all the above steps successfully.
Note: In the above code, use your Gmail id at place: [email protected] and password: #########
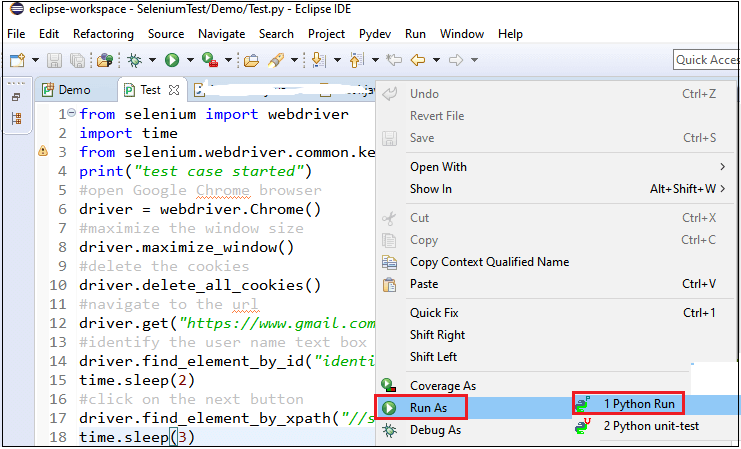
Run the test script
To run the above test script, we will right-click on the code and then select Run As → Python Run as we see in the below screenshot:
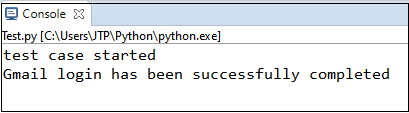
The above test script will launch the Google Chrome browser and automate all the test scenarios.

And, as we can see in the below screenshot that our code is running successfully as we get the print message (output) on the console screen.