SMARTSHEET TUTORIAL

- Smartsheet is an online Project Management tool which is developed by Smartsheet Inch.
- Smartsheet is a Software-as-a-Service (SaaS) provided for Work management, and Collaboration.
- Smartsheet is a Cloud-Based project management tool which is designed in such a way that the number of employees can use it easily.
In our Smartsheet tutorial, we are going to discuss the following topics-
- What is Smartsheet
- What Does Smartsheet do
- Advantages of Smartsheet
- Disadvantages of Smartsheet
- How to Start Working on Smartsheet
- How to Create New Smartsheet
- How to Rename an Item in a Sheet
- How to Modify the Rule Permission Settings for the Sheet
- Data and Formatting Options
- How to Save the Sheet Data
- How to Refresh the Sheet
- Rows and Hierarchy
- Column Type Reference
- Attachments in Smartsheet
- Conversations in Smartsheet
- Have Conversations in the Context of your Work
- Interact with Comment in a Sheet (Grid View or a Card View)
- Create a New Comment which is Applied to the Entire Smartsheet
- How to Reply an Existing Comment
- Edit, E-mail, Print or Delete a Comment
- Use File Attachment to Give Context to Comments
- How to Delete a File which is Attached to a Comment
- How to Delete an Attachment from the Comment Panel
- Conditional Formatting in the Smartsheet
- Formula Basics
- Sharing in Smartsheet
- Contacts
- Groups in Smartsheet
- Card View in Smartsheet
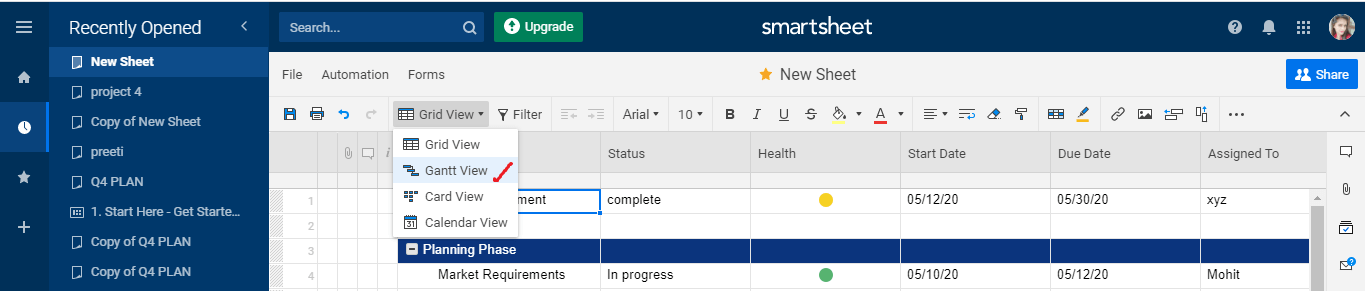
- Basic Gantt View
- Calendar View
- Proofing
What is Smartsheet
Smartsheet is an online project management tool which is used for task allotment, calendar management, share documents, track project progress, and to handle other work. Smartsheet is developed by Smartsheet Inc.
Smartsheet is a cloud-based tool, and a spreadsheet tool used for project management. Smartsheet competes against various task management products such as Asana and Trello.
What does Smartsheet Do
In the Smartsheet, we use spreadsheets known as sheets. Spreadsheet performs every task like a Smartsheet, but there are some differences between the smartsheet and spreadsheet, such as Smartsheet contains all the collaboration functionality incorporated into it, which is beyond the standard spreadsheet functionality.
There are various tasks which are performed by the Smartsheet:
- Collaboration
- Set up alerts
- Attach Files
- Have discussions
- Request updates
- Set up web forms
- Publish the sheet
1. Collaboration: – In the Smartsheet, collaboration means we can also invite other members of the project team to collaborate on a sheet. It means they have the authority to edit and view the sheet.
2. Set up Alerts:- Set up alerts means, within the sheet, we can set up reminders and notification for the tasks.
3. Attach Files:- In the smartsheet, we can attach the files to a row or overall sheet. The files are stored on the server of the smartsheet, and the files can be accessed when we log in to the smartsheet and view the sheet.
4. Have Discussions:- We can also set up discussions about the whole project or a few tasks. The detail of the discussion is stored in the sheet.
5. Request Updates:- Requests update means we can request updates from the collaborators regarding the progress of the job, which is allotted to the collaborators.
6. Set Up Web Forms:- Smartsheet provides the feature of setting up web forms. In this, we can set up the feedback forms, and the responses, which are given by the user. It can be populated into a sheet automatically.
7. Publish the Sheet:- We can make the sheet available through the external URL so that others can see the sheet.
Features of Smartsheet
There are various features of the smartsheet, which makes the project tracking and collaboration easy.
- Shared sheets
- Collaboration
- Mobility
- Alerts and Reminders
- Shared workspace
- Permissions levels
- Upload files
- View history of changes
- Advanced reports
- Send and receive updates via e-mail
- Send Sheets
Shared Sheets: – In the smartsheet, we can share and manage any kind of work. Also, there is no limit of users. We can invite the number of users to edit and view your sheet.
Collaboration:- Collaboration is easy in the smartsheet, no matter whether it is collaboration on a particular task or sharing the work with the colleagues because all the project information and all the associated files notes are placed in one centralized location.
Mobility:- Smartsheet increases productivity by editing tasks, creating projects, and cooperating with the team members using any device (laptop, PC, phone, etc.) with the internet signal. In the smartsheet, users can instantaneously add files, view attachments, and also takes action on the notifications at anytime, anywhere that makes it helpful to know the status of the project for everyone.
Alerts and Reminders: – In the smartsheet, there is a feature of automated alerts and reminders that gives the facility of automating alerts and reminders for all the upcoming jobs and approaching deadlines that makes it easy for all the team members to keep track of all the due dates. So, in this way, all the tasks are completed on time. It is also helpful to simplify and modernize the work process.
Shared Workspaces: – Smartsheet provides the facility of securely collaborating among the clients, internal team members, and the partners. It makes the setup easy for others via shared folders and sheet.
Permission Levels:- Permission levels mean control access privileges related to the workspaces, rows, and sheets.
Upload Files:- In the smartsheet, we can easily upload the files to a workspace, row, or sheet.
View history of changes:- We can see the history of changes in the sheet, and who made the changes.
Advanced Reports: – With the help of Smartsheet, we can quickly make a report to check where the things stand and to check performance about the work.
Send and Receive Updates via E-mail: – In the smartsheet, there is no login requirement for people to update your sheet through e-mail.
Send Sheet: – We can easily send the sheets in the form of PDF or Excel attachments.
Target Market
Smartsheet can be used by any person or in any business, no matter whether a business is small or large.
Various notable customers are:
- Netflix
- Cisco
- Aramark
- Box
- Hilton
- Behr
- World Vision
- Weyerhaeuser
- Colliers International
- Veritiv
Advantages of Smartsheet
There are various advantages of smartsheet:
- Easy user-interface
- Availability of Gantt charts
- Efficient mobile app
- Excellent card view
1. Easy User-Interface: – As compared to spreadsheet, smartsheet design is simple, clean, and professional.
2. Availability of Gantt chart: – Gantt chart is useful to estimate the progress of the work. With the help of the Gantt chart, we can easily check who is working in a particular task and when they did this task.
3. Excellent Mobile App: – Smartsheet comprises incredible mobile app functionality. Smartsheet is a user-friendly tool. Smartsheet is designed for iOS as well as Android devices.
4. Excellent Card View: – Every project management software do not contain a card view, but most of them are working to offer the feature of card view in their project management software.
Disadvantages of Smartsheet
There are various disadvantages of Smartsheet:
- Lack of Time Tracking Feature: – In every project management software, time tracking is an essential feature. Such feature is not present in the Smartsheet project management tool and relies on the third-party integrations.
- Not all Excel Formulas Work on Smartsheet:- Another disadvantage of Smartsheet is there are several Excel formulas that do not work on the Smartsheet.
How to Start Working on Smartsheet
There are various steps to sign in to the smartsheet:
Step 1. If we want to use a smartsheet, we have many login options to login to Smartsheet. Also, we can create an account by Sign Up. But in this tutorial, we will login via the Google account. So, visit the following link https://app.smartsheet.com.
Step 2. When we click on the link, a login page will open as shown above. We have to log in with the help of an e-mail address and password.
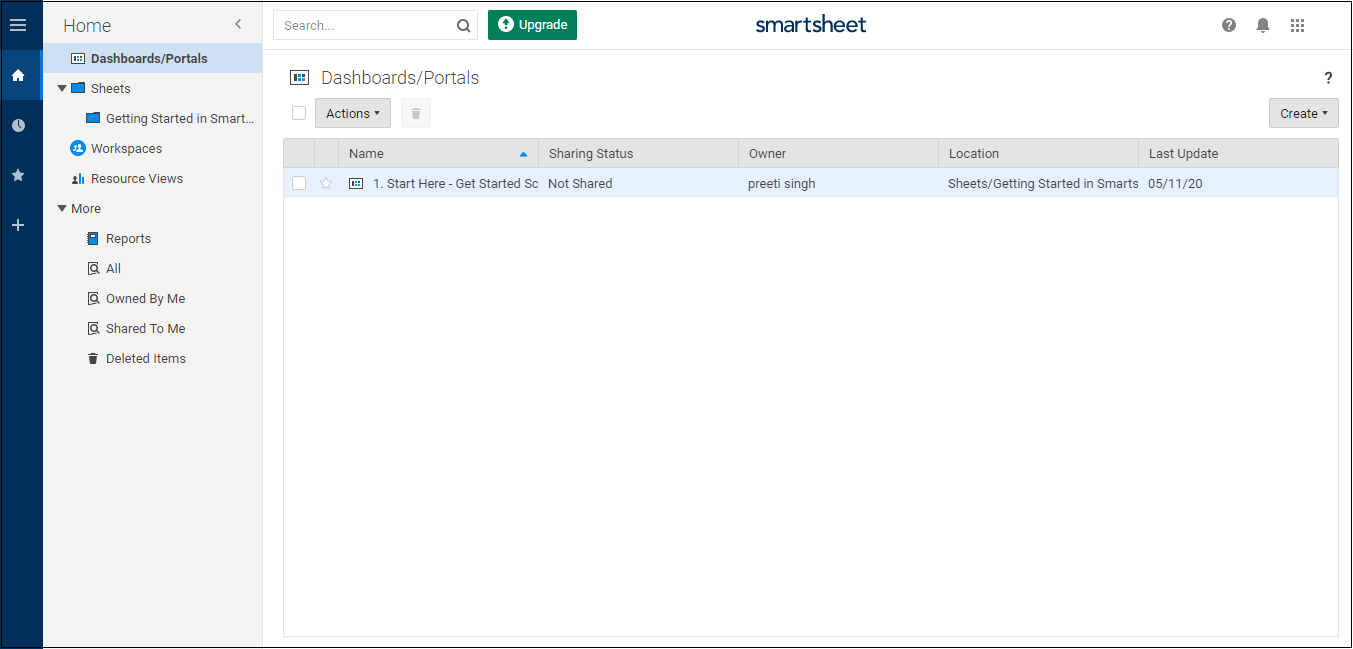
Step 3. A dashboard will open after successful login to our smartsheet account as shown above and we can start working.
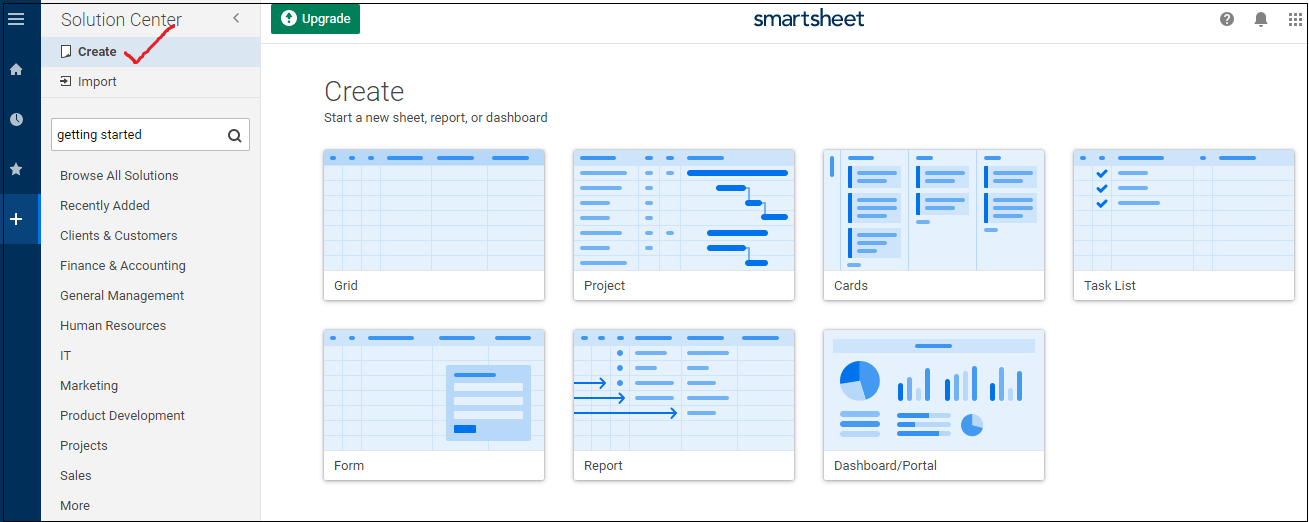
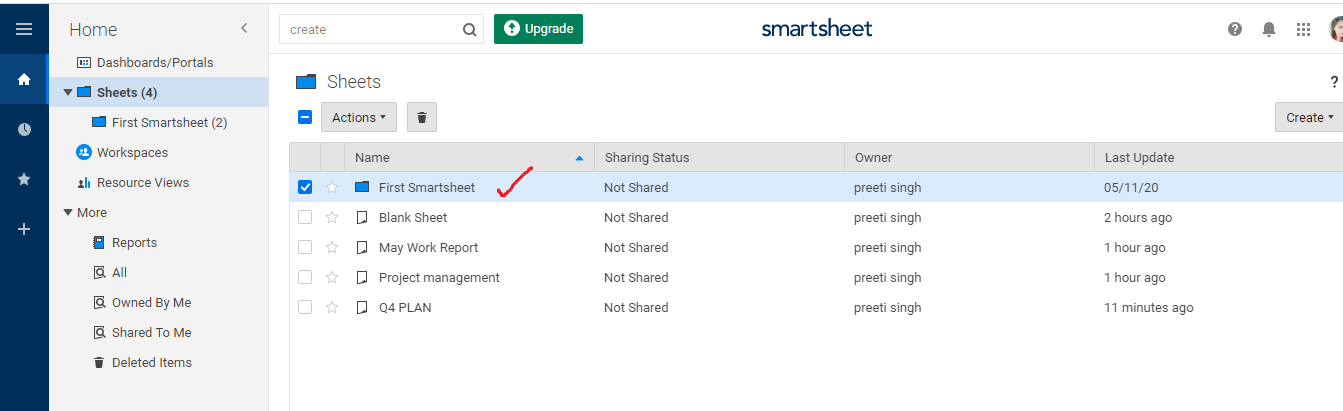
How to Create a New Sheet
To create a new item, we have to follow the following steps:
Step 1. First, we have to click on the Menu icon (menu icon is present in the upper-left side of the Smartsheet window).

Step 2. After clicking the menu icon, click on the Create option.
Note: It is must that an item name contains up to 50 characters.
Step 3. Next, we have to select the title of the sheet which we want to create, and after choosing the title of the sheet we can start filling item in the sheet, and in this way our first sheet is created
Note: The sheet which we created will not be visible to others until we share the sheet with others.
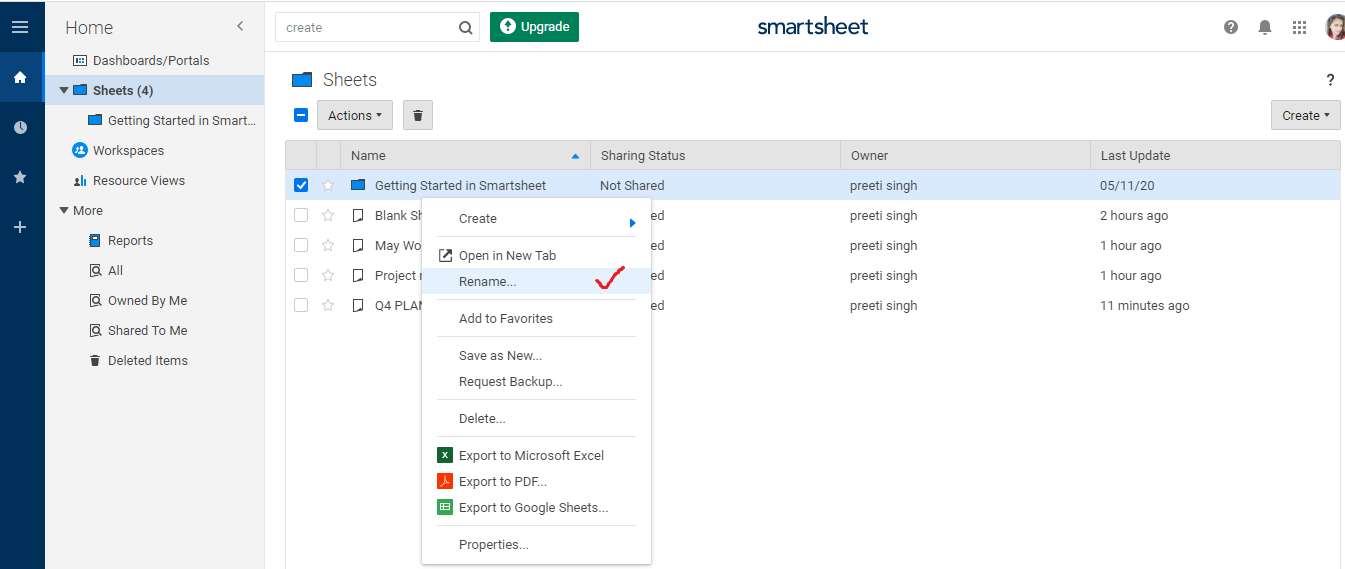
How to Rename an Item in a Sheet
There are various steps which we have to follow to rename an item in a Smartsheet:
Step 1. To rename an item, right-click on that item that we want to rename and then select Rename option. The below figure show the pictorial representation to rename an item:
Step 2. After clicking on the rename option, type the new name of that item, which we want to rename, and then click OK. The below figure shows the item after rename:
Overview of the Smartsheet Item
- Grid: Grid contains not any predefined column. Grid is a clean slate, and we use a grid when we start from scratch.
- Task List: – Task List contains various predefined columns such as Task Name, Assigned To, Due Date, Status, and Comments.
- Forms: – In the smartsheet, we make a three-column sheet and a form attached to this sheet. We use this form at that time when we know how data is collected from others with a form.
- Report: – Report is used to generate a report so that we can check the performance and position of the project.
- Dashboard/Portal:- Using a dashboard/Portal, we can create a visual summary of the sheet data.
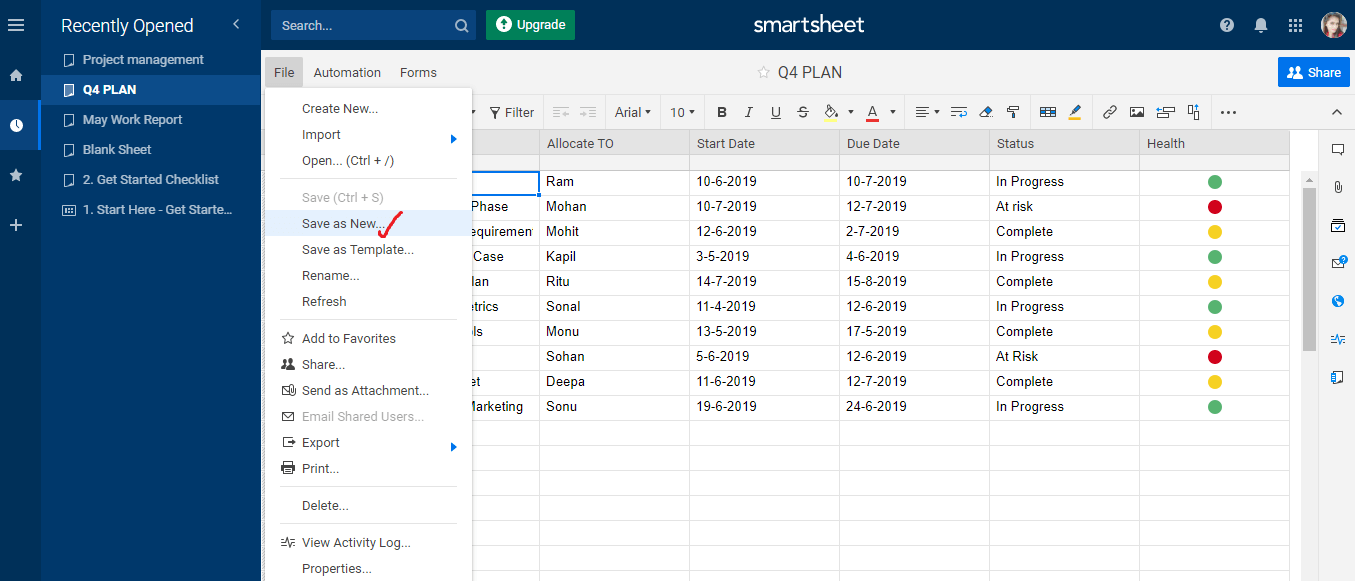
How to Create a Copy of a Sheet
There are various steps to create a copy of a sheet:
Step 1. To create a copy of a sheet, select the sheet which we want to copy and after choosing the sheet, it will open. Click on the file and select Save as New to display the Save as New window.
Step 2. Next, we have to type the name of the new sheet under “Name your sheet” as shown below:
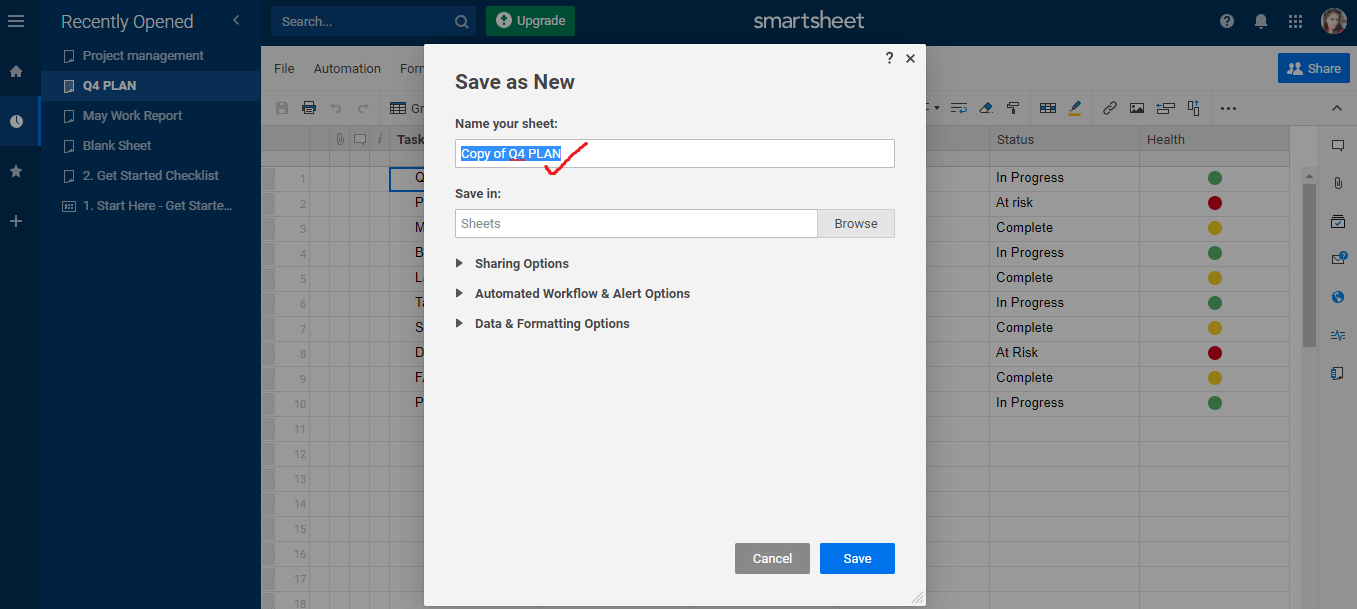
Step 3. Under the Save in, we can choose the folder or location where we want to save the copied sheet.
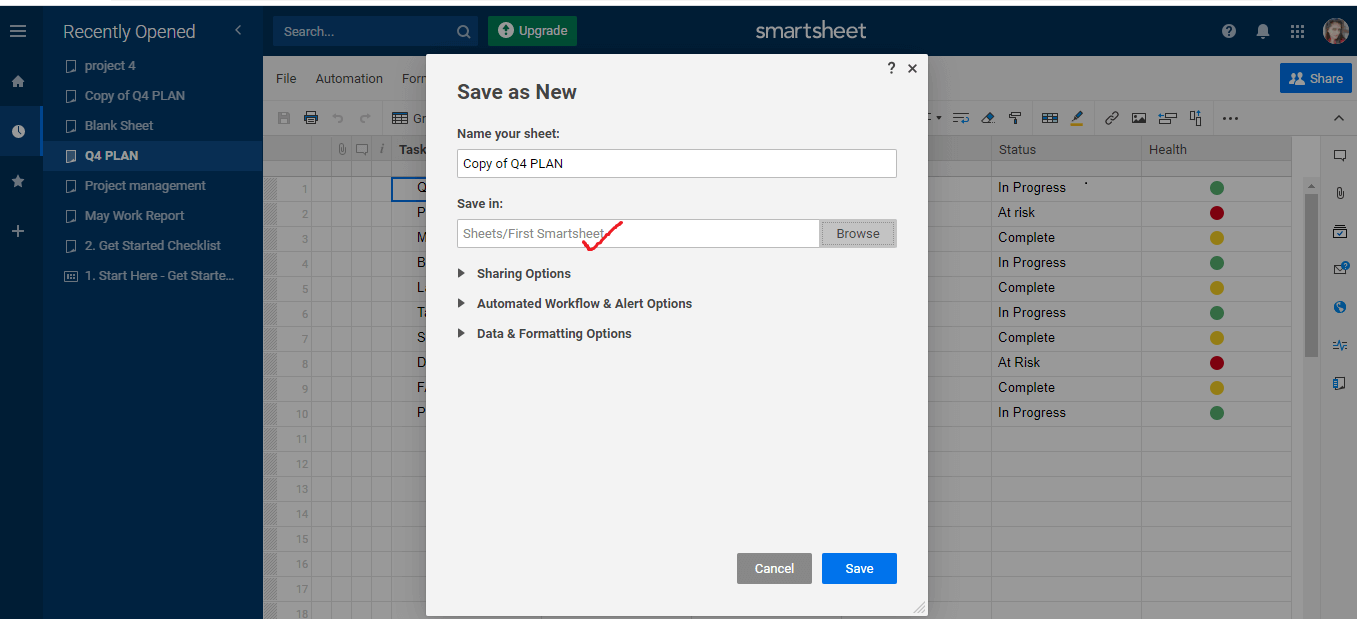
Step 4. Next, we have three options, i.e., Sharing Options, Automated Workflow & Alert Options, and Data & Formatting Options. We can choose one of the options from them by clicking on it. Then, select the item that we want to save with a copy of our sheet.
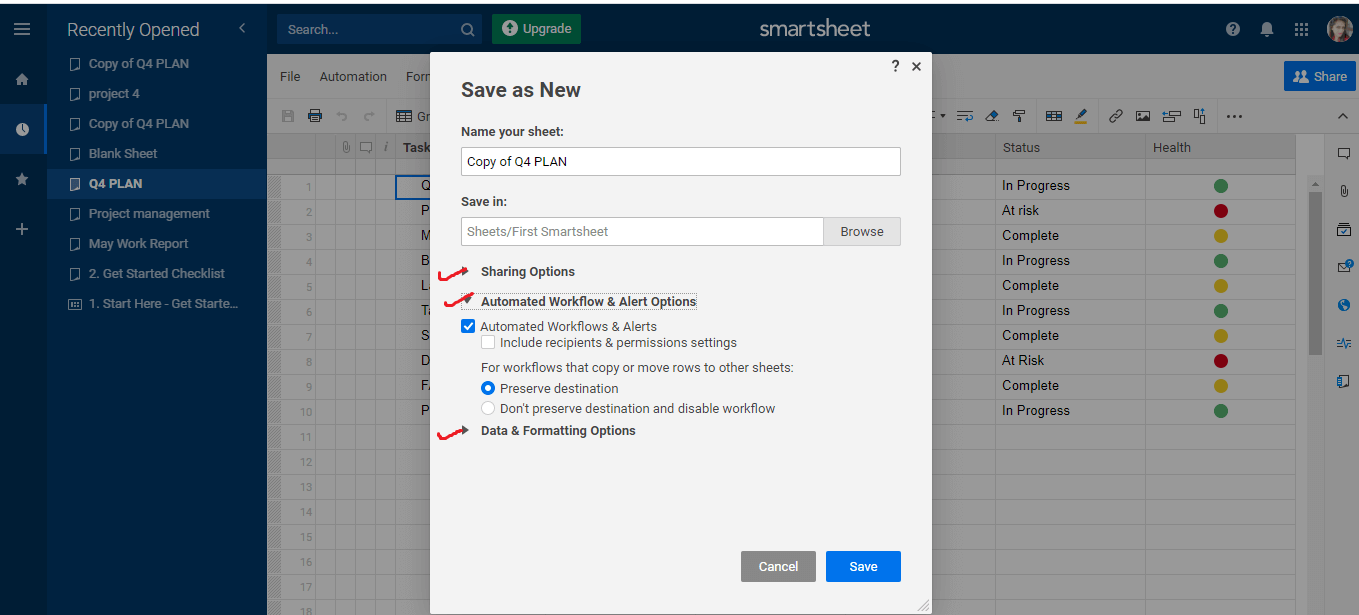
Step 3. Click on the Save button.

How to Modify the rule permission settings for the sheet.
We use this to control who can receive notifications and requests from the sheet.
We have to follow the following steps to modify the rule permission settings for the sheet:
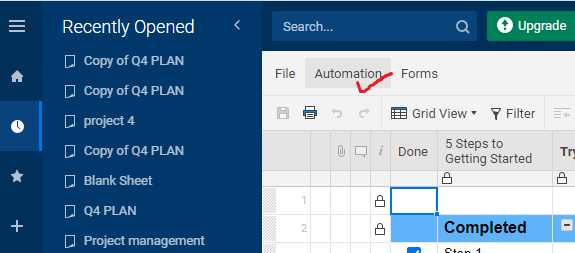
Step 1. First, we click on the Automation option on the menu bar.
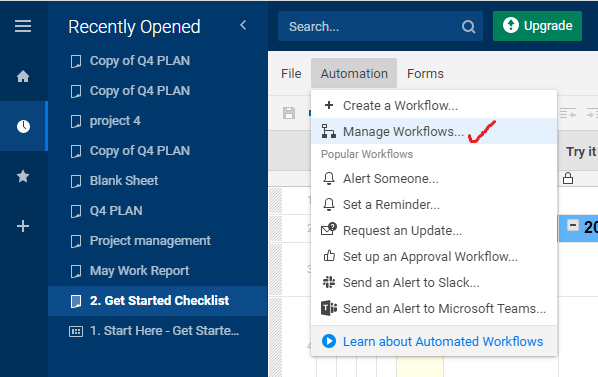
Step 2. Next, we click on the Manage Workflows.
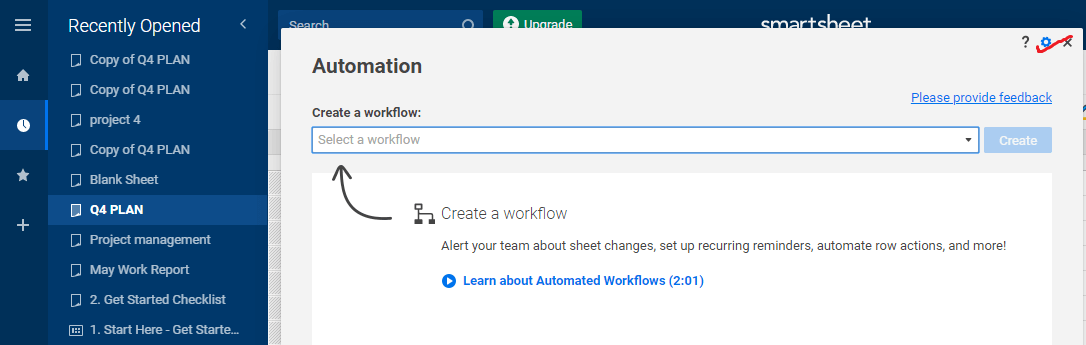
Step 3. Next, to modify the permission levels in the automation window, click on the Setting icon, which is present on the upper-right side of the window.
Step 4. After clicking on the setting icon, the page of the permission levels will open, and after that, we can modify the automation permissions setting for the sheet.
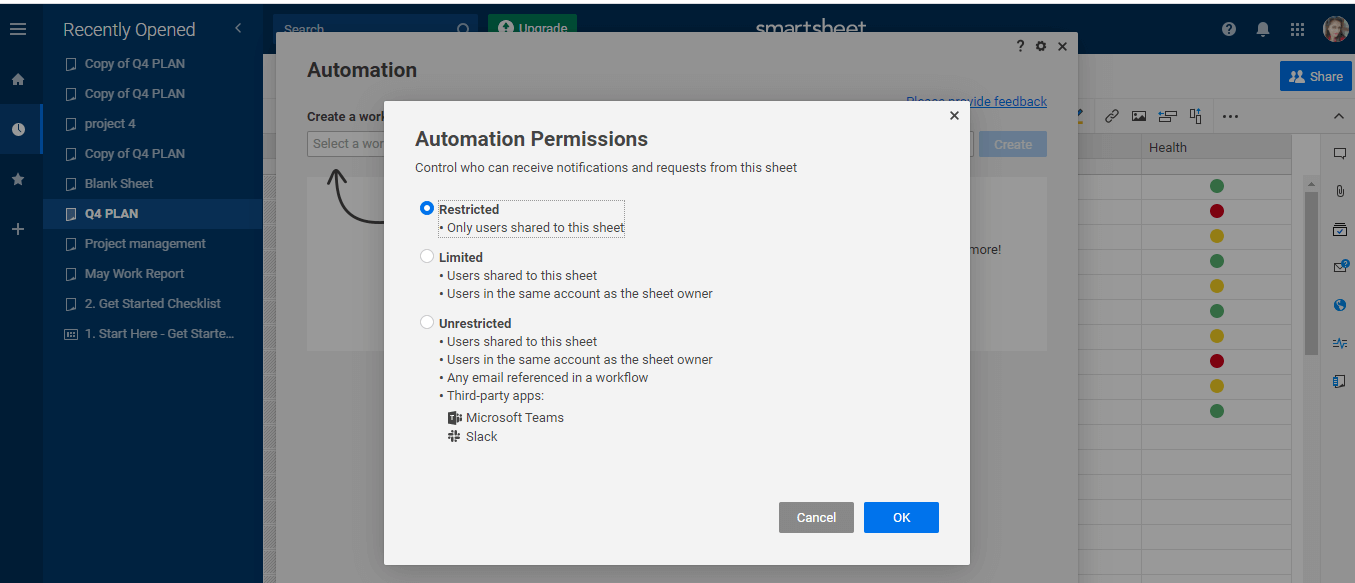
Step 5. Last, we have to select one of the options from the given options (Restricted, Limited, Unrestricted), and when we choose the option, click OK.
Data & Formatting Options
There are various options available in the data and formatting options:
- Sheet data and formatting
- Comments
- Attachments
- Cell Links
- Sheet Links
- Sheet Filters
- Forms
1. Sheet Data and Formatting: – Sheet data and formatting contains the information which we can type into the cells and the information regarding the manual formatting, which is applied to the cells.
2. Comments:- Comments comprises all the row comments and the sheet-level comments.
3. Attachments:- Attachments comprise attachments of all the rows and Sheet-level.
4. Cell Links:- Cell links include inbound cell links. c
5. Sheet Hyperlinks:- Sheet hyperlinks contain hyperlinks of the other sheets.
6. Sheet Filters: – Sheet filters contain sheet filters.
7. Forms:- Forms contain forms which are attached to the sheet.
How to Save the Sheet Data
We can perform various actions to save the sheet data:
- To save the sheet data, we can use the shortcut key Ctrl + S for Windows and Cmd + S for Mac.
- We can also use auto-save options. For auto-save, we have to click on Account > Personal Settings > Settings.
- If we want to save the sheet from outside of the Smartsheet, export the sheet to any format of your choice, then we can save the sheet from outside of the Smartsheet.
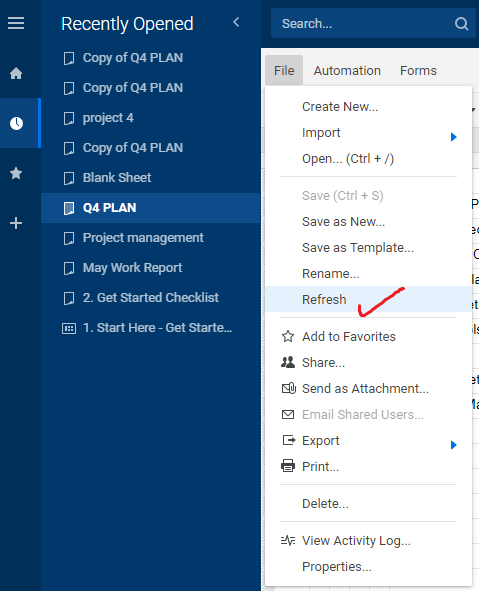
How to Refresh the Sheet
We can refresh the sheet by performing the following steps:
- Click on the File
- After clicking on the file option, select the refresh option and refresh the sheet.
Rows and Hierarchy
In a Sheet, rows are the essential element. Rows include information such as task name, customer name, order information, etc. In a row, we can also add some information like comments and attachments. In a row, there is a reminder which we can use to keep track of the essential items like due dates. In Smartsheet, the information can also be shared with the help of the send row option, and for updating on row items, we can request from the team members.
Smartsheet provides a wonderful feature of indent tool. With the help of an indent tool, we can create a row hierarchy. So, in a project, instead of using hundreds of rows, we condense the data so that we can only focus on a specific aspect.
Hierarchy: Indent or Outdent Rows
Indent row means making a hierarchy on a sheet. If we indent a row, it becomes the child of the row that is above it. We can only create the hierarchy from the child row; it means we cannot generate the hierarchy from the parent row.
How to Indent a Row
There are various steps which we use to indent a row:
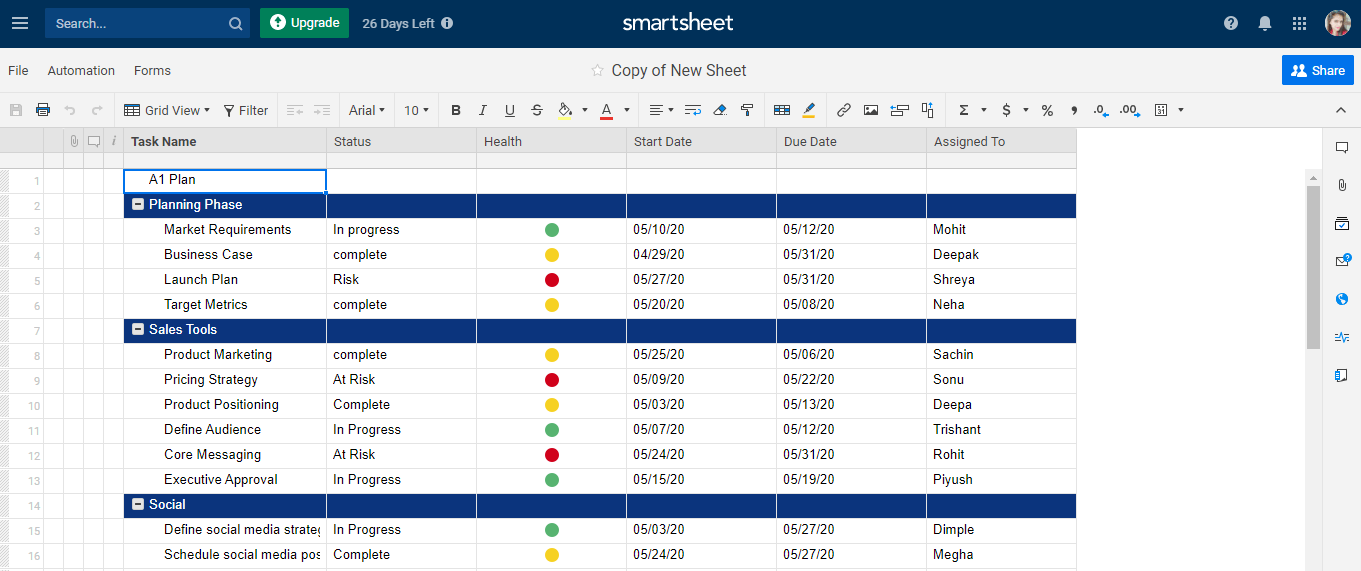
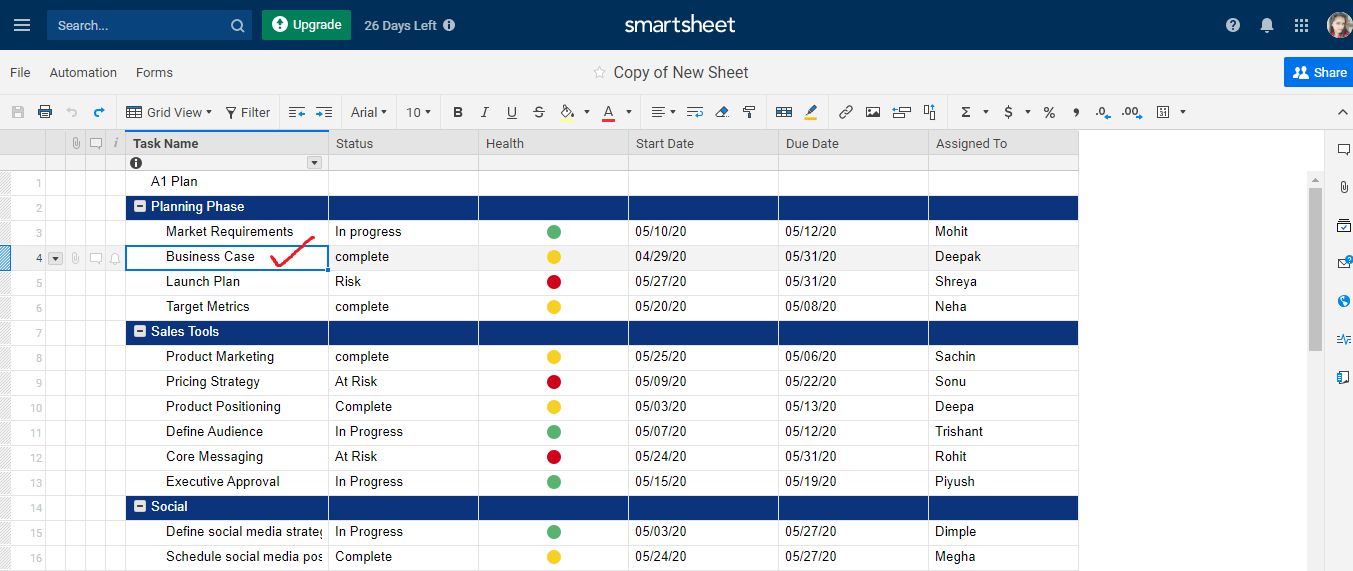
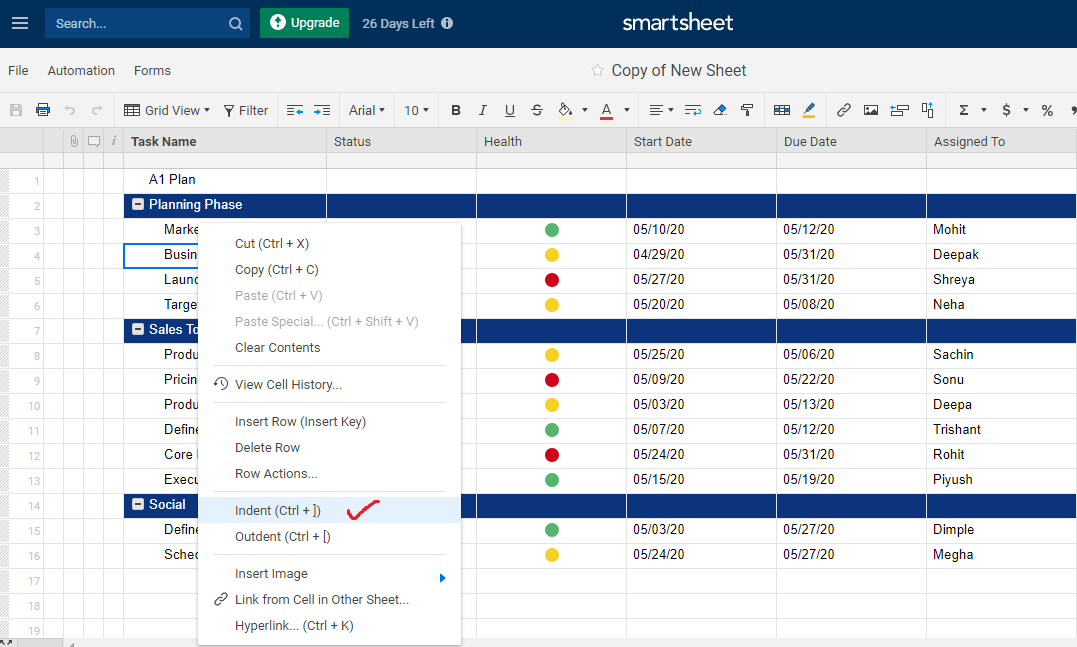
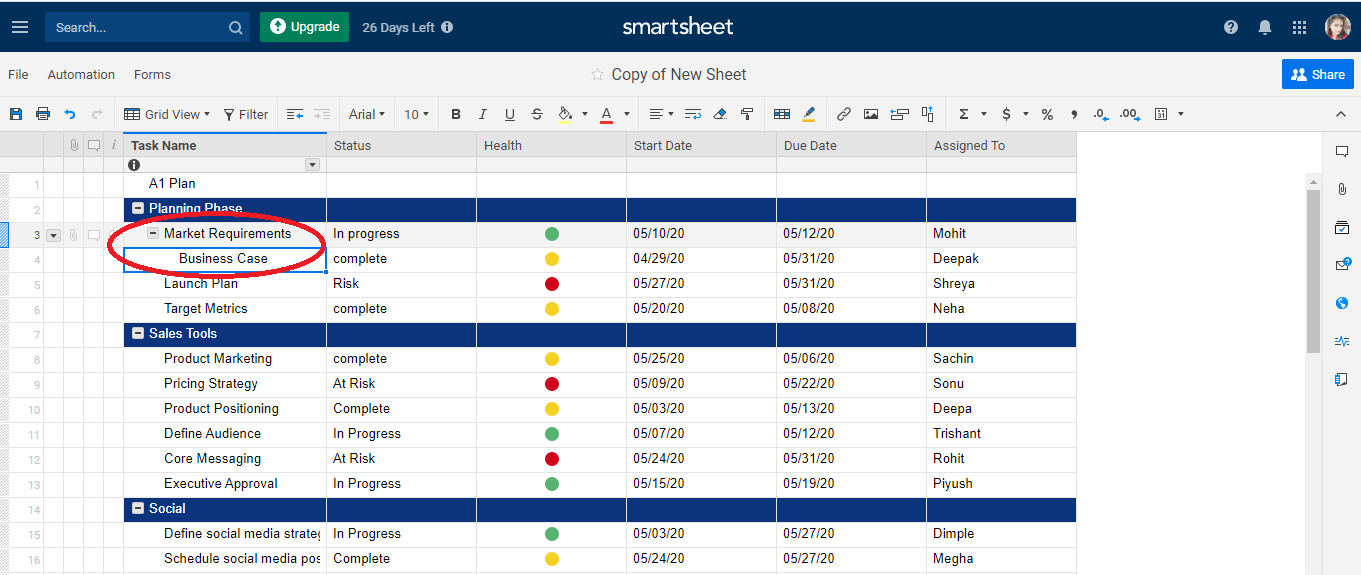
Step 1. To indent a row, select that row which we want to indent. Then right-click on that row. We can easily see in the below figure that we have selected a row named Business case.
Step 2. Next, we click on the Indent option
Step 3. Now, we can see in the below figure that the row is indented and has become the child of the row, above it.
Remove Hierarchy
Remove Hierarchy means outdent a row.
There are various steps to remove hierarchy:
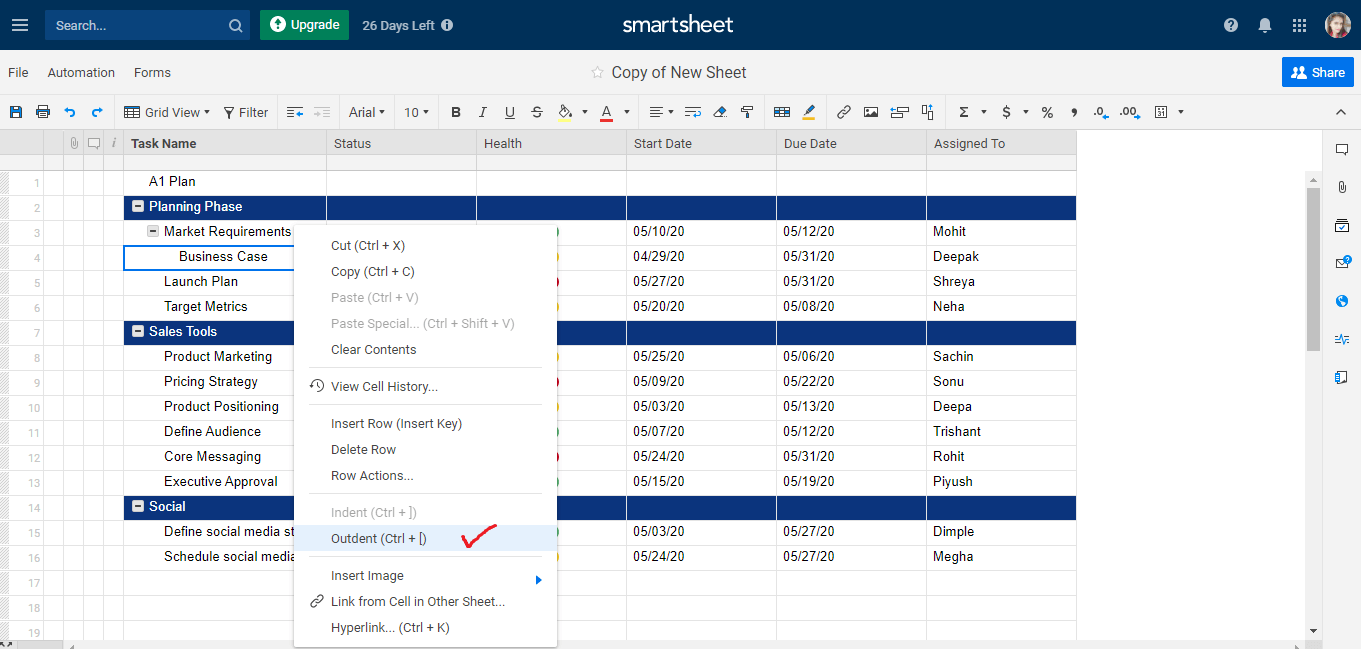
Step 1. To remove the hierarchy, select the row in which we want to remove hierarchy. In the below figure, we can easily see that we have selected a row named Business Case.
Step 2. Then, right-click on a cell of a row which we want to outdent or remove hierarchy and click on the Outdent option.
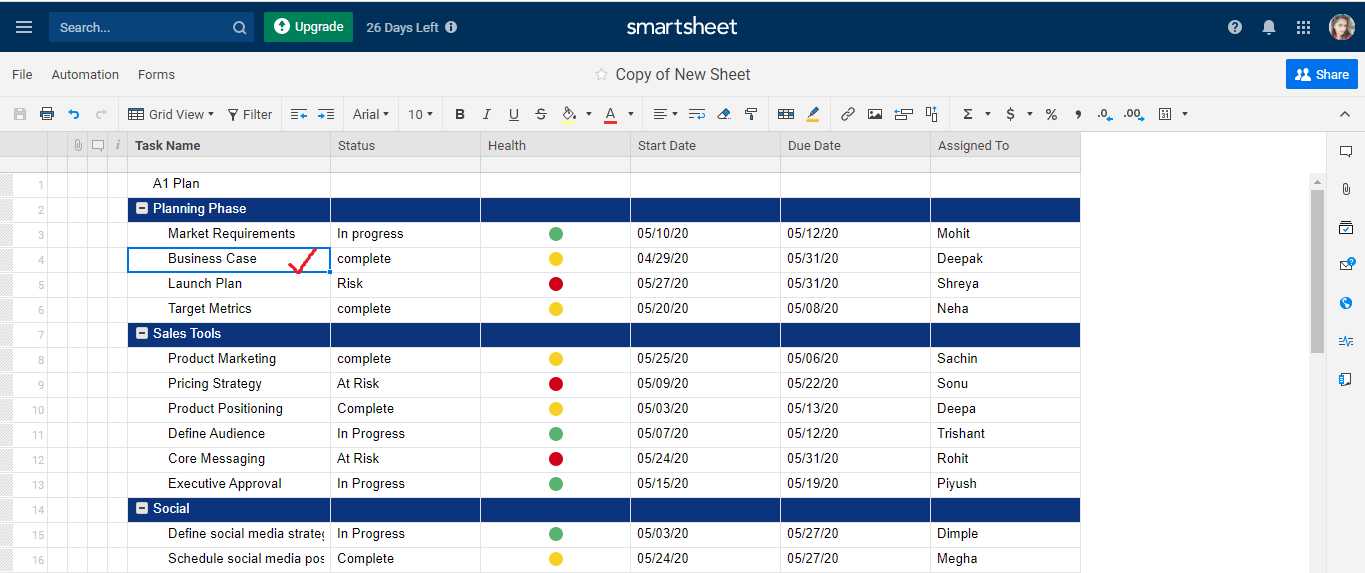
Step 3. We can easily see in the below figure the row after removing hierarchy or outdenting a row.
Hierarchy Best Practices
There are some essentials points which we have to keep in our mind while working with hierarchy:
- There is no limit to indent. We can apply it to any number of rows according to the need.
- If we want to delete a parent row, we also have to delete the indented child rows. It means we cannot delete the parent row without deleting the child row, which is indented.
- If we click the row which contains the items below it, the child row will move along with that item which we selected.
Column Type Refrence
Columns in Smartsheet are the same as the columns in a spreadsheet except that the Smartsheet column contains some unique features that make the Smartsheet more powerful and easier. Column type means the type of data that is allowed to enter into a column. In the Smartsheet, we work with configurable columns and default columns.
- Default Columns: – The column which we cannot remove or change is known as a Default column. In every sheet primary column is present. Primary column is obligatory we cannot delete the primary column from the sheet.
The column values are the key descriptor for the row. The column contains a type which is Text/Number.
There are various types of column display icons which we use to alert some row-specific activities:- The
 Icon used for Attachments: – Each row contains an icon for attachments. By using this, we can easily attach some attachments with the row. If we want to review the attachments, then click on the icon.
 - TheIcon used for Comments: – Each row contains an item for comment. Comment icon is used for commenting. If we want to review the comment, then we have to click on the comment icon.
- TheIcon used for Row Action Indicators: – The row action indicators icon is used to display the icon for update requests, pending reminders, allocation alerts, and locks that are linked with the row.
- The
- Primary Column: – The column which we cannot change is known as Primary column. The primary column is a column that has a type of Number or Text.
- Configurable Columns:- In the Smartsheet, there are various types of configurable columns:
- Text/Number
- Contact List
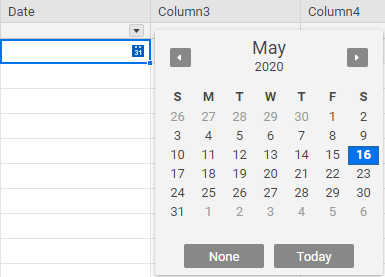
- Date
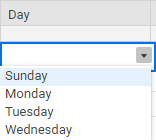
- Dropdown List (Single-Select)
- Dropdown List (Multi-Select)
- Checkbox
- Symbols
- Auto-Number/System
- Text/Number: – Text/Number column type comprises of text values, numeric values, or the combination of both values, i.e., text as well as numeric. For comment, Text/Number is the best selection. For project expenses, the number type is the best option.
- Contact List: – The contact list column type is used to store the values like an owner, assigned to, etc,. With the help of the contact list column type, we can contact the collaborators easily. In addition to that, the contact list column type is also helpful to send reminder and generate report which consists of the tasks list that is assigned to an individual team member.
If we use the contact list column type, by using different options, we can define the chosen contact values in the value box. Contact name and email address are the acceptable values for the contact list.
In the contact list, we can also set-up the preferred contacts, which helps to access the contact quickly only by clicking the dropdown arrow. - Date:- In the cell of the date column, there is a calendar icon. By clicking on the calendar icon, we can easily choose a specific date. If we want to type a date manually, it is also allowed in the date column. The date column type is helpful in displaying the items in the calendar view.
There are various formats of date in the smartsheet. We can set up the format of the date with the help of personal settings in the smartsheet account. - Dropdown List (Single-Select): – The dropdown list contains a list of values. We select one value from the list of values.
If we want to remove any item from the dropdown list, first select that item, which we want to remove and then click on the delete button or backspace. - Dropdown List (Multi-Select): – The dropdown list (multi-select) contains the list of values. We can select multiple values from the list of values. When we use dropdown list (multi-select) option, then we can type the values to be used in the list.
- Checkbox: – Checkbox column contains the checkbox, which can be checked or unchecked.
- Symbols: – In the Symbol table, visual images are present. The symbol column is used to specify the status of the row. In the symbol column, we cannot add any symbol manually.
- Auto-Number/System: – Auto-Number/System is the type of column in which the values for each row are generated automatically. We use Auto-Number/System when we need to enter values like the part number, Invoice number, row IDs, customer numbers, and so on.
 Icon used for Attachments: – Each row contains an icon for attachments. By using this, we can easily attach some attachments with the row. If we want to review the attachments, then click on the icon.
 Icon used for Comments: – Each row contains an item for comment. Comment icon is used for commenting. If we want to review the comment, then we have to click on the comment icon.
 Icon used for Row Action Indicators: – The row action indicators icon is used to display the icon for update requests, pending reminders, allocation alerts, and locks that are linked with the row.
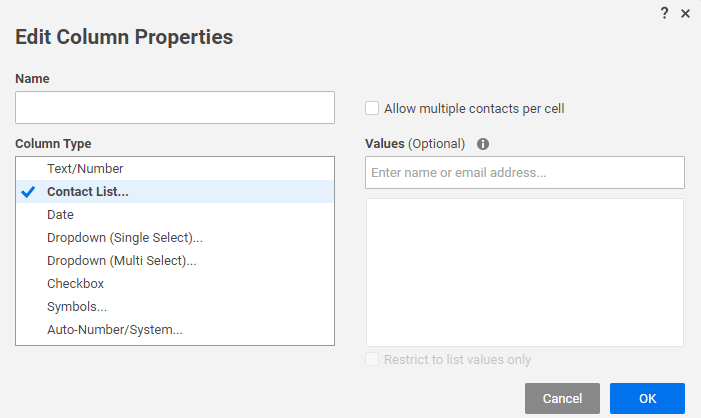
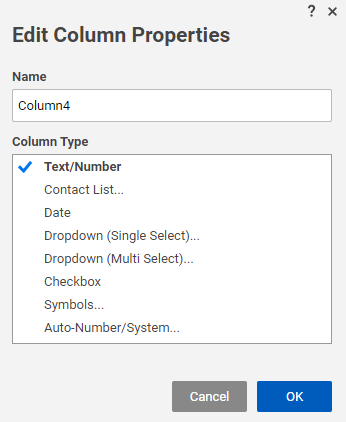
How to Edit a Column to Change its Type
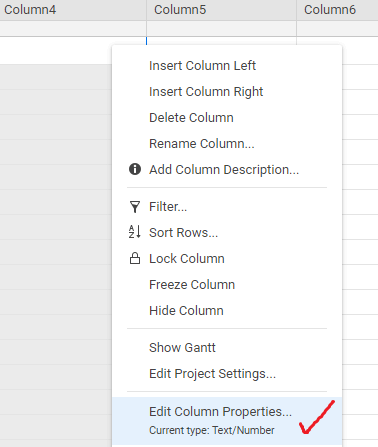
If we want to modify the existing column properties, we have to follow the following steps:
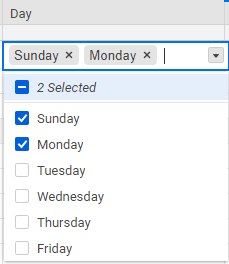
Step 1: First, click on the dropdown arrow. Dropdown arrow is present under the column header.
Step 2: Next, select the edit column properties.
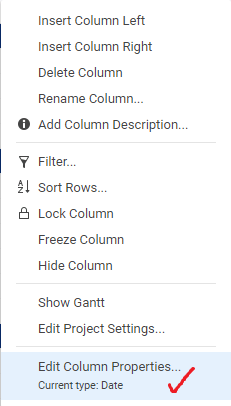
Step 3: Then, we can change the properties of the existing column

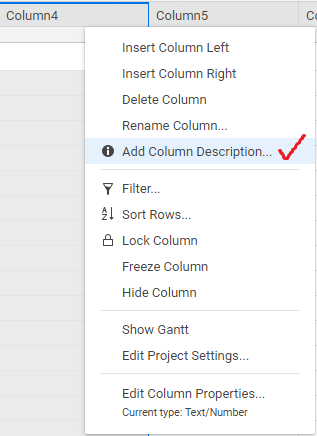
Create a Column Description
There are various steps to create a column description:
Step 1: First, right-click on the column header and choose Add Column Description.
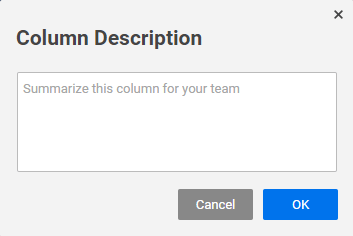
Step 2. Then the column description window will appear. Finally, we can create the column description.
Edit Column Description Information
There are various steps to edit the column description information:
Step 1. First, right click on the column header and then click on the option named Edit Column Description.
Step2. Next, modify the desired changes in the column description window and click on the OK button.
How to Set Up a Dropdown Column in a Sheet
There are various steps to set up a dropdown column in a sheet:
Step 1. First, click on the dropdown arrow, which is present below the column header. Then choose the option either insert column right or insert column left, which is based on the need where we want to insert an extra dropdown column.
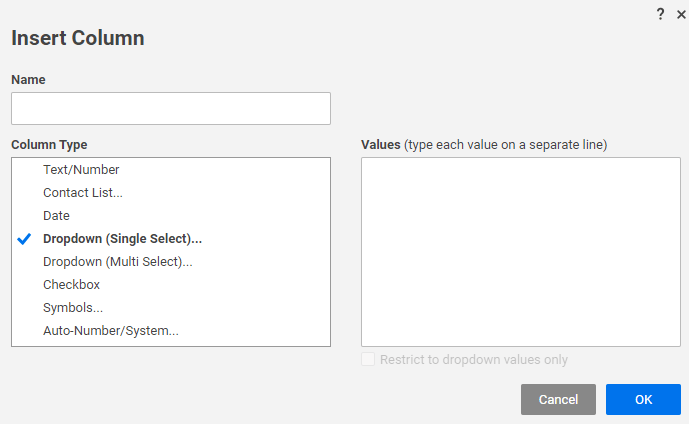
Step 2: Next, we have to type the name of the column in the Name box.
Step 3. Select column types, either Dropdown (Single Select) or Dropdown (Multi-Select).
Step 4. Next, type the value in the Value box based on the need means which type of value we want to get appeared in the list.
Step 5. Click on the OK button.
How to Edit Dropdown Column Properties
Edit dropdown column properties means to add or delete values from the dropdown list.
There are various steps to edit the dropdown column property:
Step 1. First, click on the dropdown arrow and select Edit Column Properties option.
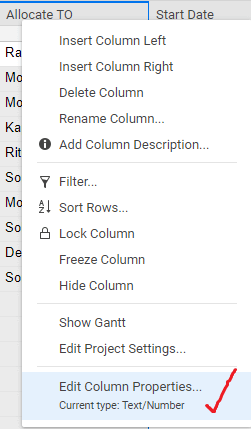
Step 2. Next, alter the listed value, which is stored in the value box. If you want to delete the value from the dropdown list, then select the value which we want to remove and press Delete and Backspace.
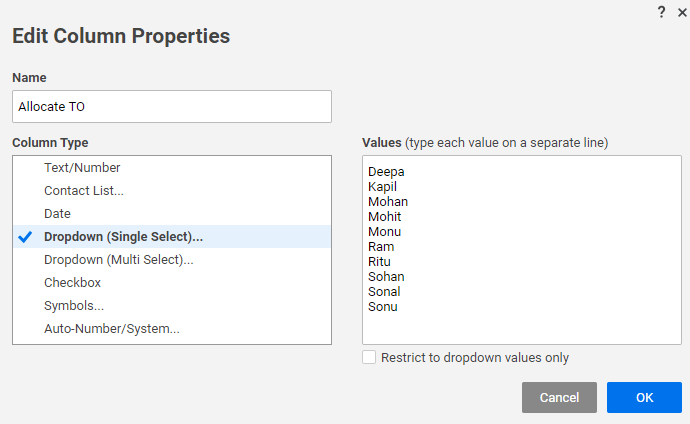
Step 3. Then, click on the Save button.
Some Important Tips While Working with Dropdown Columns:
There are various essential points which we should keep in mind while working with the dropdown columns:
- In the Multi-Select dropdown column, we can select any number of values.
- Free text values are stored alphabetically in the Multi-Select drop-down columns at the end of the cell to which they are added.
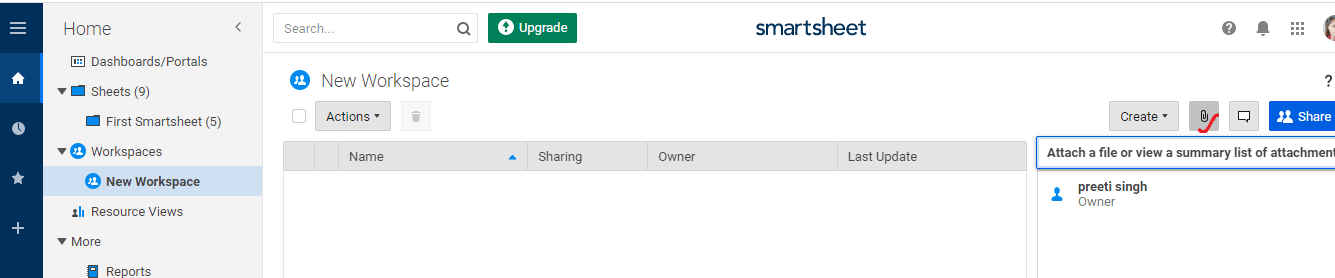
Attachments in Smartsheet
In the Smartsheet, we can easily manage and attach files in our sheet so that all the work can be accessed at one place. With the help of desktop and cloud storage providers, we can easily attach our files. The attachment feature in Smartsheet helps us to keep all the project related information at one place.
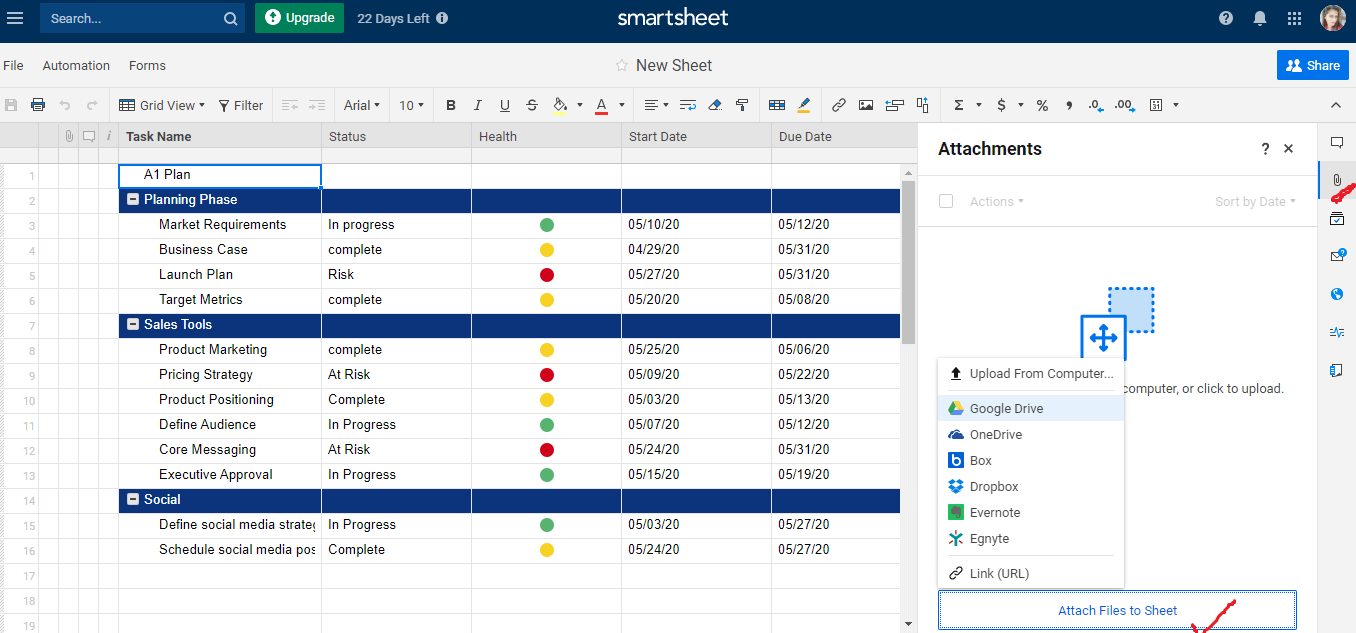
Attach Files Stored on Your Computer to a Sheet
In the Smartsheet, every kind of file can be attached to a sheet, row, or comment. It is helpful in the situation where we want to relate the files to the items which we are tracking in the smartsheet.
In the Smartsheet, we can attach files that are stored on the computer or the files which are stored on the cloud.
How to Attach a File or Link from an Online Resource
We can attach files with the help of a workspace, sheet, row, and comment.
So, let us discuss all these one by one.
- Attach files from the workspace: – First, from the workspace, click on the icon named attachment’s, which is present in the upper-right side of the workspace. Then, we can attach the files easily.
- Sheet Attachments: – For the sheet attachment, open the sheet in which we want to add the attachment and again click on the attachment’s icon, which is present on the right side of the sheet. Then, click on the option named Attach Files to Sheet.
- Row Attachments: – On the row present in the sheet, click on the icon named attachment, and attach the attachment based on the requirement
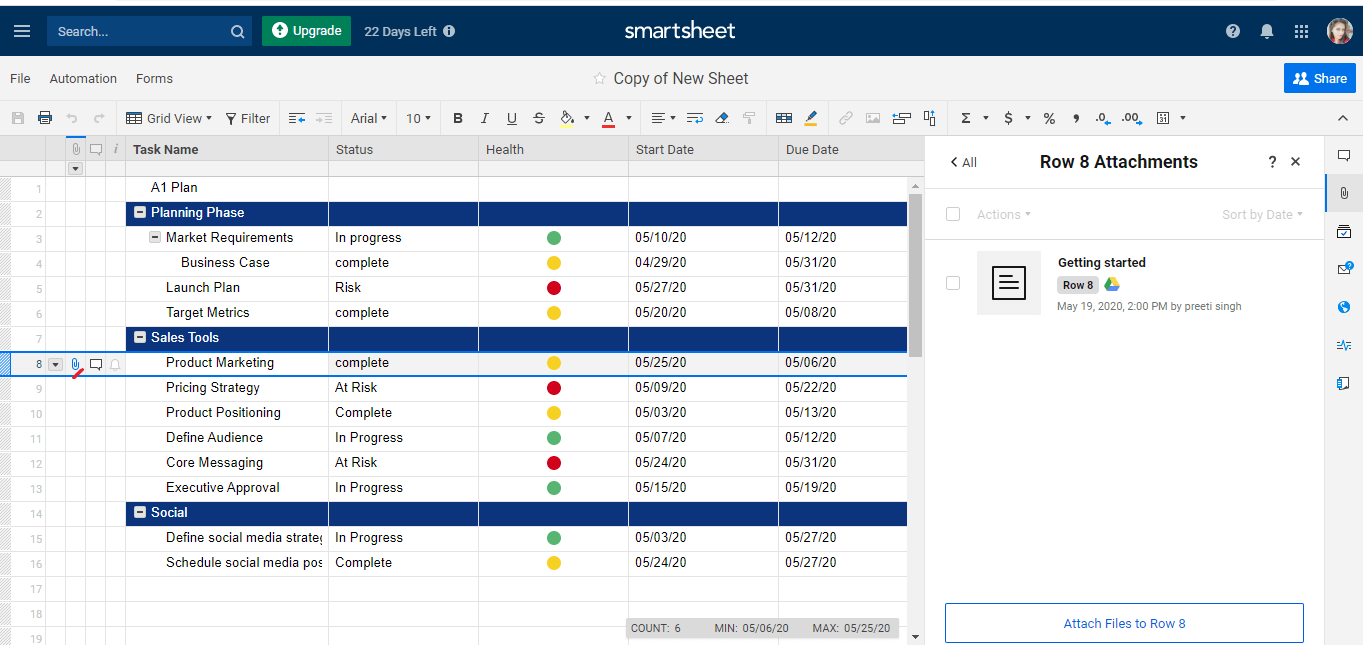
Behaviors of row-level attachments
The behaviors of row-level attachments are:
- At a time, only in one row, we can attach files.
- If a file is already attached to a row, then the attachment icon will be displayed on the left of the row number.
- If there is a file that is already attached to any row, then we cannot attach that file with another row or any area of the sheet.
3. Comment Attachments: – In a row, there is a comment icon, so we have to click on the comment icon, and after that, we have to click on the add attachment option.

Supported file types for attachments in the Smartsheet
There are various files types that support attachments in the Smartsheet:
| File Type | Examples of Extensions |
|---|---|
| Microsoft Office Suite | .pptx, .xlsx, .docx |
| Most Image Formats | .png, .gif, .jpg |
| Portable Document Format |
Supported Browsers and Uploaded Quantities
- At a time, we can upload 100 files. In the Smartsheet, there is no limit of file attachment. We can attach any number of files on a row or sheet. But there is a restriction on the amount of the storage space.
- If a browser support HTML 5, we can only upload that type of files which are having the size more than the 30 MB.
Unsupported File Types
Due to some security issues, Smartsheet does not support some types of files. For example: In the Smartsheet, we cannot upload the .exe file (executable file).
Maximum file sizes based on the user and method of upload
| User or type of Upload | Maximum File Size |
|---|---|
| Anyone uploading files from a Smartsheet form | 30 MB |
| Free User | 250 MB |
| Trail User | 30 MB |
| Licensed User | 250 MB |
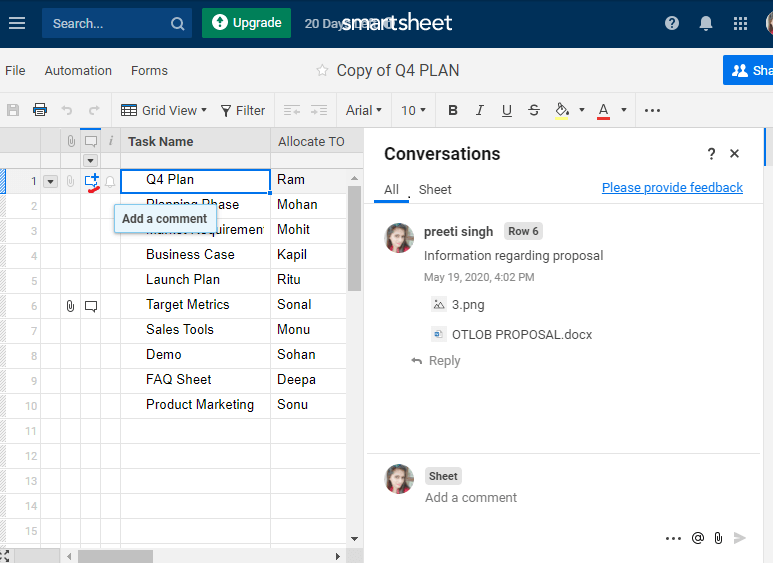
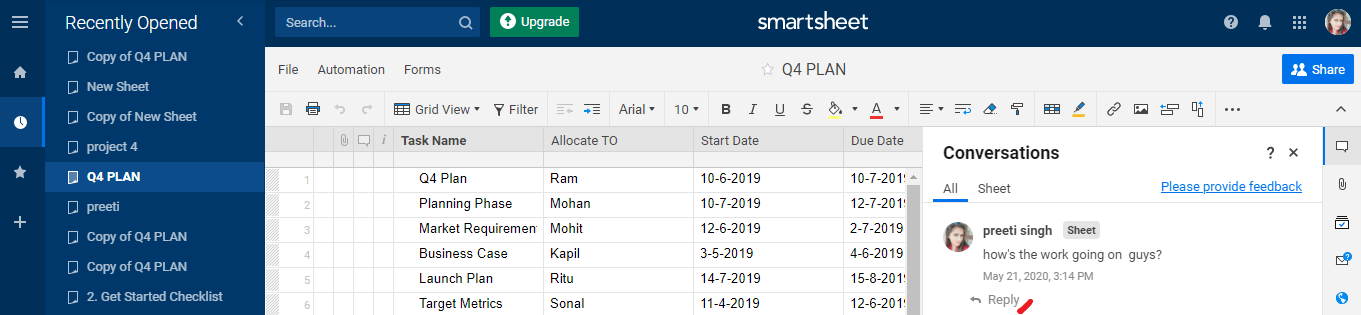
Conversations in Smartsheet
Smartsheet offers a wonderful feature of conversations. With the help of the conversation feature, we can easily manage our work, and it provides effective communication among all the collaborators regarding the work.
By using @mention, user can directly reply from the mail. This saves time because there is no need to switch between the apps.
Having Conversations in the Context of Your Work
Conversations provide easy tracking of the work and discussion regarding work can also be done in one place. We can apply conversations to a particular row or to the whole sheet based on the requirement. In the conversation panel, we can work with comments.

If we want to make direct comments to a particular person, then we have to type the @<email address> (for example, @tutoraspire.com) in the comment section to tag the person.
Interaction with Comments in a Sheet
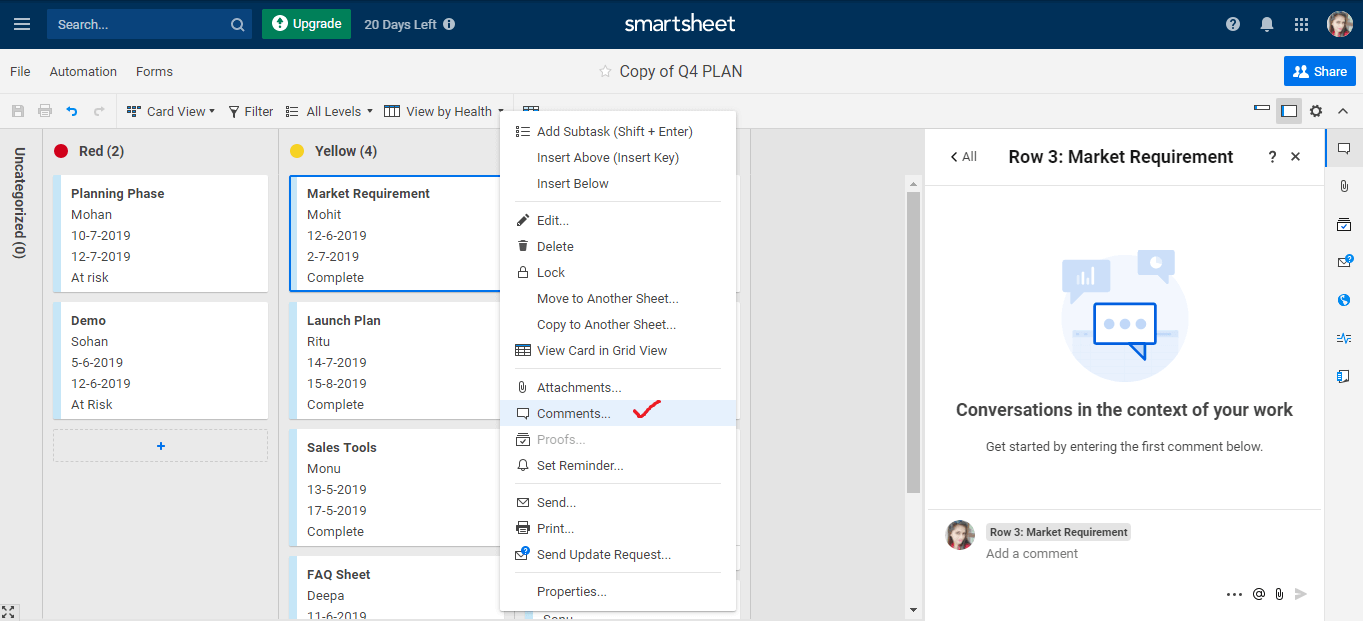
In the Smartsheet, all the comments for the sheets, rows, and cards are available in the conversation panel. If we want to review the conversation, we have to click on the conversation icon, which is present in the right panel.
In the conversations, all the comments appear chronologically on the basis of the date.
There are various tips which we have to keep in mind while working with the comments:
- If we want to view the different collection of comments, then click on All, which is present at the top of the panel. If we want to display only those comments, which are applied to the whole sheet, then we click on the sheet.
- If we want to go on that row where the comment was made, first, we have to click on the row number and click on that person’s name who wrote the comment in the conversation panel.
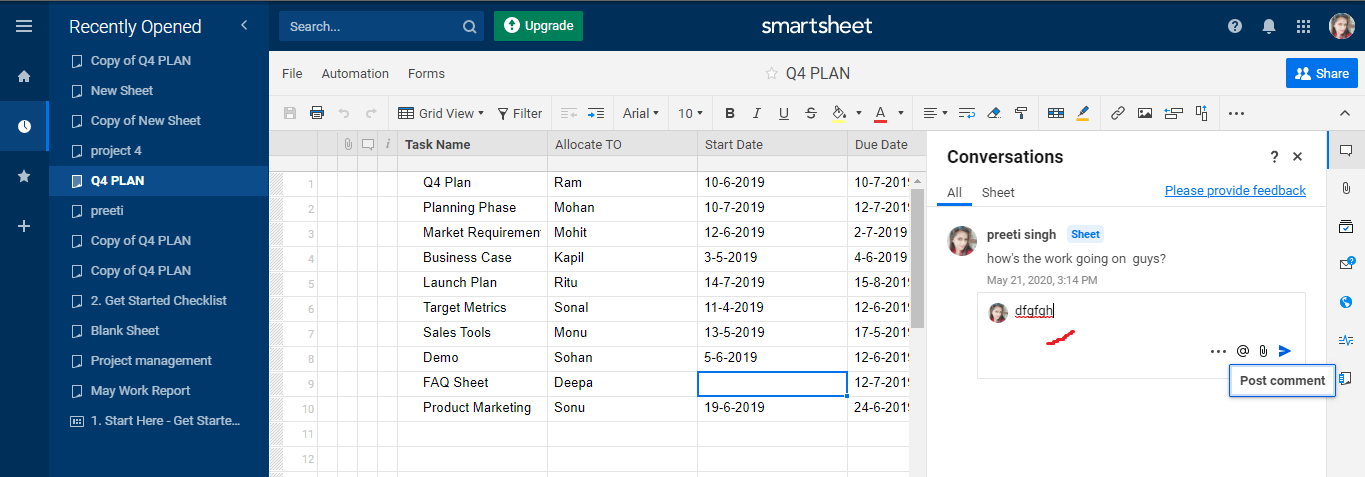
Create a New Comment for a Row (Grid View or a Card View)
- If we want to write a comment for any row, then in the comment column of the row, we have to click on the Add a comment
- If we want to write a comment for a specific card, then we have to right-click on the card and then click on the comments option.
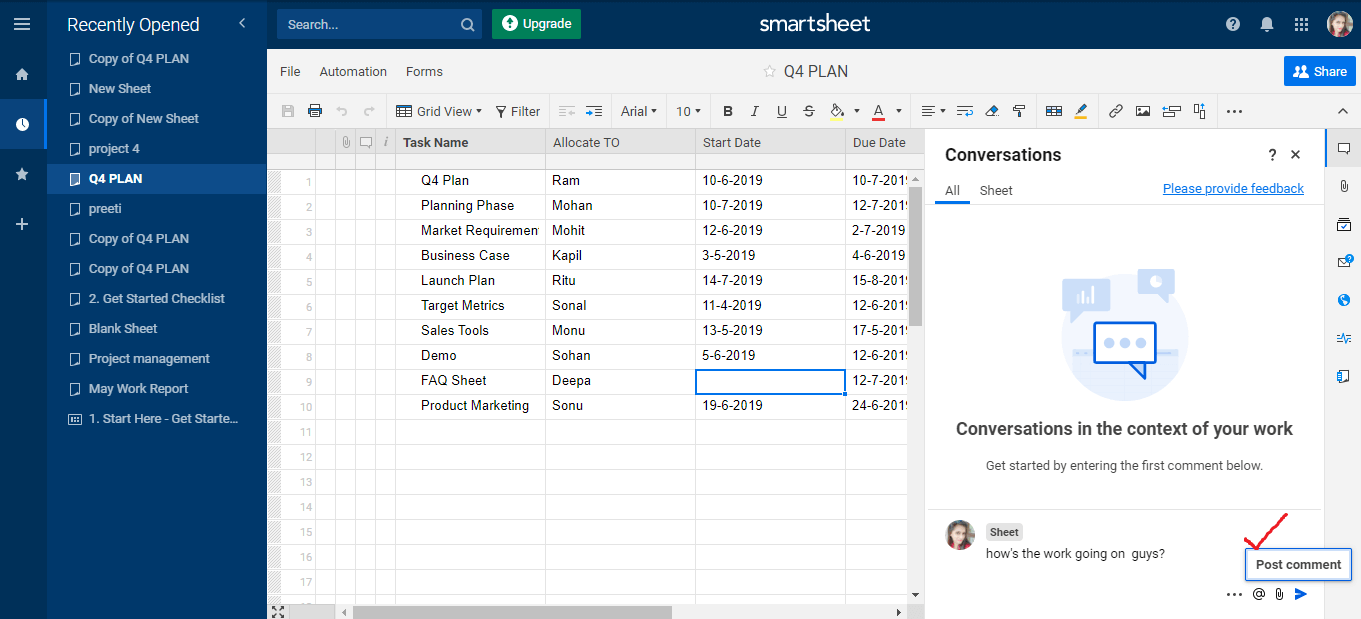
Creating a New Comment applied to the Entire Sheet
When we want to require a general conversation related to the sheet, and then we use sheet comments. It is not for a specific row but we use it for an entire sheet.
There are various steps to create a new comment on the entire sheet:
Step 1. First, click on the conversation’s icon, which is in the right panel.
Step 2. Next, type the comment in the add a comment box.
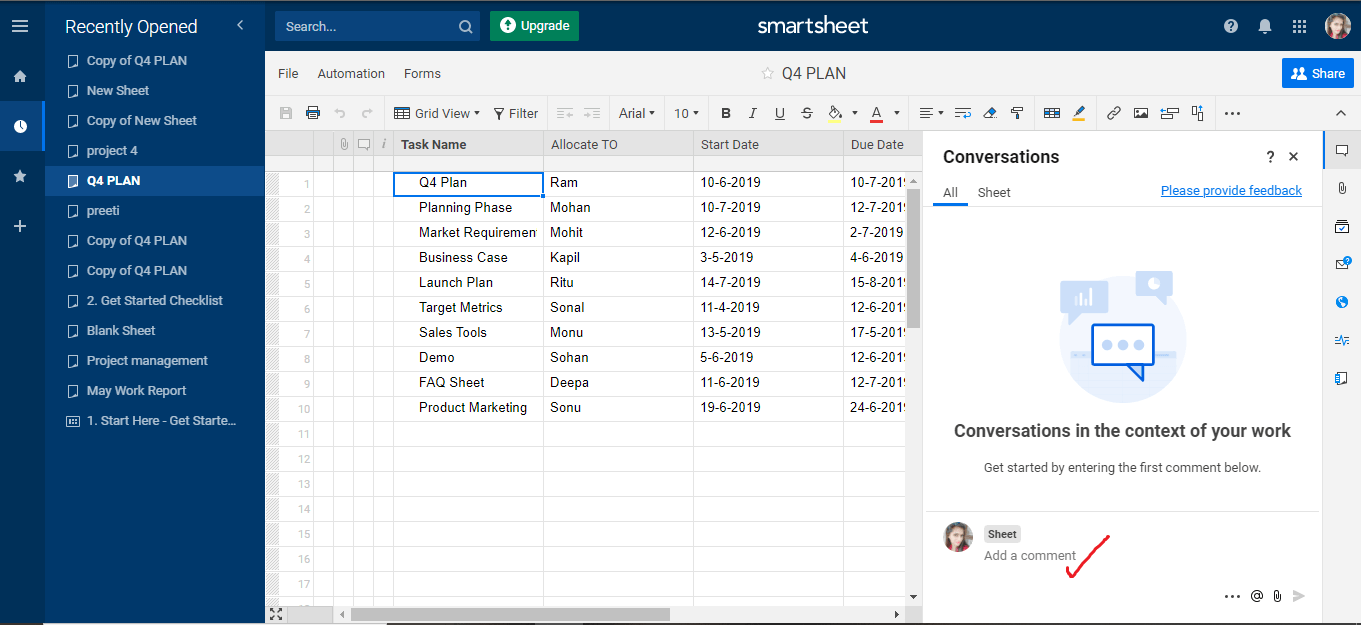
Step 3. Last, click on the option named post comment and then press enter.
How to Reply an Existing Comment
There are various steps which we have to perform to reply an existing comment:
Step 1. Click on the Reply option in the conversation panel.
Step 2. Then, type a reply in the reply box.
Step 3. Last, click on the post comment icon.

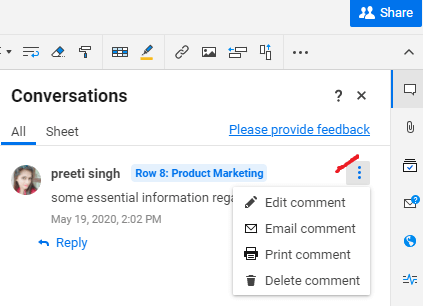
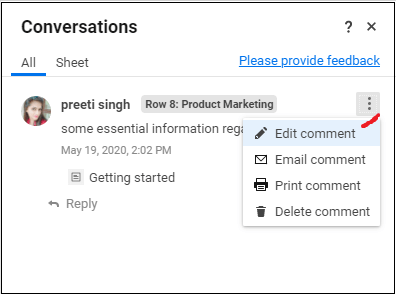
Edit, E-mail, Print or Delete a Comment
If we want to edit, email, print, or delete a comment, then click on the More Options icons, which is on the right side of the conversation panel.
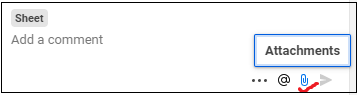
Use File Attachments to Give Context to Comments
If we want to give some additional context to comment, then we can add some attachments along with the comment. To add an attachment to the comment, click on the icon named Attachments. The Attachment icon is present at the lowermost side of the add comment box.
Remove Attachments from a Comment
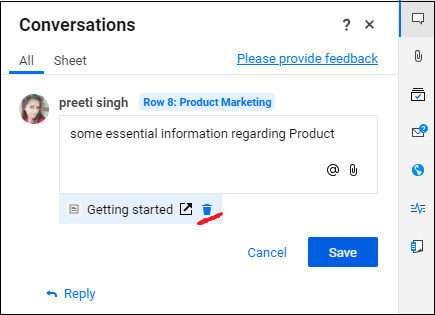
There are various steps to remove an attachment from a comment:
Step 1. First, from the comment which contains an attachment, click on the menu icon, present in the right of the conversation panel, and then select the option named edit comment.
Step 2. Next, we have to move the mouse over the attachment and then click on the Delete option so that the file is deleted.
Step 3. Last, we have to click on the save option so that the changes are saved.
How to Delete a File Attached to a Comment
We cannot delete the files that are attached to a comment from the attachments panel. If we want to delete the file, we only have one option: we have to delete the file from the comment itself, or we can delete that comment in which the file is attached.
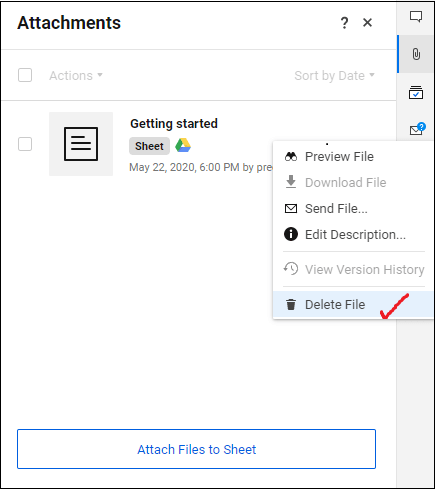
How to Delete an Attachment from the Comment Panel
There are various steps to delete an attachment from the comment panel.
Step 1. First, click on the icon named More Options, which is present on the right side of the comment panel.
Step 2. Select the option named Edit Comment.
Step 3. Next, we have to move the mouse over the attachment, which we want to delete, and then click on the trash icon.
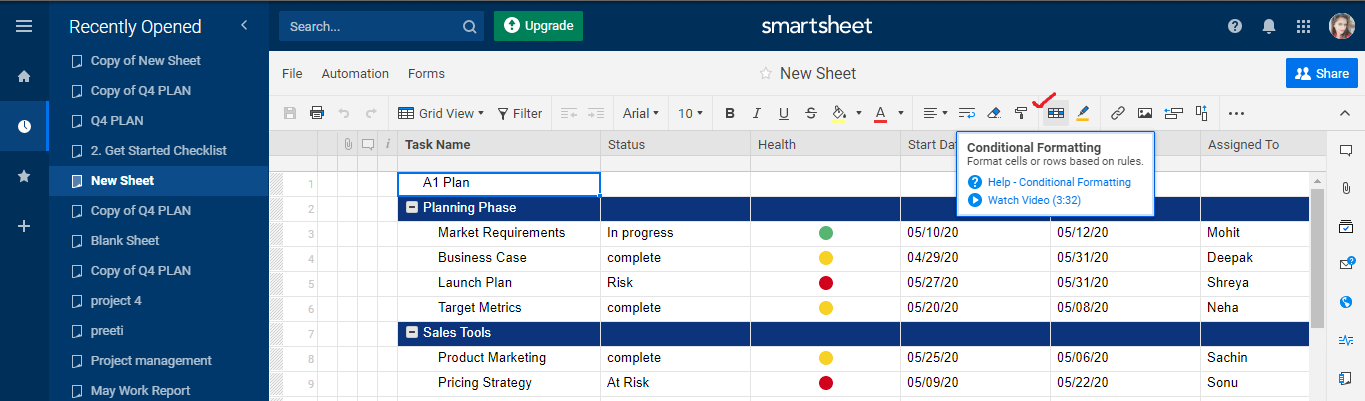
Conditional Formatting in the Smartsheet
In the Smartsheet, conditional formatting is used to create the rules on the sheet. So, the conditional formatting helps us to create the rules on the sheet. Because of the Conditional formatting, the appearance of the sheet cell is changed.
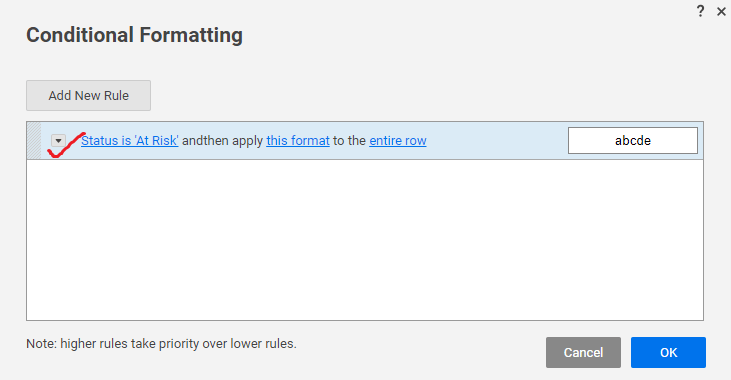
How to Create a Conditional Formatting Rule
There are various steps to create a conditional formatting rule:
Step 1. First, on the toolbar, we have to click on the conditional formatting icon so that the conditional formatting window is displayed.
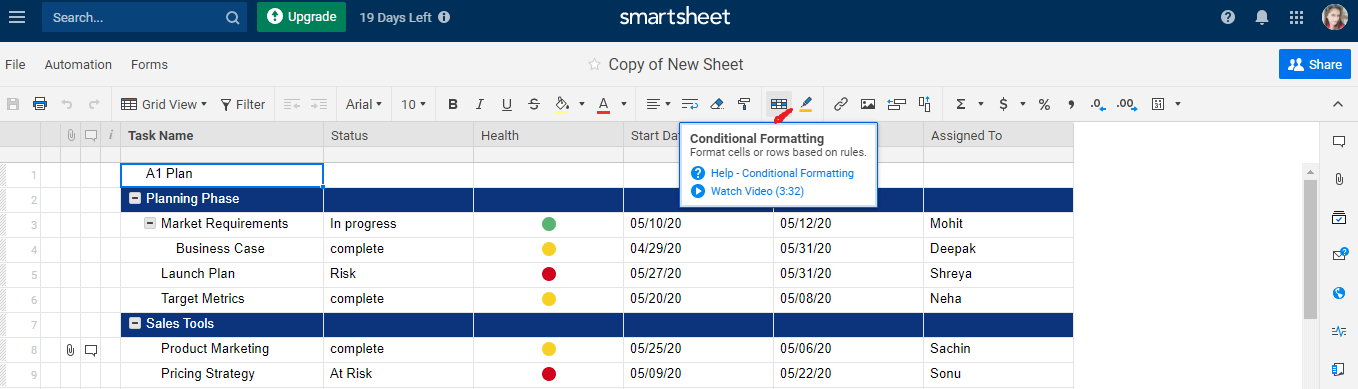
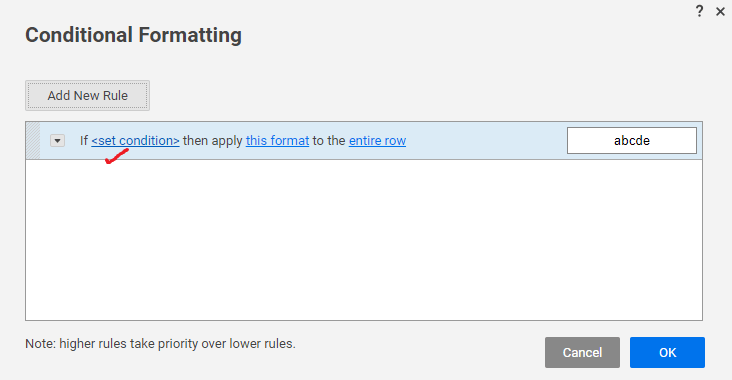
Step 2. Next, to make a new conditional formatting rule, click on the option named Add New Rule.
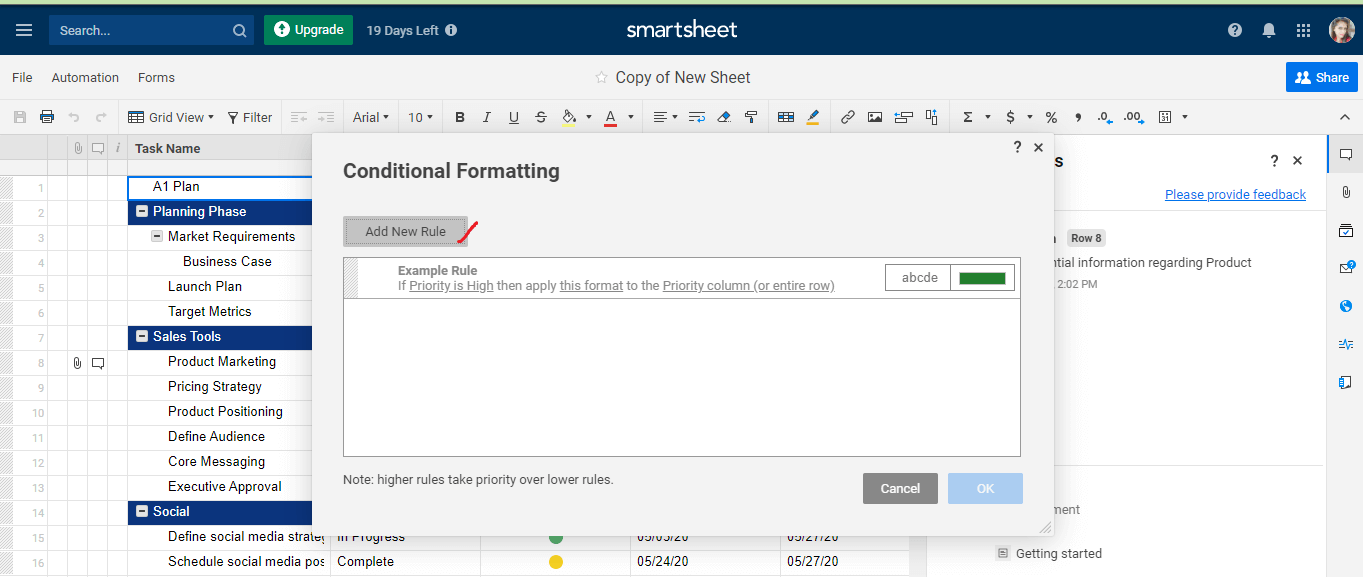
How to Set the Conditions for the Rule
There are various steps to set the conditions for the rule:
Step 1. First, click on the Set Condition option so that the set condition window is displayed.
Note: The criteria differ based on the type of the column. For example: If the column type is a date, then we can only apply the formatting on the basis of the date means the date in the past or date in the next days. If the column is a checkbox type, then we can only apply the formatting on the basis of the checked box, or unchecked box.
Step 2. If we want to customize the rule again, then click on the defined custom criteria option.
Step 3. If we want to display the formatting on the rows where the condition is not applied then choose the checkbox to use format when the condition is not met.
Step 4. Next, when all the conditions are set, then click on OK.
Set the Format for the Rule
There are various steps to set the format for the rule:
Step 1. To set the format for the rule first, from the conditional formatting window, we have to click on the option this format. The below figure shows how the formatting option is displayed within the window:
We can apply formatting based on the requirement means we can use formatting only on a particular column in the row or the entire rows. If we do not define the limit of the formatting when it takes place, then, by default, the formatting will be applied on the entire row.
Step 2. Next, click on the OK.
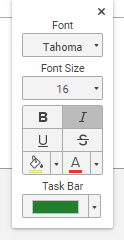
Formatting Options
The below table shows the various type of formatting options that we use for the formatting:
| Option Name | Use of the Option |
|---|---|
| Font Type and Font Size | Font type is used to set the type of the font such as Arial, Times, Verdana, Tahoma, or Auto. Font size is used to change the size of the font. |
 | Bold, italics, underscore, and strike through are used for the font. |
 (Background) (Background) | The Background option is used to apply the background color to the cells. |
 (Font color) (Font color) | Used to apply a color to the font |
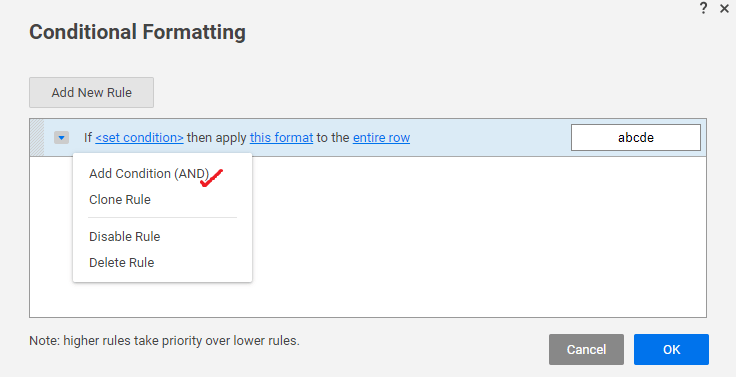
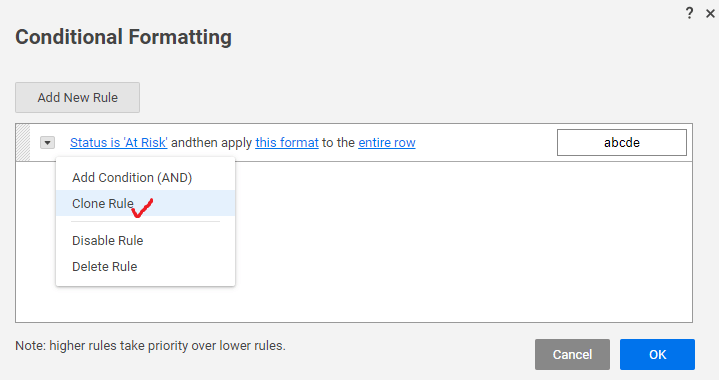
Add a Condition, Clone, or Rearrange a Rule
Add a Condition
There are various steps to add a condition:
Step 1. First, on the toolbar, click on the Conditional Formatting icon.
Step 2. Then, to view the additional options, click on the drop-down arrow, which appear in the left side of the rule in the conditional formatting window.
Step 3. Next, select Add Condition (Add) to add conditions to a rule.
The Add condition (AND) rule is used to apply an “AND” operator in the rule, which indicates that there are various conditions that should be met for the format to be applied.
Clone a Rule
Cloning a rule means copy an existing rule so that it can be used in a similar new rule. If we want to clone a rule, click on the drop-down, which is on the left of the rule, and then select the cloned rule.
Rearrange Rules
If we want to execute the rule in a specific order, then we can rearrange the rule. So, to rearrange the rule, click and drag on the rules up or down in the list.
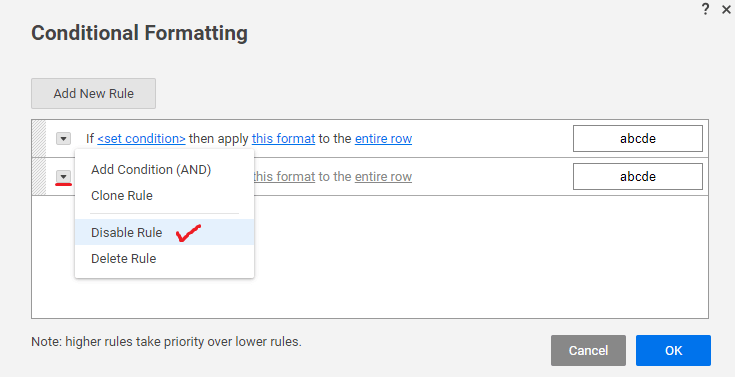
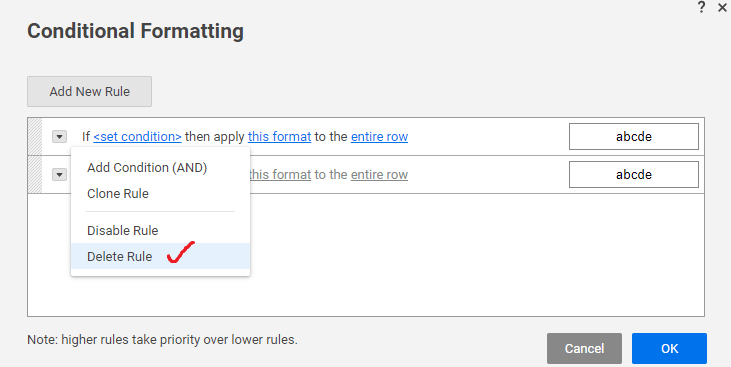
Delete or Disable a Conditional Formatting Rule
There are various steps to delete or disable a conditional formatting rule:
Step 1. First, on the toolbar, click on the conditional formatting icon. When we click on the conditional formatting icon, then the list of all the existing rules will appear.
Step 2. Next, select one of the following:
- To temporarily turn off: We use a Disable option if we want to use the existing rule later. If we want to disable the rule, click on the drop-down arrow and select Disable Rule. If we want to again use that rule which we disabled, click on the option Enable Rule.
- To Delete the Rule Entirely: If we want to delete the rule permanently, then use the option To Delete the Rule Entirely. To use this rule, we have to click on the drop-down arrow and select the Delete Rule option.
Formula Basics
Smartsheet provides the facility of the formula’s so that we can perform the calculations. We can apply the formula on the numeric values and values contained within the cells. With the help of the formulas, we can also automate symbols and drop-down fields.
Create and Edit Formulas in Smartsheet
In Smartsheet, formulas are used to calculate the numeric values and automate aspects of the sheet.
Create a Formula
There are various files types which we use to create a formula:
- Text/Number
- Contact List Fields
- Date
- Dropdown List
- Checkbox
- Symbol
We can place a formula in a file with the help of the following:
- Select the file.
- Then, in the field, type the equal sign, and then type the calculation.
- When the formula is typed, then press the enter button. The result will be displayed as:


Functions
Formulas may also contain functions like: SUM, AVG, etc. With the help of the function, we can perform calculations and data manipulation in the smartsheet.
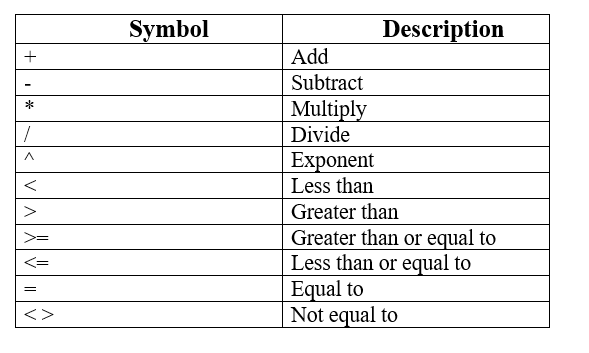
Formula Operators
There are various types of operators we use in the Smartsheet formulas:
Edit an Existing Formula
We have to follow the following steps to edit an existing formula:
Step 1. First, double-click on the cell, which comprises the formula to edit the formula.
Step 2. Then, edit the formula and press the Enter key.
Work with Percentage
In the Smartsheet, the percentage is treated as a value between 0 and 1. If we want to create a formula for percent, then we have to use decimals values.
For Example: =0.5 + 0.4
It will give you 90% in a column formatted for percentage.
= 5+4
It will give you 900% in a column formatted for percentage.
Copy a Formula with Drag-Fill or Auto-Fill
If there is any formula that we want to use in the multiple fields without typing the formula manually, then we have two methods. First is Drag fill, and the second is Auto-fill.
- Drag-Fill: – In the drag-fill method, if we want to copy a formula in the sheet, then drag the formula from the lower-left corner of the selected filed. When the formula is copied, then automatically formula will change its respective field references.
- Auto-Fill: – The auto-fill method is used when we want to automatically copy the formula into the desired field. When we use auto-fill, then automatically new formula changes its respective filed references.
Areas Where Formula Use is Restricted
There are various fields where the formula cannot contain:
- Contact list fields that we used in resource management.
- Default columns (Row Action Indicator, Comments, Attachments).
- System Fields (such as Modified By).
- There are various fields which we use for resource management and dependencies:
- Predecessors
- Duration
- Start Date
- End Date
- % Allocation
- % Complete
Features where Formulas Cannot be Edited
In the Smartsheet, there are various features where we cannot edit the formulas:
- Forms
- Reports (In reports, we can only view the formula result, but we cannot edit the formula).
- Update Requests (In Update Requests, the result of the formula is the only view, but we cannot edit the formula).
- Dashboard (In Dashboard, we can only view the formula result, but we cannot edit the formula).
Features where Formulas Cannot be created
In the Smartsheet, there are various features where we cannot create the Formulas:
- Forms
- Reports
- Update Requests
- Dashboard
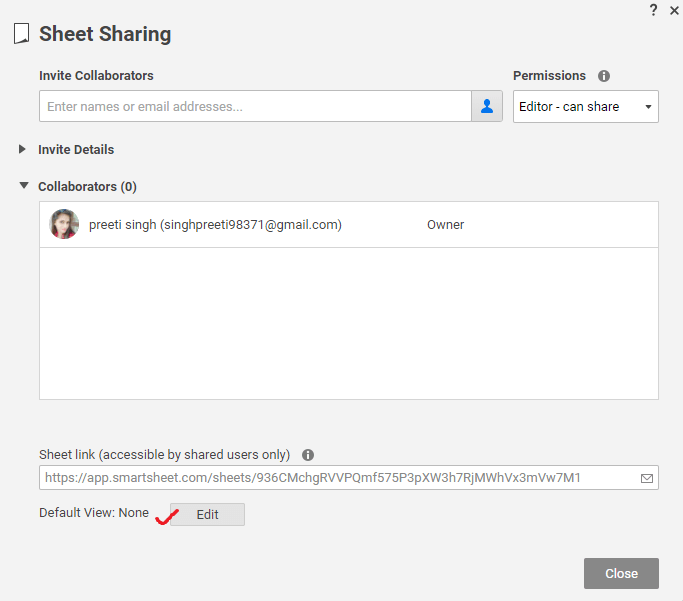
Sharing in Smartsheet
Sharing is the core feature of the Smartsheet. With the help of sharing, all the information is shared among all the collaborators effectively. In the Smartsheet, we can easily share the entire sheet, or some part of the sheet. In addition to that, we can also set some permissions or restrictions on the sheet so that we can control the sharing of the sheet. Smartsheet provides quick and easy collaboration.
Share a Smartsheet Item
There are various steps to share a Smartsheet item:
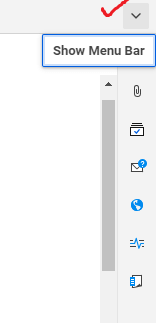
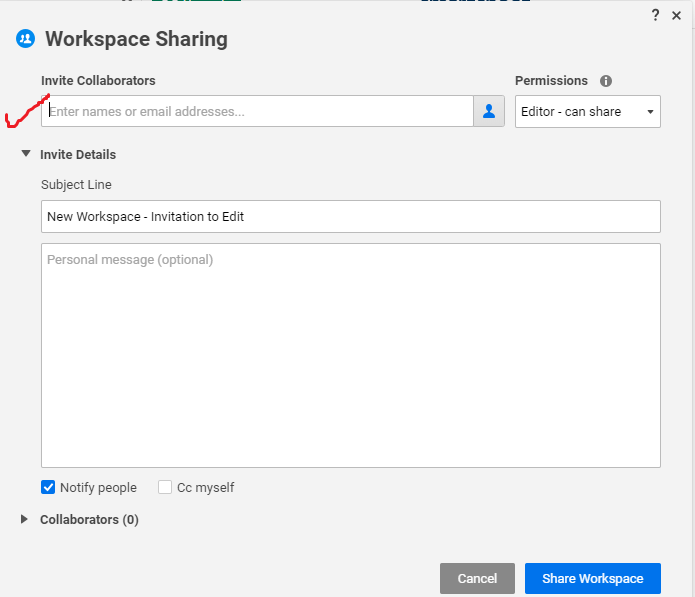
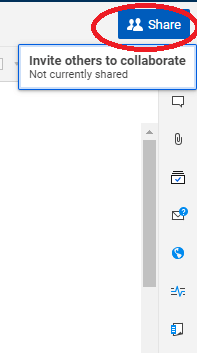
Step 1. First, click on the share button, which is at the top of the item.
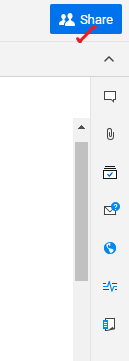
If the share button does not appear, then click on the drop-down arrow, which is present on the right side of the Smartsheet window.
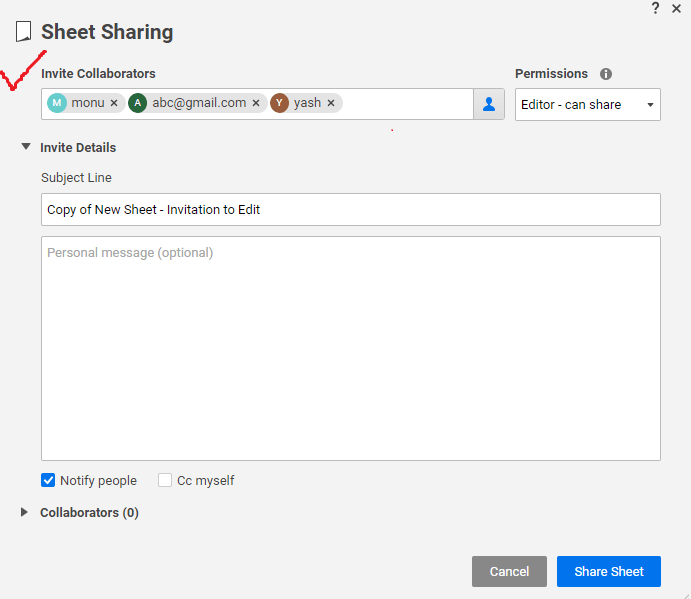
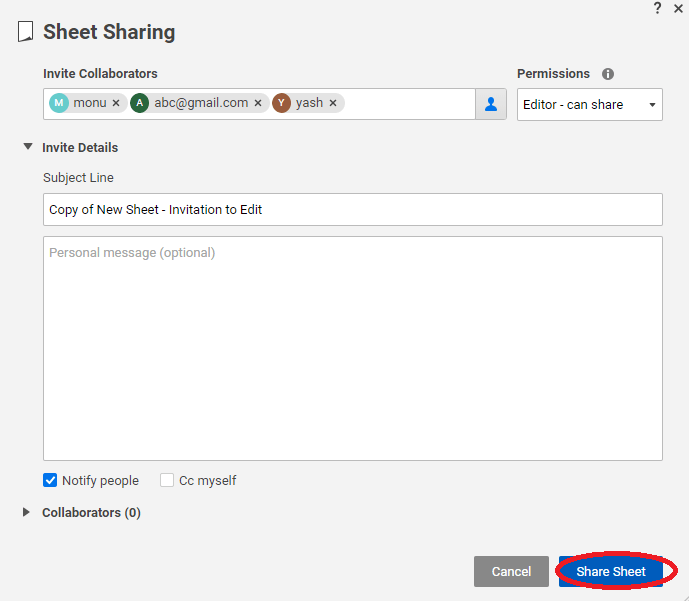
Then the sharing form will appear. If the item in the sheet is not shared with anybody, then the Invite Details option will be seen. With the help of the Invite Details page, we can enable and disable the invitation email, and we can also draft a custom message.
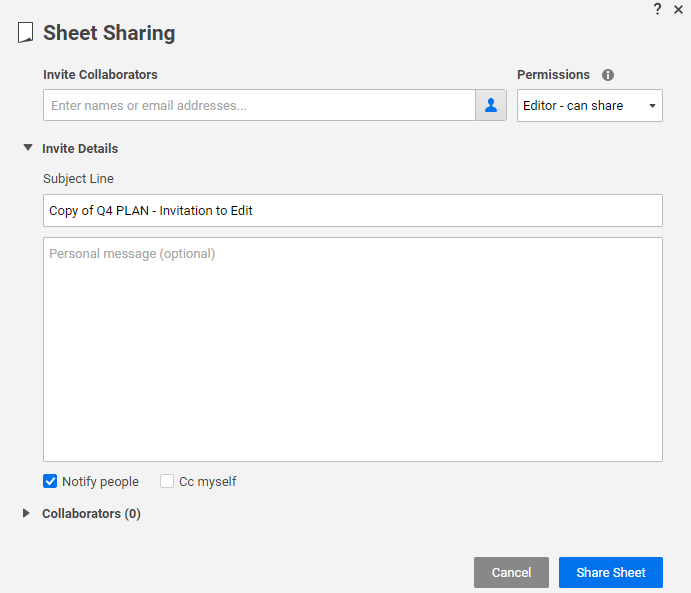
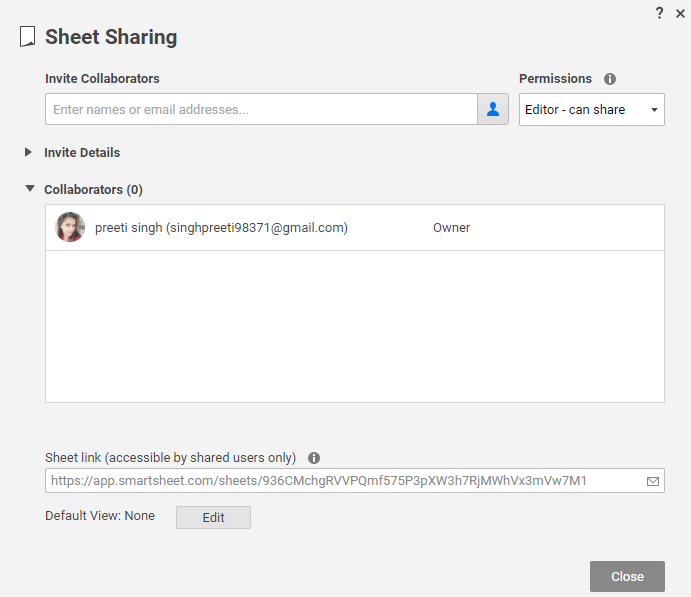
When the sheet is shared with others, then by default, the list of all the existing collaborators will appear.
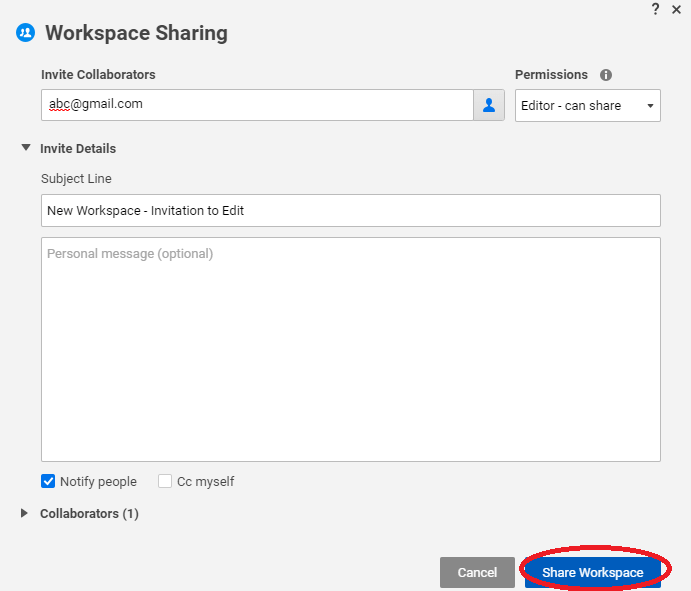
Step 2. Next, in the Invite Collaborators box, write the email address of those persons which we want to share the sheet. If there are multiple email addresses, then separate them by using semicolon or comma.
Step 3. Then, select the permissions level.
Step 4. Last, we have to click on the share button.
More Sharing Options
In Smartsheet, sometimes there may be situations where we cannot share the Smartsheet items directly, then we have various options:
- Send as Attachment
- Use a Form
- Publish
1. Send as Attachment: – Send as Attachment feature is used when we want to share a PDF or Excel file of a smartsheet item. So, to share a PDF or Excel file, we have to email the file as an attachment with the help of the Send as Attachment feature. By using this feature, we can also share the data of specific rows to the people, if needed.
- Send One or More Rows via Email
There are various steps to send one or more rows via email:- First, we have to click on the drop-down arrow on that row which we want to send or share and then select the send
- Then the send form will be displayed.
- Next, in the To field, we have to type the email address of the person, with whom we want to share the row information. If we want to share the row information to the multiple email addresses, separate each email address with the help of the semicolon or comma.
- The subject line and message body of the email comprises of the default values. We can also edit it, if needed.
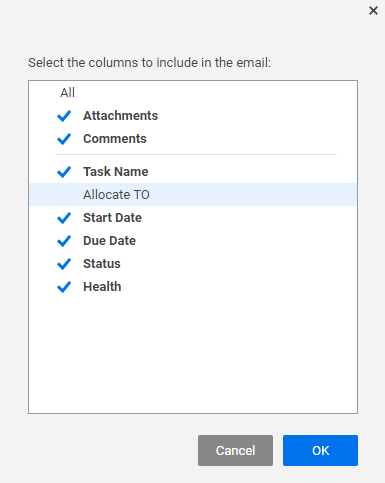
- We use two options customize and layout to specify the fields which we want to include in the email
- First, we have to click on the drop-down arrow on that row which we want to send or share and then select the send


Note: If we want to send a single row, then only the Layout option will be available otherwise not.
If there is any column which we don’t want to send, then click on the Edit button and uncheck those columns which we don’t want to send.
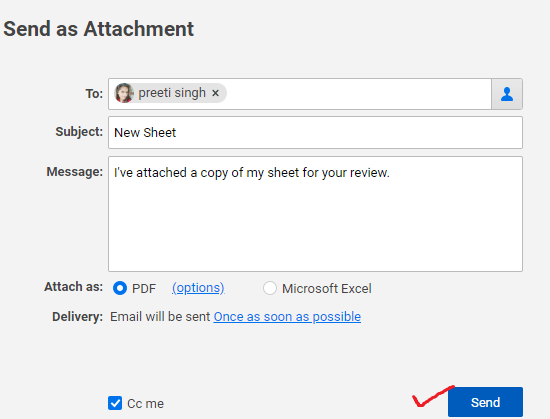
- If we want to receive a copy of an email, then we have to select the option Cc me.
- Then click on the Send
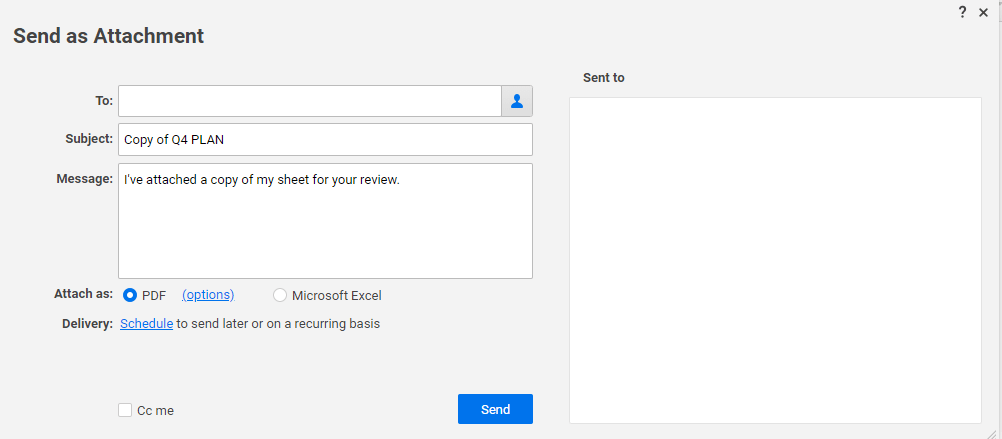
Send a Sheet as an Email Attachment
If we want to send a snapshot of the sheet, we can easily send it by attaching it as an Excel or PDF file to an email message.
There are various steps to send a sheet as an email attachment:
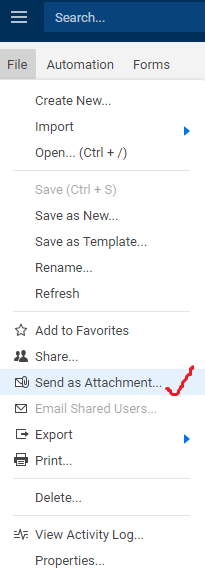
- First, click on the File and select the option named Send as Attachment.
- When we click on the send as attachment option, then the send as attachment form will be displayed.
- Next, in the To field, we have to type the email address of the person, with whom we want to share the row information. If we want to share the row information to the multiple email addresses, then separate each email address with the help of the semicolon or comma.
- Then, we have to edit the subject line and the message body if required. If we don’t edit it, then by default, the sheet name gets comprised in the subject line.
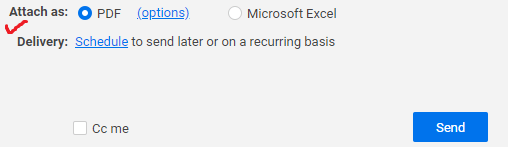
- Next, select the type of attachment in the attach as option. Attachment can be in Excel or PDF.
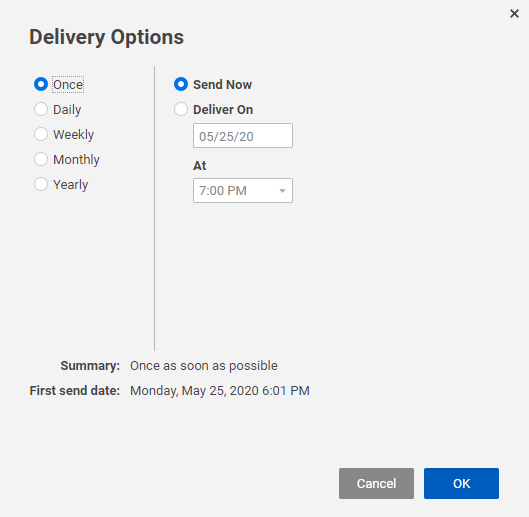
- Last, we have to select the option named Delivery to send as attachment email.
- Then click on the send button.
2. Use a Form: – Use a form option is used when we want to gather information from the people. With the help of forms, we can also add new rows in the sheet on the basis of their submission of forms without having any direct sharing access to the sheet.
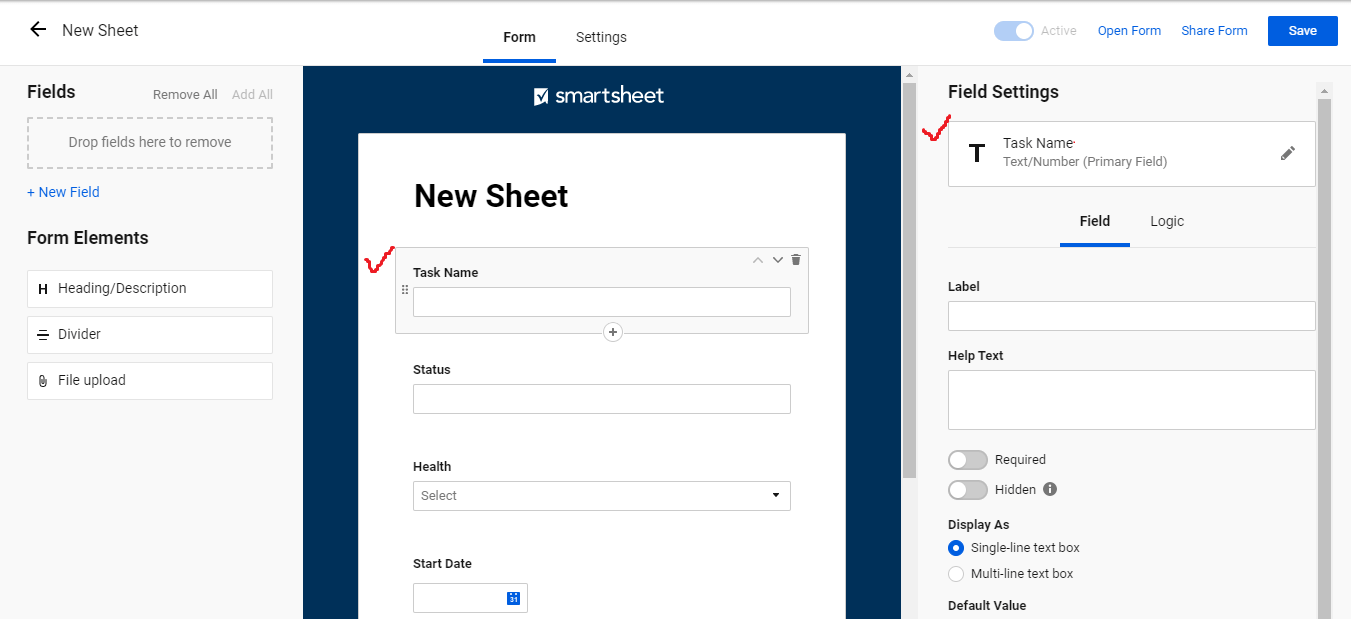
- How to Create a Form
There are various steps to create a form:
Step 1. First, open the sheet in which we want to attach a form.
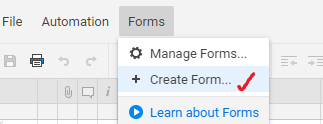
Step 2. Then, on the menu bar, select the option named Forms, which is in the upper-left side of the smartsheet window.
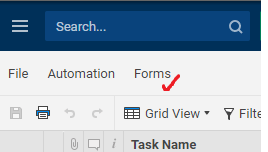
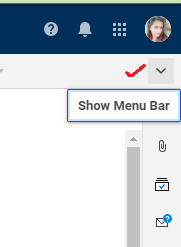
If the form option is not appearing, then select the down-arrow icon, which is present on the upper-right side of the Smartsheet window.
Step 3. Click on the create form option.
When we create a new form, then all the columns of the sheet are automatically added to the form.
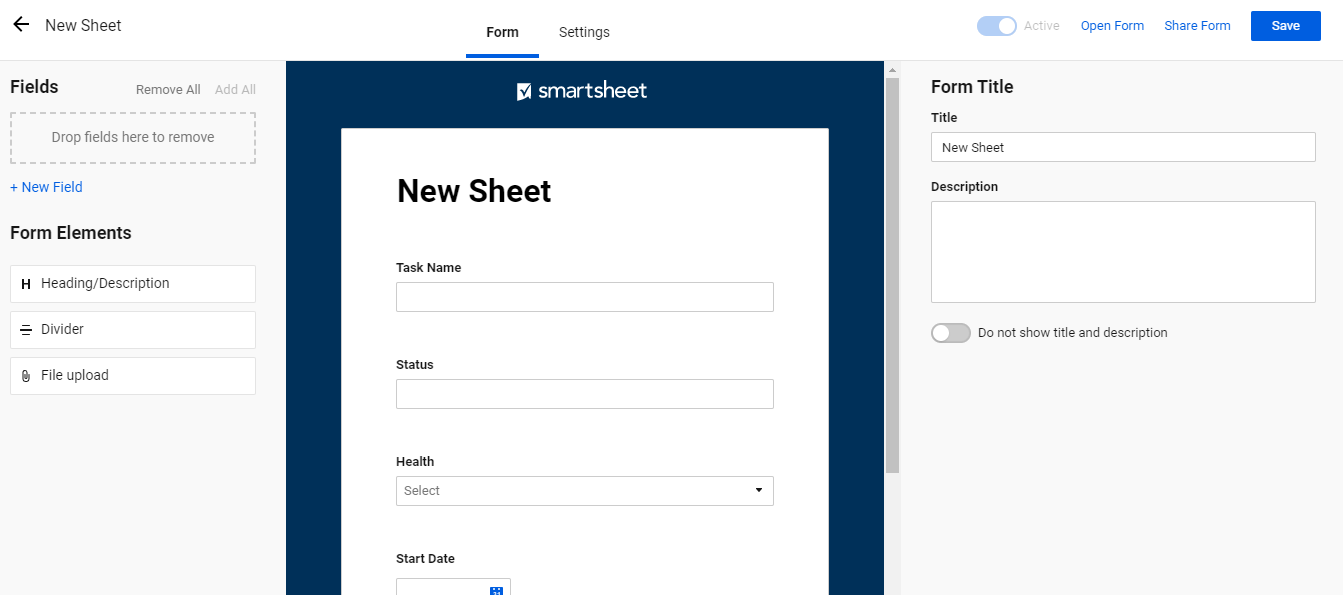
By default, the form title is the same as the name of the sheet. the field in the form is same as the column name in the sheet.
Step 3. Next, we have to choose the element from the center of the form preview to edit the setting of the elements appeared in the right panel.
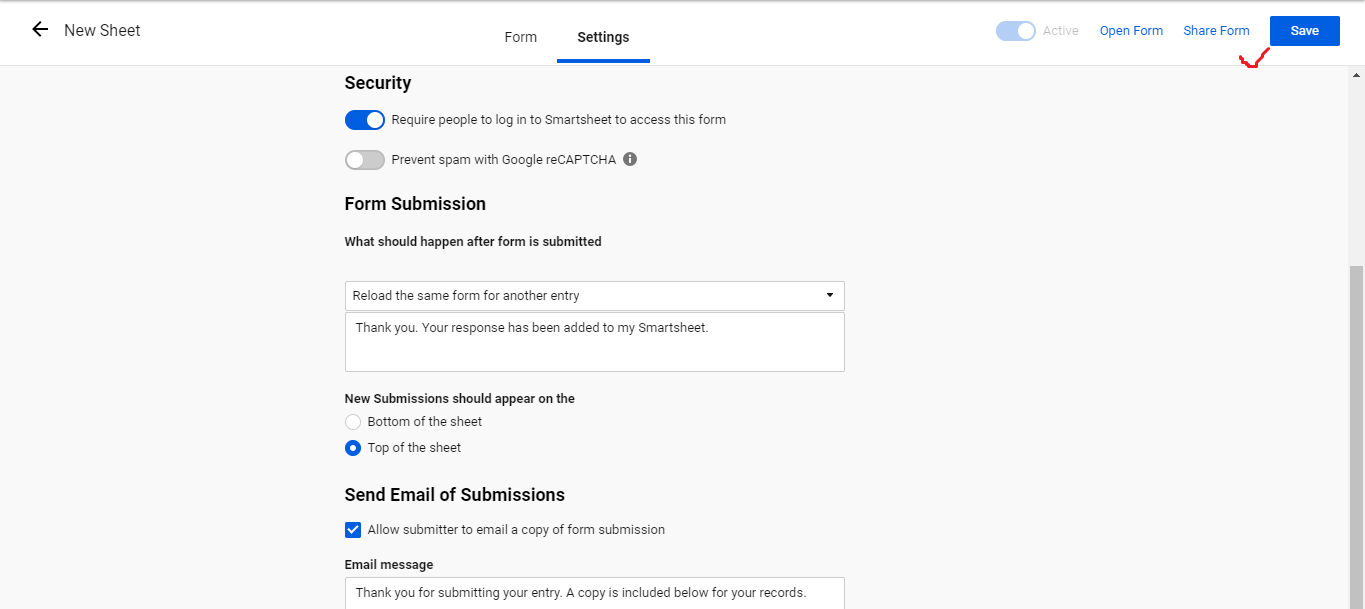
Step 4. If we want to adjust the form-level setting, then we have to click on the Setting option, which is present at the top of the form.

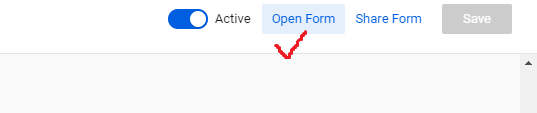
Step 5. When the form settings are finished, then click on the Save button. The save button is on the upper-right side of the form.
Step 6. Next, if we want to preview the form, select Open Form option to check that form configured is correct or not.
Step 7. Next, if we want to email the form directly, click on the Share Form option. Then copy the link of the form or insert it on a webpage or dashboard.
Step 8. Last, to close the form, select the back arrow and then return back to the sheet.
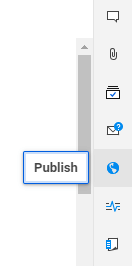
3. Publish: – In the Smartsheet, there is no need of a Smartsheet account to share a Smartsheet item. With the help of a public link, sharing can be possible.
- How to Publish a Sheet
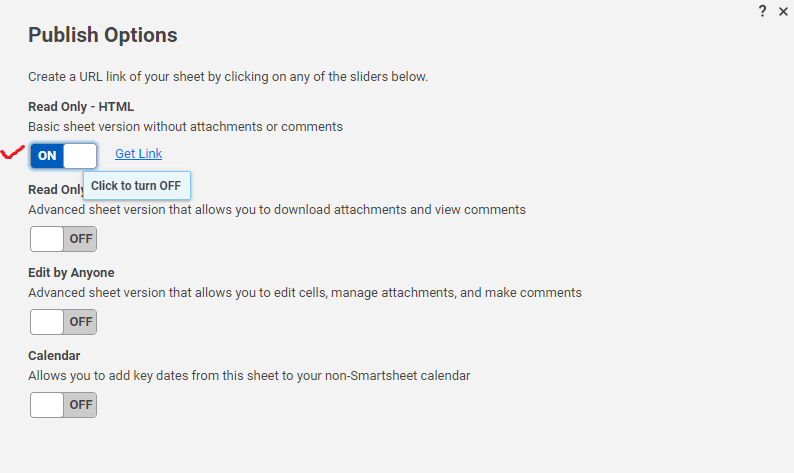
There are various steps to publish a sheet:- First, click on the Publish Icon so that the publish option is displayed.
- There are various publish options. So, based on the need, we have to click on the option and set the option ON.
- When based on the need, we set the option ON, then a link of the sheet is created.
There are various options for publishing a sheet:- Read-only Html: – This option offers a read-only view of the sheet. In this option, we cannot switch the calendar view to the Gantt view. In ready only html, comments and attachments are not available.
- Read-Only-Full: – The user interface of read-only-full is richer than the read only-HTML. This option provides the facility of row collapsed, and the user can also open the row comments and attachments.
To control the accessibility of the link, the Access Control option is used. If we want to set the default view to the grid or calendar view, we use the option named Publish Settings. - Edit by Anyone: – This option is suitable for allowing anyone to open the sheet and make the changes, but the changes are only possible if the user has the Edit-Level sharing permissions.
- iCal (Calendar): – By using this option, anyone can add the dates with the help of the non-smartsheet calendar.
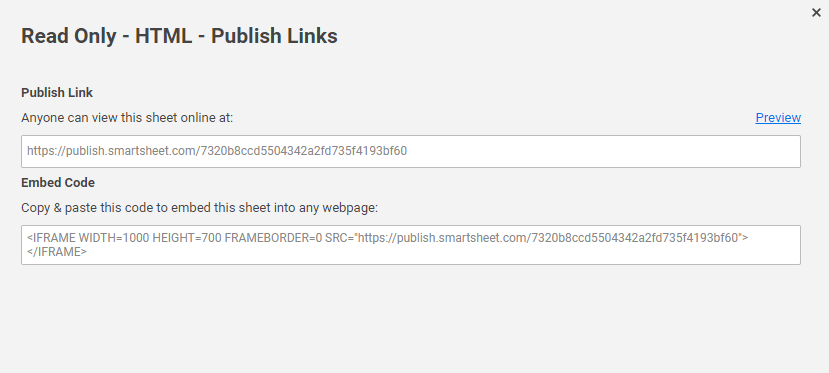
- Next, to share an embedded code and URL of the sheet using the keyboard, URL is copied and then pasted into the webpage or email message.
- First, click on the Publish Icon so that the publish option is displayed.
How to Share an Item from the Workspace
There are various steps to share an item from the workspace:
- First, click on the Menu Menu icon is present at the upper-left side of the Smartsheet window.
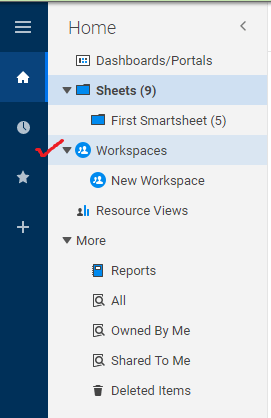
- Next, from Home, click on the Workspace option in which the sheet items reside.
- We have to right-click on the name of the item and then click on the Share option so that the sharing form will be open.
- Next, we have to click in the Invite collaborators box and then choose or type the contacts in which we want to share an item.
- Last, click on the share button if we only want to share the sheet items, but if we want to share the workspace, then we have to click on the Share Workspace.

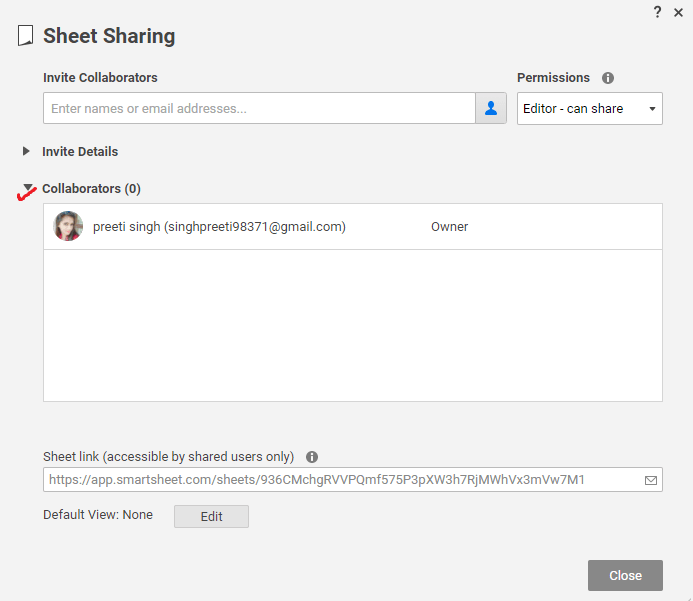
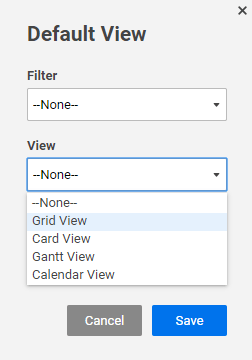
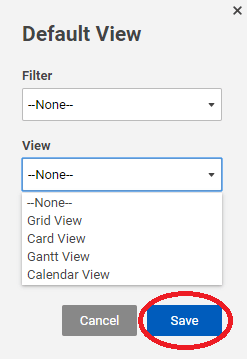
How to Set a Default Sharing View
If you want to set a default sharing view, then you must have the admin-level sharing permissions, or you should be the owner of the sheet.
There are various steps to set a default sharing view:
- First, to display the sharing window, click on the share
- Next, select collaborators so that the list of the current smartsheet user can be displayed.
- Next, we have to select the Edit button, which is at the right of the Default view.
- Select any view among all the view types such as Grid view, Card View, Gantt View, or Calendar View. We can also select default card view lanes and filter if needed.
- Click on the Save
Contacts in Smartsheet
In the Smartsheet, with the help of the contact feature, we can easily assign the task, and sharing of sheets with vendors, colleagues, and clients. In the Smartsheet, we have two kinds of Smartsheet contact list one, the account list, and another one is My Smartsheet Contacts. The account list is handled by the System Administrator. My Smartsheet Contacts are used to share a smartsheet with collaborator and customers who are not the part of the organization.
In the Smartsheet, contacts can also be imported from other email services such as Yahoo Mail, Gmail, Hotmail, etc.
How to Add Contacts to My Smartsheet Contacts
Bulk Import Contacts
There are various steps to import contacts:
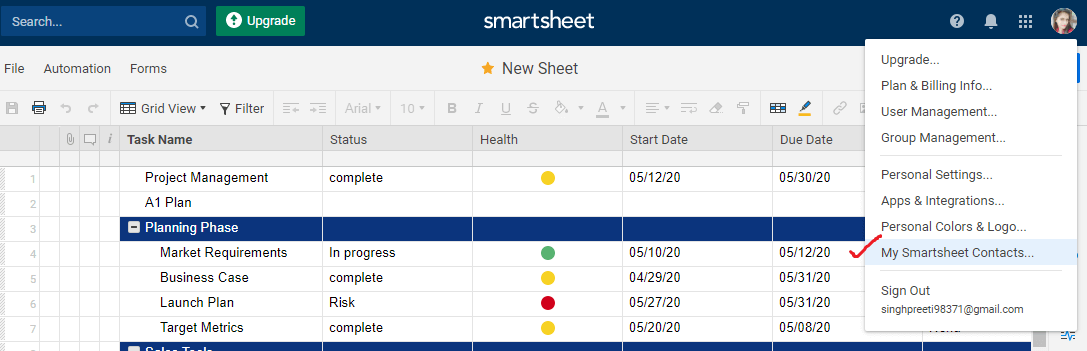
- First, click on the Account then click on My Smartsheet contacts.
- Next, click on the Import Contacts and choose Gmail, .csv (Yahoo, Outlook), or vcf (vCard File).
There are various steps which we have to follow for the kind of contact we want to import:
- Gmail: – Choose that contact, which we need to import into the smartsheet and click on the option named Import.
- .csv (Outlook, Yahoo, etc.): – Choose .csv file, and then click Continue. Select the contact, which we need to import into the smartsheet and click on Import.
- .vcf (vCard File): – Select vCard file, and then click on the Continue, and click on Import.
In your My Smartsheet, the contacts will be added.
Add Contacts Individually
There are various steps to add contacts individually:
- First, click on the Account.
- Click on the option named My Smartsheet Contacts.
- Next, click on the Add button in my smartsheet contact form, so that the contact window is displayed.
- Last, we have to type the contact name and the email address and then click on OK.


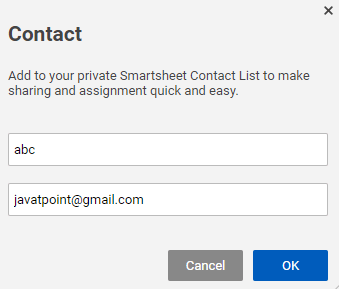
In the list of contacts, the new contact is added.
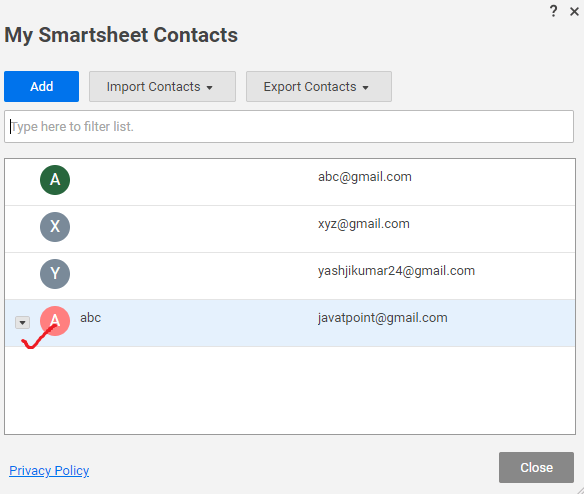
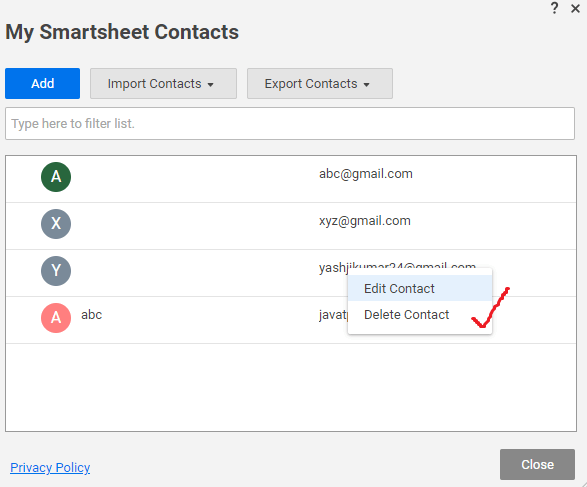
How to Edit or Delete Contacts in the Smartsheet
There are various steps to edit or delete contacts in the Smartsheet:
- Click on Account then click on the My Smartsheet Contacts. Then the My Smartsheet Contacts form will be display.
- Next, right-click on that contact, which you want to delete or edit and then Select the option named Edit Contact or Delete Contact.
How to Export Contact from your Smartsheet Contacts List
There are various steps to export contact from your smartsheet contacts list:
- Click on the Account.
- Then, click on the option named My Smartsheet contacts, and then the My Smartsheet Contact form will be displayed.
- Next, click on the option named Export Contacts and then click on .csv.

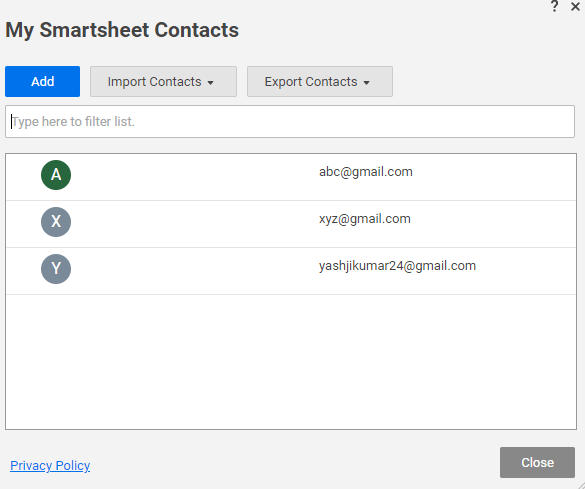
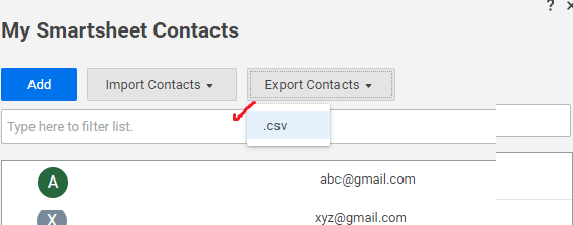
You will export the contacts from your my Smartsheet Contacts list as a.csv file to the place where the downloads are stored in the computer.
Groups in Smartsheet
In the Smartsheet, groups are created for providing easy and fast control access to sheets and workspaces. In a group, we can easily add new team members. We can also remove an existing member from the group if they leave the organization.
How to Create a Group in Smartsheet
There are various steps to create a group in Smartsheet:
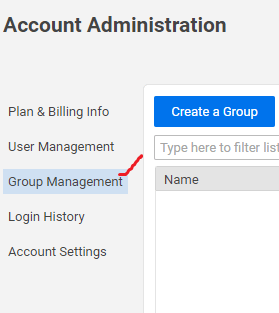
Step 1. First, click on the Account.
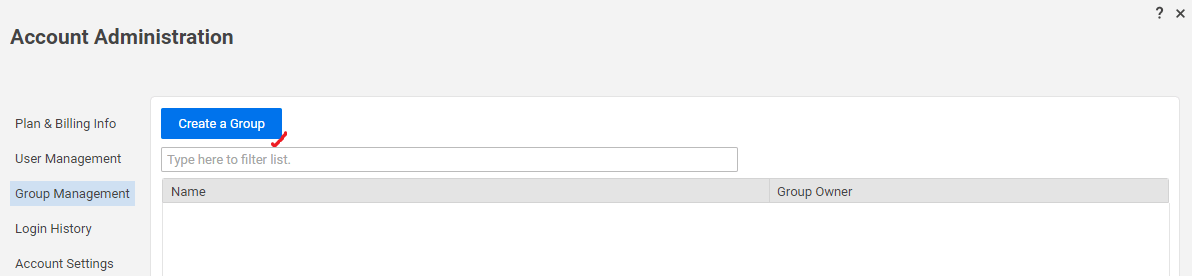
Step 2. Then, click on the option named Account Admin. After that, click on the Group Management option. Then the Group Management form will be displayed which contains the list of all the groups that are already present in the Smartsheet.
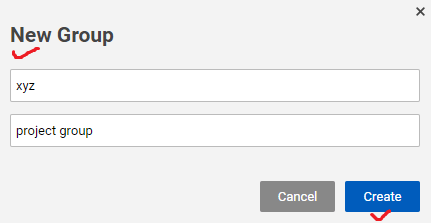
Step 3. Next, we have to click on the Create a Group button so that the New group form appears.
Step 4. Give a name to the group and also give its description.
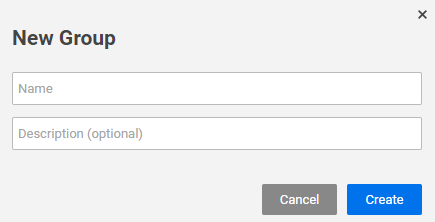
Step 5. Click on the Create option.
Then the form will display, and it contains the list of all the current team group members. By default, only your email address will be comprised to it.
Step 6. Click on the Add to Group button if you want to add new members into the group.
Step 7. Next, type the name and email address of the contact in the Smartsheet contact list, and the contact that we typed will be displayed in the drop-down list through auto-resolve.
We can type any kind of contact that we want. But the contact should not be a part of the multi-user plan or the current smartsheet user.
Then the form named Add to Group will be updated so that the contacts list which we selected will be displayed. Then, click on the Save button to finish the addition of the contacts to the group.
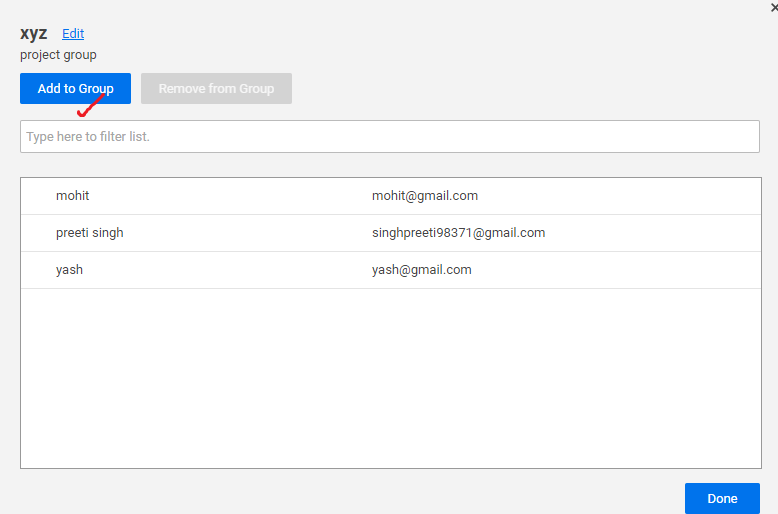
Step 8. Next, we will add all the desired contacts into the group and then click on the Save button.
How to Manage an Existing Group
With the help of the group owner or the system admin, a group can be managed.
There are various steps to manage an existing group:
Step 1. First, click on the Account.
Step 2. Then, click on the option named group management so that the existing contact list appears, which is created by the group admin.

Step 3. Next, to do a modification in the group, click on the drop-down arrow, which is present on the left side in the Account Administration box.
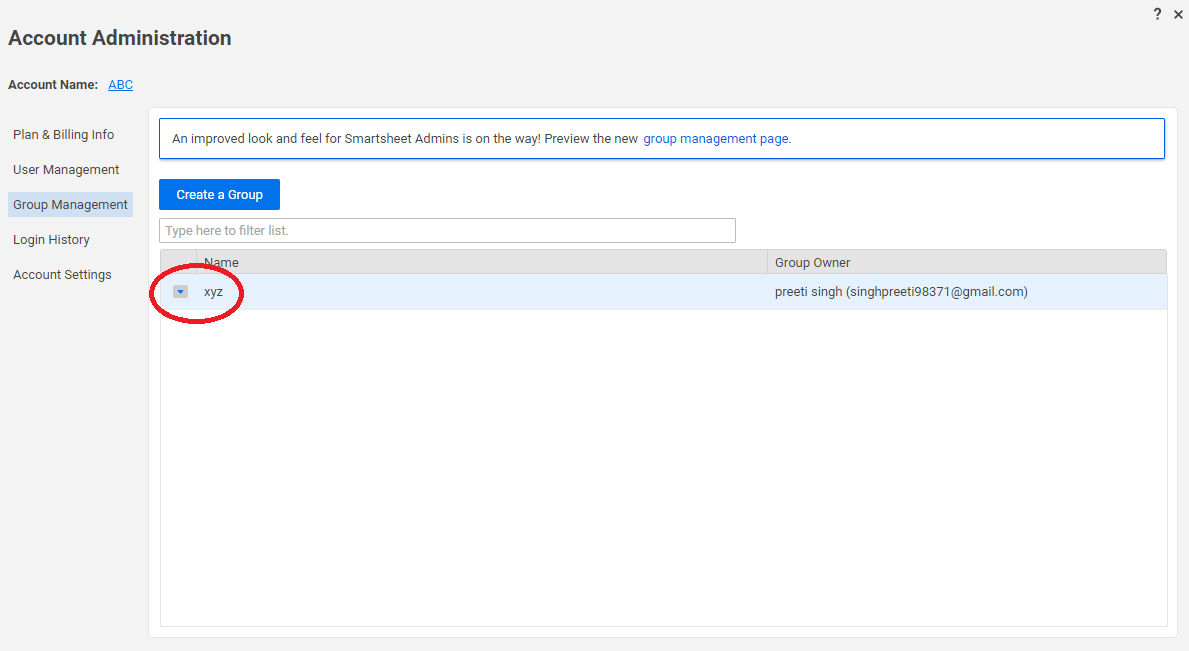
There are various options available to manage a group:
Edit Group: – The Edit group contains a list of members in the group. There are various operations we can perform with the edit group.
- Add Members to the Group: – By using the option named Add to Group, we can add the new contacts in the group.
- Remove Members from the Group: – By using the option called Remove from group, we can remove the contact from the existing group.
- Edit Group Name and Description: – Using the option named edit group name and description, we can edit the group name and the group description.
How to Share a Smartsheet Item with a Group
There are various steps to share a Smartsheet item with a group:
- First, click on the Share button, which is present at the right side of the Smartsheet window.
- Then, the Smartsheet sharing form will be open, and in this form in the Invite Collaborators box, we have to type the group name, or we can also click on the select contact icon so that the group name can be chosen from the list of the contacts.
Step 3. Last, we have to click on the share sheet button.
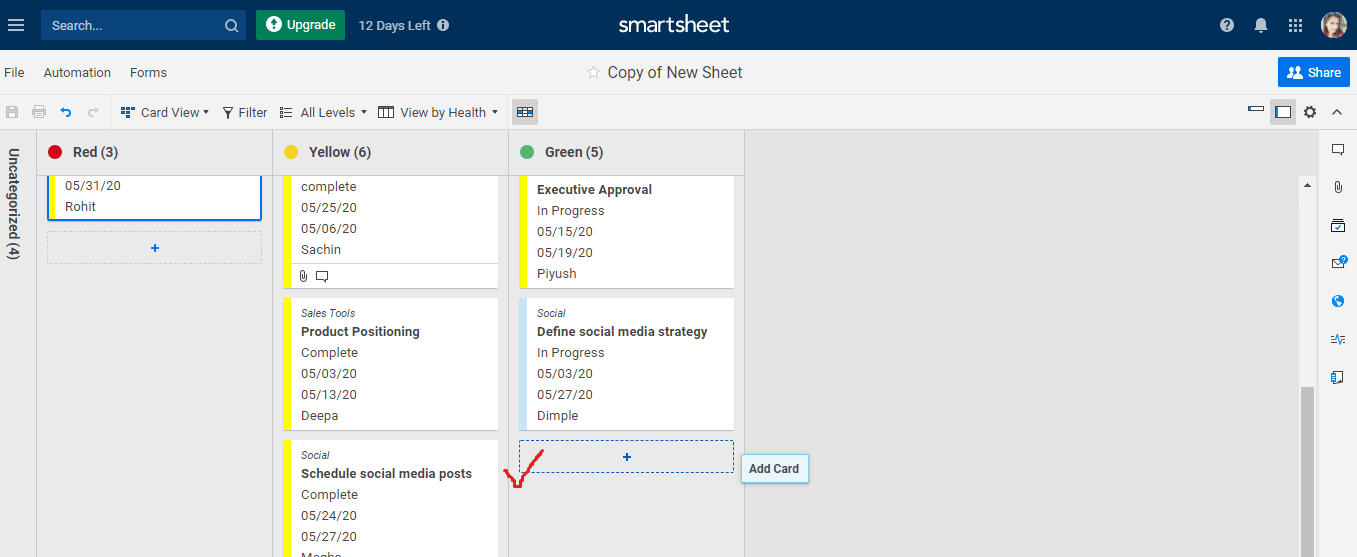
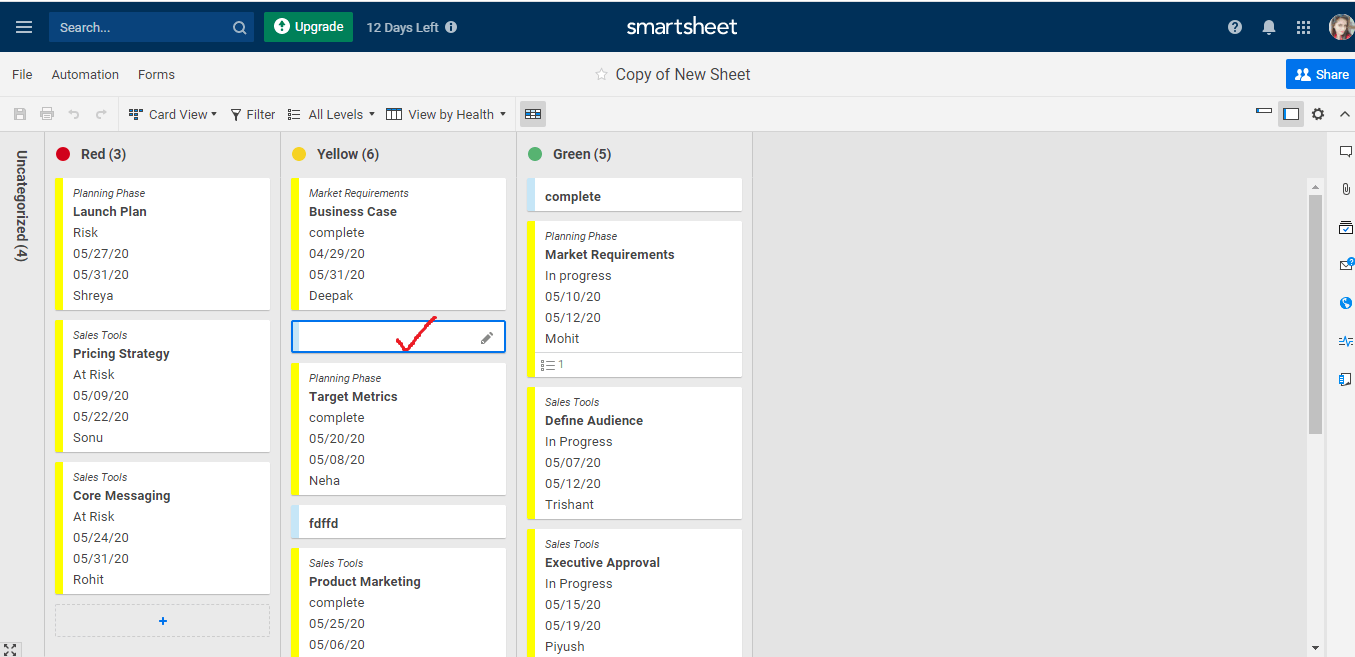
Card View in Smartsheet
There are four types of views used in Smartsheet. The card view is one of them. In the Smartsheet, the card view is used to view a sheet. With the help of card view, collaborators can easily share, see, and act on the projects together with the drag-and-drop cards so that work can be easily organized and prioritized. Card view is based on the agile project management methodology, but we can offer it to any team along with more visual methods so that the collaboration and communication can be done easily in the Smartsheet.
Card view is used for organization and prioritization of work. Card view is drived by the different column types such as contact list, drop-down list, and the symbol, which offer numerous selections.
Card view comprises information from the sheet’s rows and on the basis of the drop-down list values, it is grouped. With the help of drag and drop, a card can be re-ordered, and we can also customize the cards so that the different fields can be displayed.
In the Card View, with the help of the cards, work items or tasks are made up in our project. On the cards, field values show the information regarding the task. There are 10 fields in which the card can display 1 field for title filed, and the remaining 9 is used for other purposes.
There are some essential points about the card view:
- In the card view, the primary column in the sheet contains the title of the card.
- The information regarding the tasks is displayed by the fields on the card.
- The icon named reminders only appears if you set the reminder for the task in the Smartsheet.
- Comments and attachment icons are only displayed if the task contains these items.
How to Create a New Card
There are various steps to create a new card. We have to follow one of the following:
1. If we want to add the card in the lane:
- Click on the icon named Card icon, at the end of the card’s list.
- Right-click on the card and then click on the Insert Above or Insert Below.
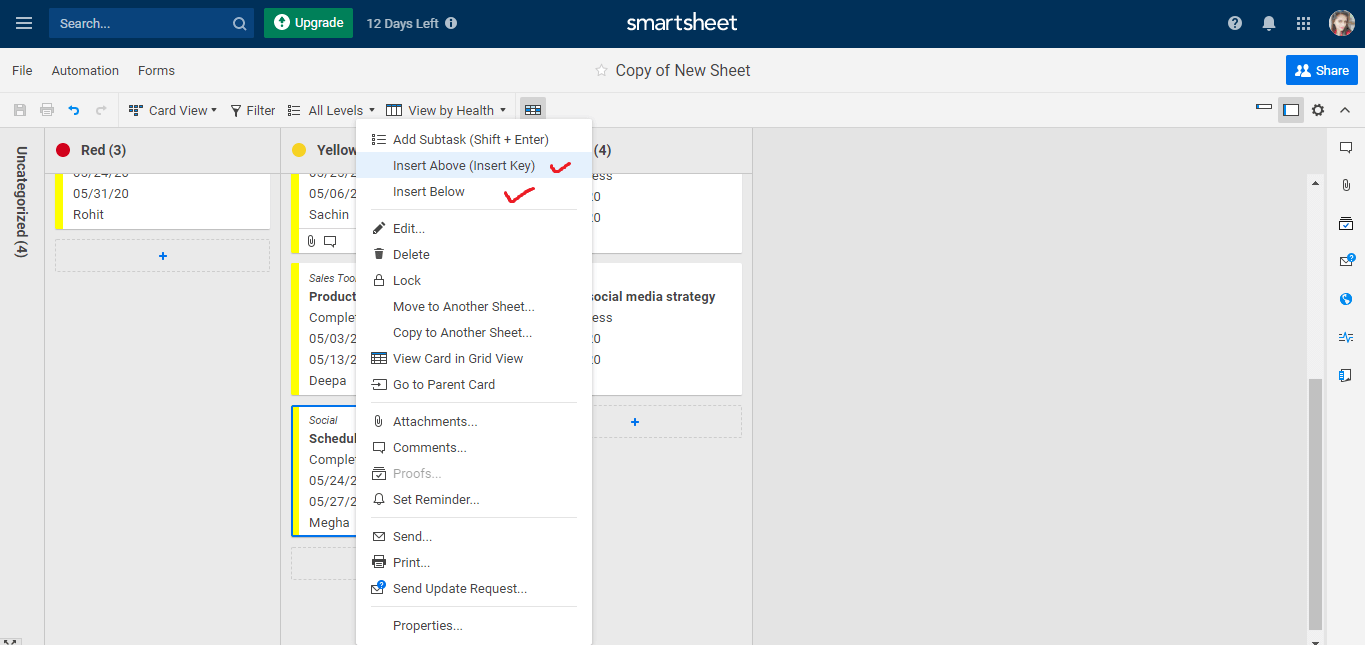
2. Then, fill the details in the edit form, and then click on the Enter button.
How to Edit a Card
Add Data to a Card
There are various steps to edit or add data to a card:
- First, double-click on the data which you want to edit or add, and then the Edit form will open.
- Next, make the changes which you want and then click the below figure shows the edit form after changes.
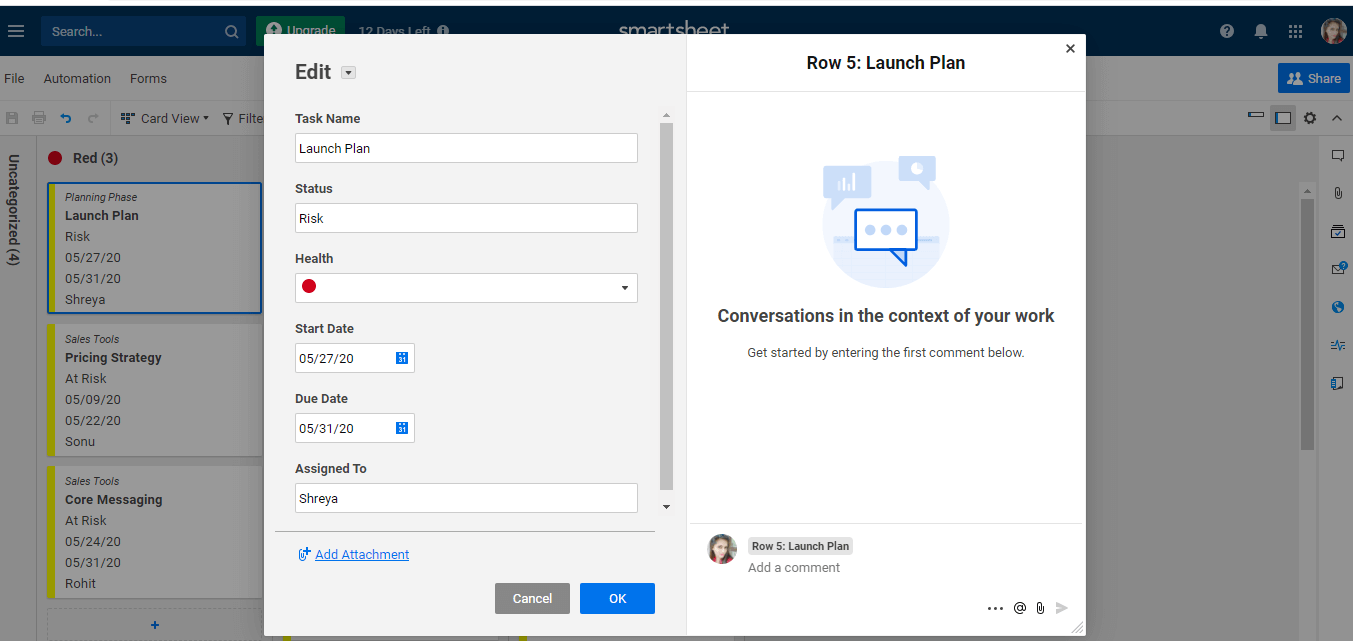
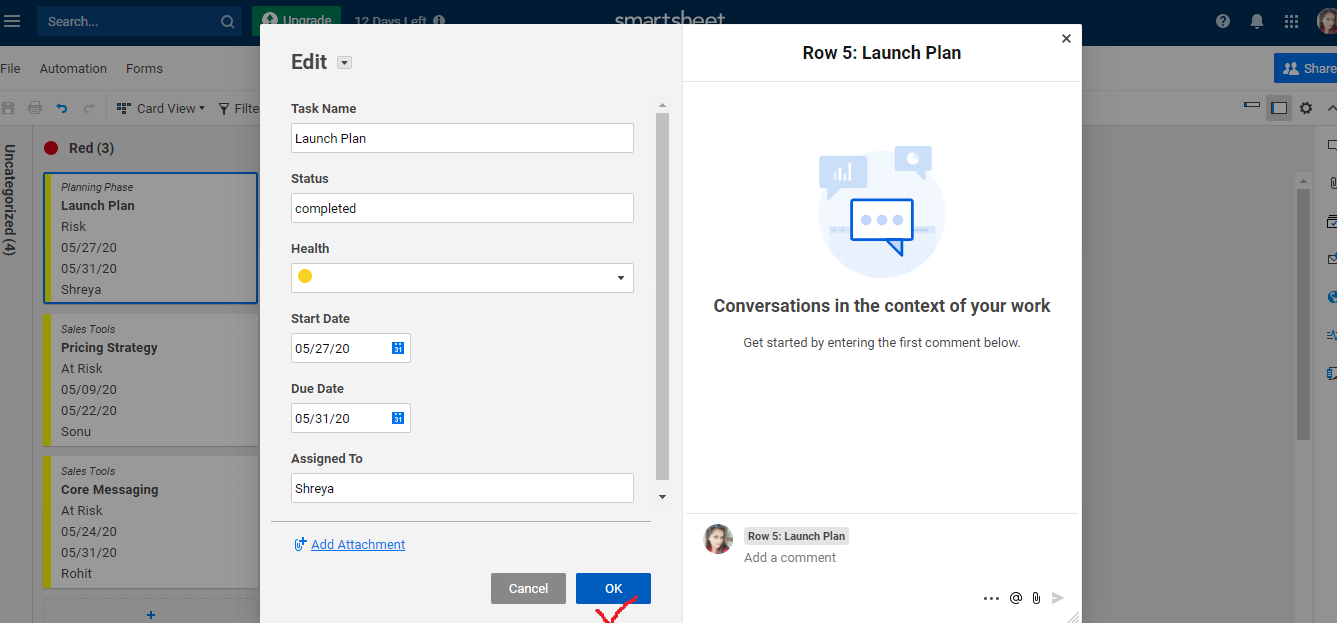
If we want to insert an image in a card, then first, remove the content of a field, or add a hyperlink then click on the arrow, which is next to the field name, which you need to edit.
How to Change a Color Bar for a Card
We have two ways to change a color bar for a card:
- Manually, we can change the color.
- Automatically with the help of the conditional formatting rule, we can change the color.
How to change a color manually
There are various steps to change the color manually:
- First, right-click on the edge of the card.
- Then, choose the color.
How to change a Card color automatically by using conditional formatting
We can change the color of the card automatically with the help of the conditional formatting only if we have the Admin or Owner-level sharing permissions.
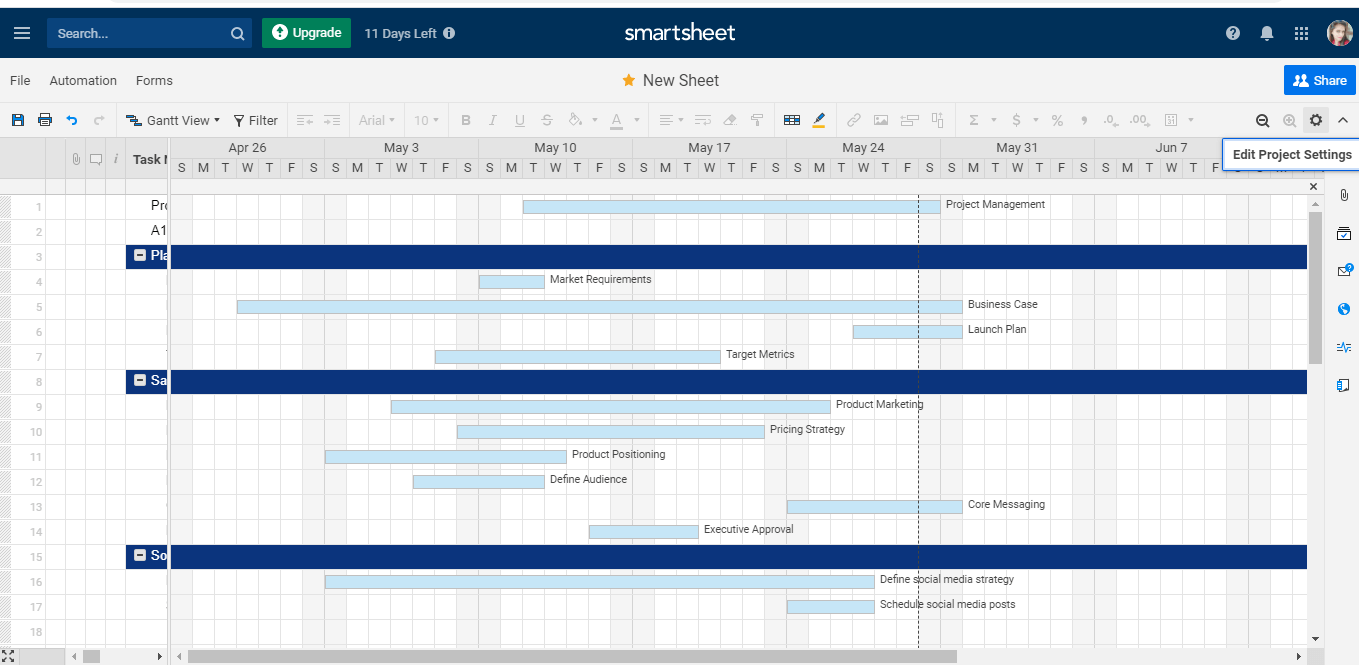
Basic Gantt View
Gantt view is another view which we used to view the sheet. Gantt’s view provides you a visual timeline of your work. We use a Gantt chart in the waterfall model. Gantt chart is useful when we want to see the visual representation of our schedule.
For Gantt view, it is must that in our Smartsheet, there are columns in which one contains a start date, and the second contains end date.
With the help of the Gantt chart, we can do the following:
- We can see the critical path of the project.
- We can use hierarchy so that we can create the rows summary to the further organization of the project.
- We can display the 100 % completion of our tasks.
- We can see the dependencies and also track the relationship between the tasks.
How to Add a Gantt Chart
There are various steps to add a Gantt chart:
- First, it is must that our sheet contains at least two date columns, the first column is used for the start date, and the second column is used for the end date.
- Then, in the toolbar, select the Gantt view icon so that the tasks appear in a timeline view based on their start date and finish date.
The Gantt chart will be displayed on the right side of the columns, and the divider divides the screen between the grid columns and the Gantt chart.
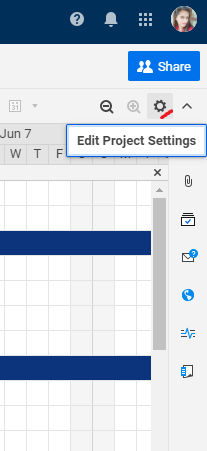
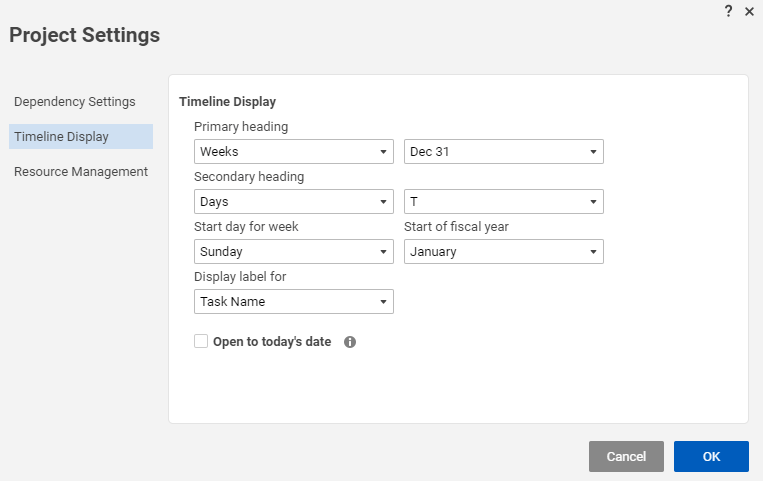
- Next, in the Gantt Chart header, click on the icon named Project Settings to check that the Gantt chart is using the appropriate columns for the start date and the end date.

Adjust the Project Settings
There are various steps to adjust the project settings:
- In the toolbar, click on the project setting icon.
- Then, the project setting form will appear.
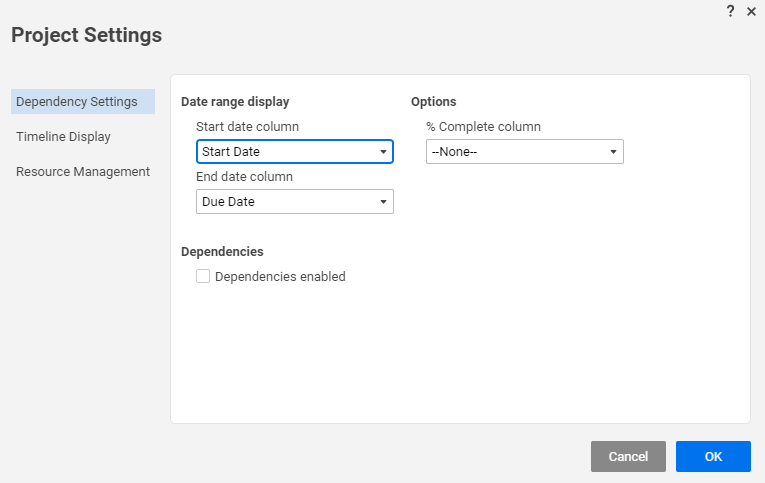
We can perform the following to the project setting:
- For the automatic calculation of the task duration, enable the dependencies.
- We can configure the holidays and non-working days.
- We can alter the Primary and Secondary Timeline Displays.

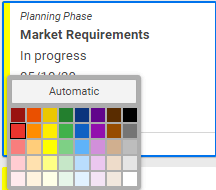
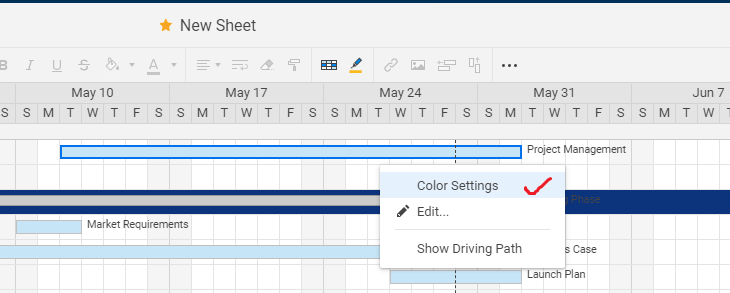
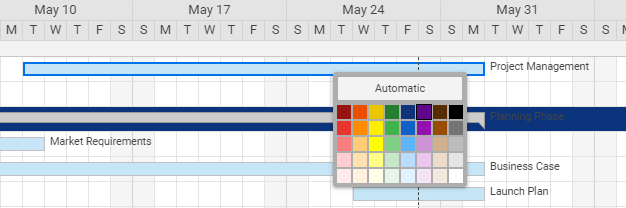
How to Apply Color to the Gantt Bars
If we want to change the color of the Gantt bar, follow the following steps:
- Right-click on that bar to change the color and select the option named Color Settings.
- Then, the color dialog box will appear, and then we can change the Gantt bar’s color.
How to Adjust the Gantt Chart Timeline
We have 4 timelines zoom levels in the Smartsheet such as day, week, month, quarter. If the person has sheet’s access than he/she can easily modify the timeline zoom level. So, if we want to modify the timeline zoom level then by clicking on the icon named Zoom in, or Zoom out that are present in the header of the Gantt Chart, we can modify.

Calendar View
The calendar view is another view which we use in Smartsheet. With the help of the calendar view, we can easily and interactively customize the view of our work on a calendar format. We can also overlay or publish the Smartsheet calendar on the Google calendar or Apple calendar.
In the Smartsheet, if you want to make a calendar, then it is must that we have one date column. As Grid view and Gantt view, the calendar view is also driven by the different column types in the sheet.
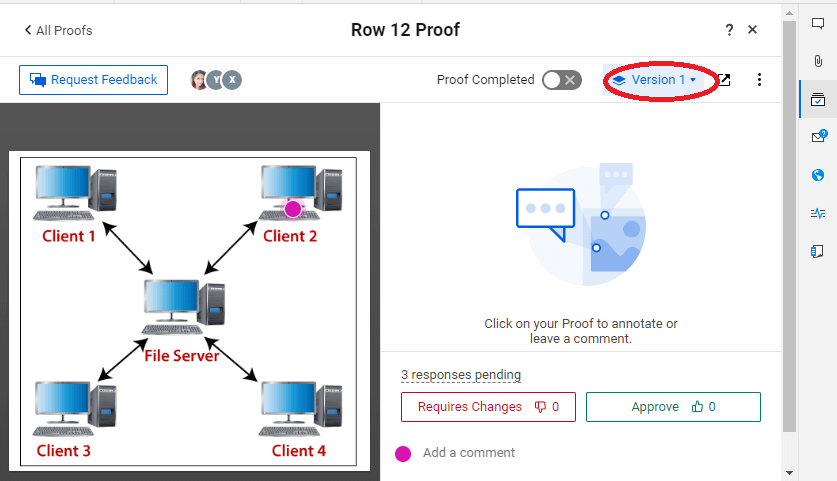
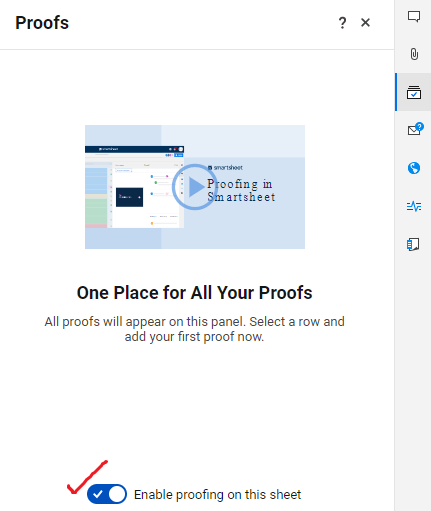
Proofing
In the Smartsheet, with the help of proofing, stakeholders can easily approve and review the team’s content. By using proofing features in the smartsheet, the team can upload the content, from the stakeholder’s request for the feedback, and get approvals by using a simple, streamlined approval process.
Proofing can be used:
- To provide particular information about a product design mock-up.
- Proofing is used to leave annotated comments and markups in PDFs and images.
- Proofing is used for review and annotate language modifications required on documents.
How to Enable Proofing on a Sheet
There are various steps to enable proofing on a sheet:
- First, click on the icon named Proofing, which is on the upper-right side of the window.
- Then, the Proofing panel will be displayed.
- Next, switch the Enable proofing on this sheet to on. The enable proofing on this sheet option is present at the bottom of the proofing panel.
- Then, the proof column will be added to the sheet, and the proof column is added to the right of the attachment column, and this column is used to upload proofs for the review.

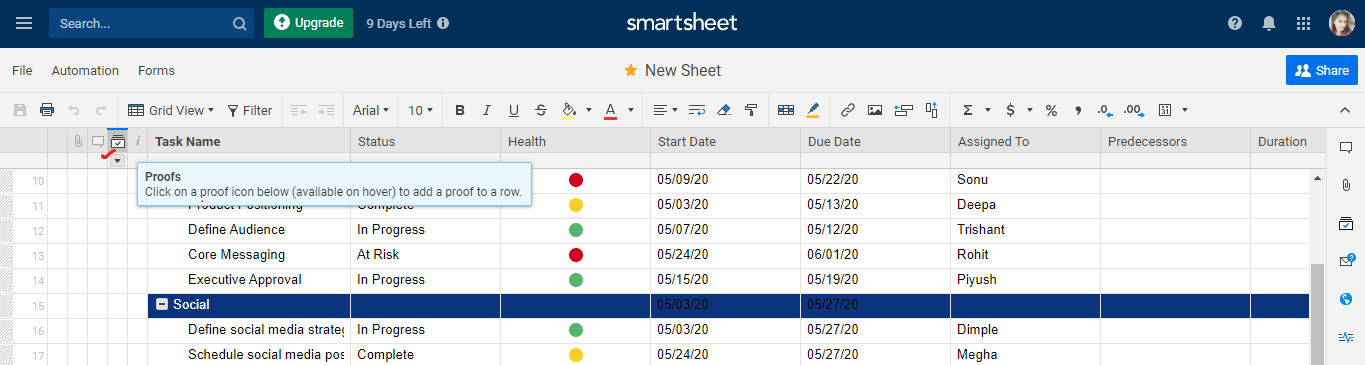
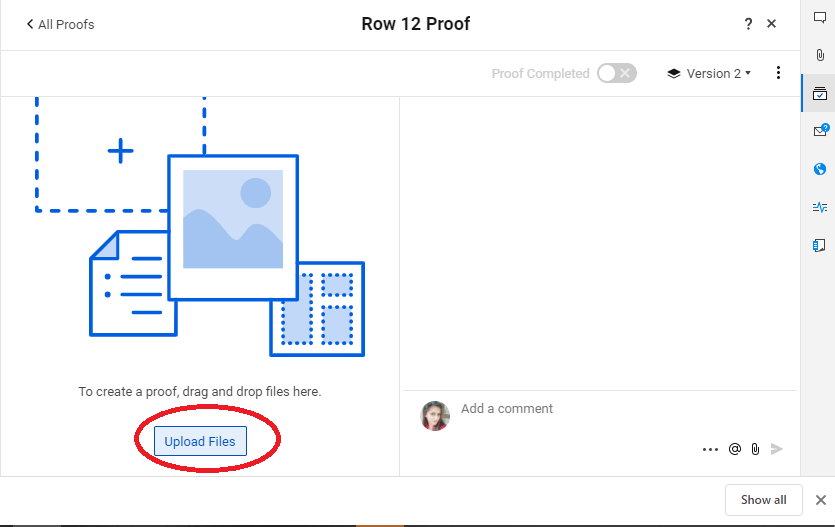
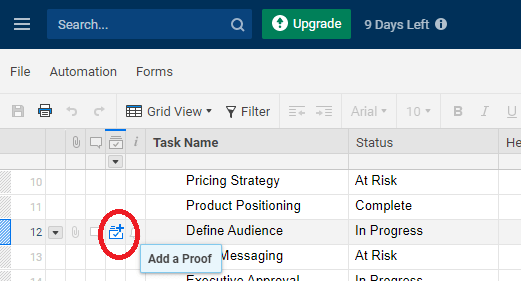
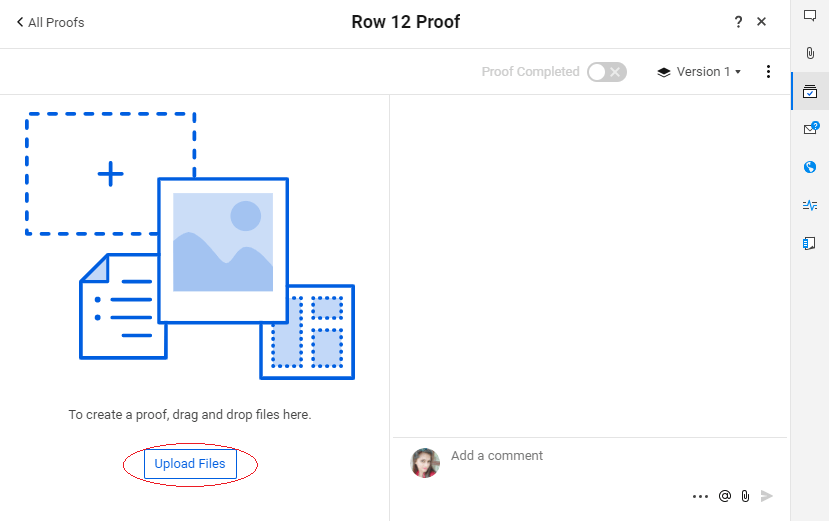
How to Upload a Proof
When proofing is enabled, then we can upload the proofs for review.
There are various steps to upload a proof:
- First, click on the Add a proof icon to that row where we want to add the proof so that the Proofs panel will be displayed. The upload file panel is present in the Proofs panel.
- Next, to locate and upload the file for proofing, click on the option named Upload File.
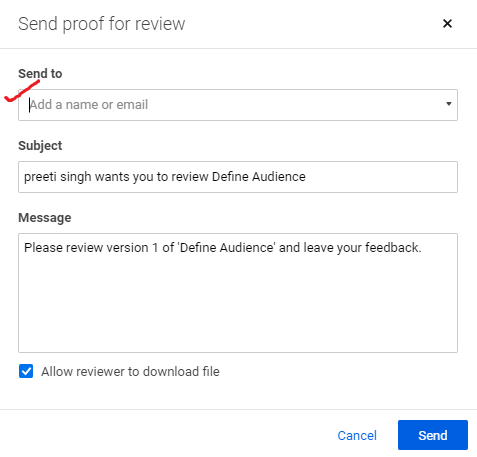
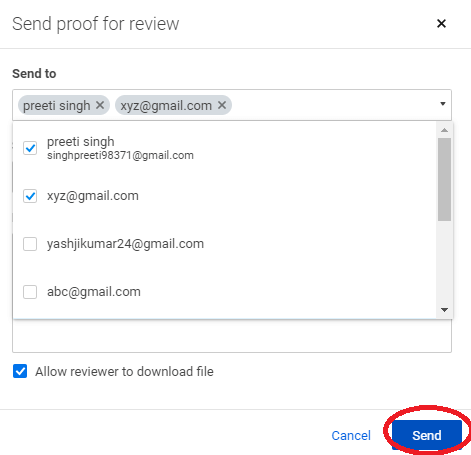
How to Create a Review Request
To receive a proof review request, it is must that a person has a valid email address.
There are various steps to create a review request:
- First, choose the proof which you need others to review then select the option named Request Feedback, present at the top of the proofing panel.
- Next, in the Send proof for review window, type the person’s name or email address which you need to review your proof.
- Next, we have to check the information contained in the Subject and the Message box to check that the information is the same that you want to send your reviewers.
- Then, click on the Send button.

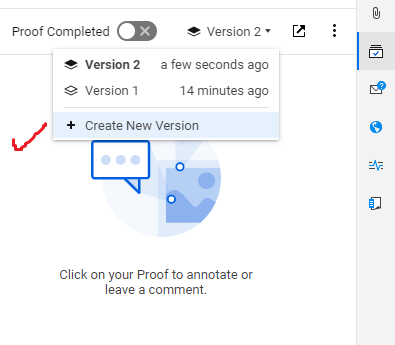
How to Upload a Version of a Proof
There are various steps to upload a version of the proof:
- First, click on the Version, present at the upper side of the right side of the proofing panel.
- Then, select the option named Create New Version.
- Next, we have to click on the option named Upload File button, present at the left side of the proofing panel.
- Last, choose the file from the computer which you want to upload and then upload (file can also be dragged from the upload section of the panel).