Spring Boot REST Example
The REST application follows the REST architectural approach. We use the REST application for developing and designing networked applications. It generates the HTTP request that performs CRUD operations on the data. Usually, it returns data in JSON or XML format.
Spring Boot REST API Example
In the following example, we are going to create a REST application. In this application, we have created a list of products and return the same list. It returns the data in JSON format.
Let’s implement it in RSET application and understand the REST approach by using the following steps.
Step 1: Open the Spring Initializr https://start.spring.io/.
Step 2: Select the Spring Boot version 2.3.0.M2.
Step 3: Provide the Group name. We have provided the Group name com.tutoraspire.
Step 4: Provide the Artifact. We have provided the Artifact spring-boot-rest-example.
Step 5: Add the Spring Web dependency.
Step 6: Click on the Generate button. When we click on the Generate button, it wraps all the specifications related to application into a Jar file and downloads it to the local system.
Step 7: Extract the jar file.
Step 8: Copy the folder and paste it in the STS workspace.
Step 9: Import the project.
File -> Import -> Existing Maven Projects -> Next -> Browse -> Select the folder spring- spring-boot-rest-example -> Select Folder -> Finish
It takes time to import the project. When the project imports successfully, we can see it in the Package Explorer section of the IDE.
Step 10: Create a model class in the package com.tutoraspire. We have created a model class with the name Product. In this class, do the following:
- Create five variable id, pname, batchno, price, and noofproduct.
- Create a default constructor.
- Generate Constructor using Fields.
Right-click on the file -> Source -> Generate Constructor using Fields -> Select All -> Generate - Generate Getters and Setters.
Right-click on the file -> Source -> Generate Getters and Setters -> Select All -> Generate
After completing all the steps, the model class looks like the following.
Product.java
Now, we need to create a controller.
Step 11: In the com.tutoraspire package, create a Controller. We have created a controller with the name ProductController.
- Annotate the class with the annotation @RestController.
- We have autowired the IProductService interface. We will create it in the next step.
- We have created a mapping /product by using the annotation @GetMapping.
- We have mapped a method getProduct() to the /product. The method returns a list of products.
ProductController.java
Step 12: Create an interface in the package com.tutoraspire with the name IProductService and define the findAll() method that returns a List of products.
IProductService.java
Step 13: Create a Service class. We have created a service class in the package com.tutoraspire with the name ProductService.
- Annotate the class with the annotation @Service and implements the IProductService interface.
- In this class, override the findAll() method by using the annotation @Override. The findAll() method of the ProductService class overrides the findAll() method of the IProductService interface.
- Create an object of ArrayList.
- Add the products in the ArrayList.
- Return the list of the products.
ProductService.java
Step 14: In the static folder (src/main/resources/static), create an HTML file. We have created an HTML file with the name index. In this file we have created a link of Get all Products.
index.html
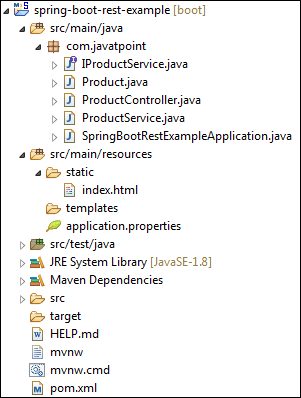
Now we have created all the files and folders. After creating all the files, the project directory looks like the fooling:
Let’s run the application.
Step 15: Open the SpringBootRestExampleApplication.java file and run it as Java Application. By default, it runs on port 8080.
SpringBootRestExampleApplication.java
When the application runs successfully, it shows the message, as shown below

Step 16: Open the browser and invoke the URL http://localhost:8080/index.html. It shows the link of Get all Products, as shown in the following image.

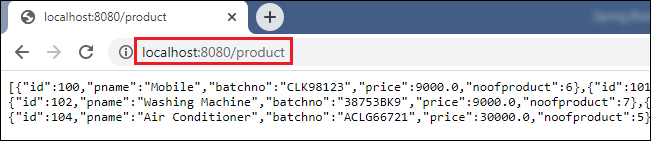
Click on the link Get all Products. It returns a list of products in JSON format and the URL change to http://localhost:8080/product.