Understanding the need for Spring Cloud Bus
Step 1: Select the project spring-cloud-config-server and run the SpringCloudConfigServerApplication.java file.
Step 2: Select the project limits-service and run the LimitsServiceApplication.java file.
Step 3: Open the browser and type https://localhost/8080/limits. It returns the following response:
We are getting these values from the limits-service-qa.properties file, because we have configured this file into the bootstrap.properties file of the limits-service.
In the next step, we will create one more instance of LimitsServiceApplication.
Step 4: Create an instance of LimitsServiceApplication.
Right click on the limits-service project -> Run As -> Run Configurations… -> Right-click on the LimitsServiceApplication -> Duplicate -> Rename the application name to LimitsServiceApplication8081 -> Click on the Arguments tab -> Provide the VM arguments: -Dserver.port=8081 -> Run.
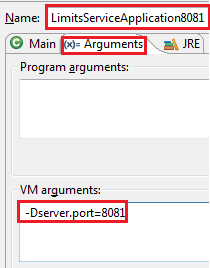
An instance of LimitsServiceApplication will run on port 8081.
Step 5: Open the browser and invoke the URL http://locahost:8081/limits. It returns the same response as the original limits-service sends.
The two instances of limits-service up and running.
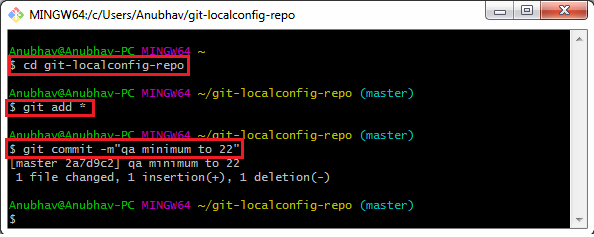
Step 6: Make the changes in the limits-service-qa.properties, we have changed the minimum value from 2 to 22.
limits-service-qa.properties
We are required to commit the changes.
Step 7: Open the Git Bash and run the following commands:
Again, invoke the URLs http://localhost:8080/limits and http://localhost:8081/limits. Both the URLs return the old values, while we have committed the values in the Git repository. It does not reflect the values in the limits-service. To make the changes in the limits-service, we will use Postman.
Note: Before moving to the next step, remove the security from the limits-service.
Step 8: Open limits-service.properties file and disable the security by using the following statement.
Again, set the old values in the limits-service-qa.properties file and commit the changes.
Step 9: Open the Postman and send a POST request with the URL http://localhost:8080/application/refresh.
Note: If you are invoking the URL http://localhost:8080/limits and it does not return the new values. So to get the new values on invoking the URL http://localhost:8081/limits, you have to do the following:
Open the Postman and send a POST request with the URL http://localhost:8081/application/refresh.
Step 10: Invoke the URLs http://localhost:8080/limits and http://localhost:8081/limits. Now both the URLs return the changed value.
We have created the two instances of the limits-service. Suppose there are a hundred instances of the limits-services that are running in parallel. We need to invoke a hundred URLs to refresh the configuration from the Git repository.
Invoking a hundred URLs is not as easy as the number of limits-service increases. Along with this, the maintenance headache for the service also grows.
Whenever we make the changes in the configurations, it must reflect changes in the microservices. Here, the Spring Cloud Bus provides the solution for this, so we do not need to call hundred URLs.
Spring Cloud Bus provides a URL for all the hundred instances. When we invoke that URL, all the instances of the microservices would be updated with the latest values from the Git configuration.
In the next step, we will implement the Spring Cloud Bus.