UNINSTALLING XAMPP COMPLETELY
XAMPP is an open-source software package developed by Apache Friends, which plays the role of a local host used to test raw websites for their validation before their deployment to the web. It includes a stack of software that provides a suitable environment for web development and testing. The process of installing XAMPP over different platforms under various formats was discussed in the earlier articles. In this article, we will discuss the difficulties faced during uninstallation and the process to be followed for completely removing XAMPP from the system.
Complications faced while Uninstalling XAMPP
Multiple installed files and large storage of data are usually the main reasons causing difficulty for people to remove XAMPP successfully from their systems. Numerous issues often faced by users during this process are mentioned below:
- Even if the main application i.e., XAMPP, is deleted from the system, the correlated files and folders like Apache, php, MySQL, Mercury, etc. are left on the computer and cannot be removed.
- While uninstalling XAMPP, the process of removal might freeze.
- It is very hard to coercively remove the program’s leftovers present on the hard drive
- One may keep getting an error notification pop up while trying to uninstall the application.
The problems encountered while removing XAMPP are usually above the understanding of many users. Thus, such complications cannot be handled via troubleshooting. In order to remove XAMPP adequately without facing hindrance by such issues, the below-mentioned process can be followed to learn the effective ways.
Conventional and Manual ways to Uninstall XAMPP
Here two methods of uninstalling XAMPP effectively from your systems will be discussed. Opting any of these methods will lead to successful uninstallation of the software without any remains or errors.
1. Conventional Method
This method makes use of Windows Uninstall Feature. Follow the steps sequentially for correct results:
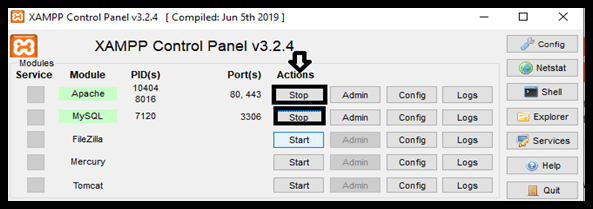
Step 1- Stop Apache and MySQL before beginning the process. This can be done by clicking the “Stop” button corresponding to the respective modules in the XAMPP Control Panel.
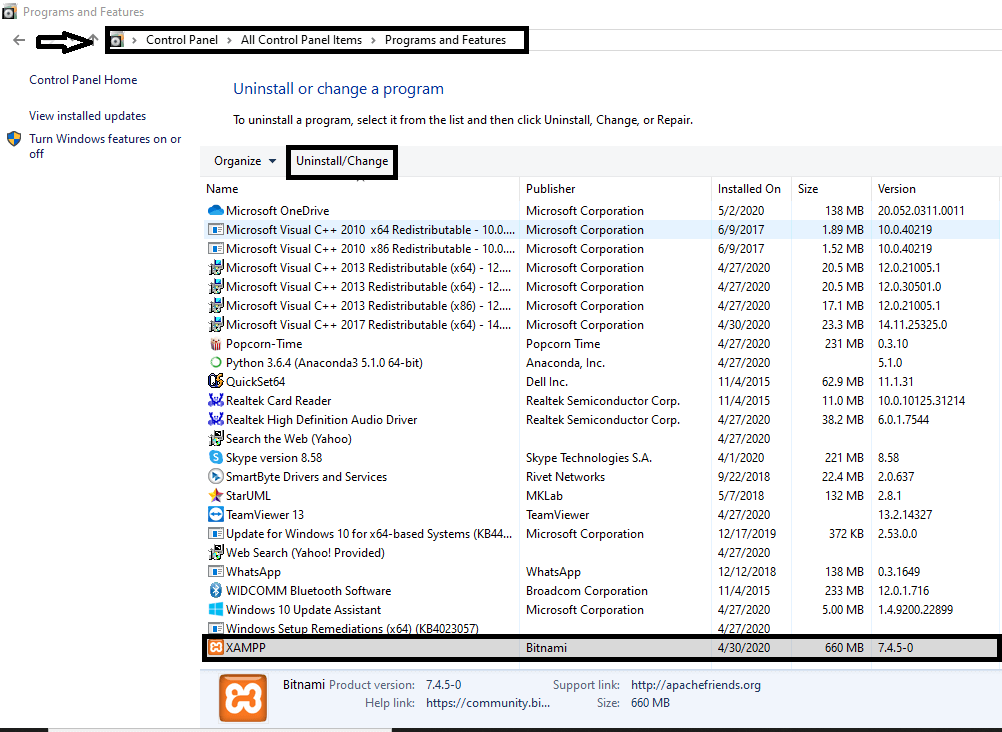
Step 2- Go to the Windows button and search “Control Panel.” The Control Panel opens.
Step 3- Once the Control Panel opens, navigate the path, as shown in the below image:

Step 4- By typing “X,” you can locate XAMPP in the list of programs, then click on “Uninstall/Change.”
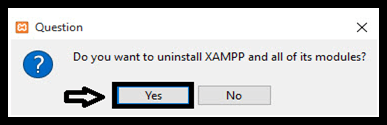
Step 5- To start the process of Uninstalling XAMPP and all its modules, click “YES.”
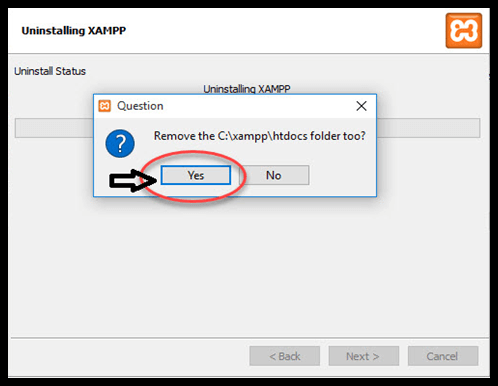
Step 6- For effectively removing XAMPP, click “YES” again when asked to remove it from C:xampphtdocs folder.
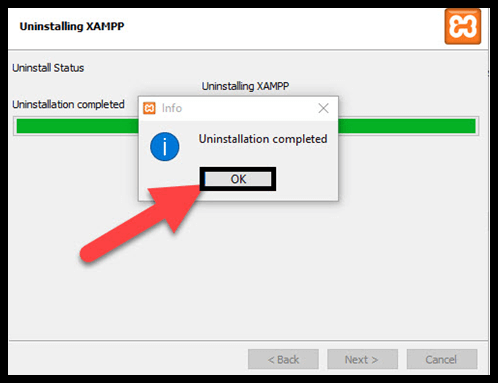
Step 7- The set-up wizard starts to uninstall the application. This process might consume a few minutes. Once it is complete, click “OK.”
Step 8- Restart your system. Search for “Regedit” through Windows Search Box and open the Registry Editor on your computer. Check all registry keys and delete the entries linked to XAMPP.
2. Manual Method
This method uses the default approach of the Application’s Uninstall process. The steps mentioned below should be followed for adequate results.
Step 1- Stop Apache and MySQL before beginning the process. This can be done by clicking the “Stop” button corresponding to the respective modules in the XAMPP Control Panel.
Step 2- Navigate to the following path through Windows Search Box.
Step 3- Once the Uninstallation Wizard appears, to start the process of Uninstalling XAMPP and all its modules, click “YES.”
Step 4- For effectively removing XAMPP, click “YES” again when asked to remove it from C:xampphtdocs folder.
Step 5- The wizard pop-up starts to uninstall the application. This process might consume a few minutes. Once it is complete, click on “OK.”
Step 6- For the final step, go to the program’s install directory and make sure it has been deleted. Just like the previous method, open “Regedit” the Registry Editor and remove all registry entries related to XAMPP.
Few files and folders cannot be discarded completely during the uninstallation. In order to totally remove XAMPP opting for the traditional or manual method, one should check those residues again and remove them from the system manually. This would help to verify the successful uninstallation of the application and help avoid any issues while re-installing for future use.