Angular Unit Testing
Testing the Angular application helps us to that your app is working or not as you expected. The test documentation provides some techniques for unit and integration testing Angular applications by a sample application created by Angular CLI.
Prerequisites
If You have a basic understanding of the below concepts before writing test cases for the Angular App, it would help:
Angular Basics
- Javascript
- HTML
- CSS
- Angular CLI
You can explore the test code in your browser while reading the guide for practical experience.
If you want to experiment with the application described in this guide, you can run it in the browser or download and run it locally.
Set-Up Test
Angular CLI downloads and installs everything we need to test Angular applications with the Jasmine Test Framework.
The project you create with the CLI is ready for testing. Run the ng-test cli command:
The ng-test command makes the application in watch mode and launches the karma test runner.
The console output looks like this:
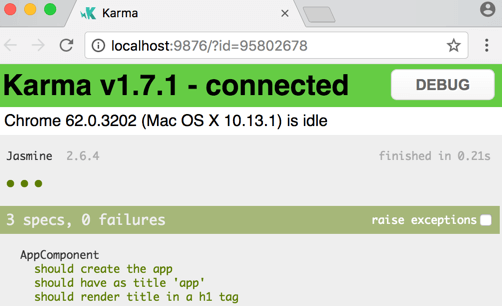
A Chrome browser opens and displays the “Jasmine HTML Reporter” test output like this.
You can click the test row to re-run only that test or click Details to re-run the tests in the selected test group (“test suite“).
The ng-test command is watching the changes.
To see it in action, make a small change in app.component.ts. The tests run again, and the new test results appear.
Configuration
You can fine-tune several options by editing the karma.conf.js files in the project’s root folder and the test.ts files in the src/ folder.
The karma.conf.js file is a type of configuration file. The CLI creates a whole runtime configuration in memory based application structure specified in the angular.json file implemented by karma.config.js.
Other Test Frameworks
You can also test an Angular application with other test libraries and test runners. Each library and runner has its own specific installation procedures, configuration, and syntax.Search the web to learn more.
Test File Name and Location
Look inside the src/app folder.
The CLI generated a test file for appComponent called app.component.spec.ts.
- The test file extension is .spec.ts so that the tooling can recognize it as a test file (AKA, a specific file).
- The app.component.ts and app.component.spec.ts files are in the same folder. The root file name (application component) is the same for both the files.
- Follow these two conventions in your projects for each type of test file.
- It places your specific file next to the file it tests.
- Such tests are readily available.
- You can see at a glance that any part of your application is lacking in tests.
- Testing around can reveal how a part performs in context.
- When you rename the source file, you have to remember to rename the test file.
- Put your specific files in a test folder.
Application integration specs can test the interactions of multiple parts of folders and modules. It is better to create a suitable folder for them in the test directory.
The specifications that the test assistant is testing are in the test folder next to their respective files.
Set-Up Continuous Integration
Best ways to keep your project bug-free is by test suites, but it is easy to forget to run tests all the time. Continuous Integration (CI) Server lets us set up your project repository so that we can test every commit and pull request.
There are paid CI services like Circle CI and Travis CI, and you can host your code with the help of Jenkins. Circle CI and Travis CI are paid services, and they provided free of charge for open-source projects. Contributions to the Angular repository are run by the entire suite of Circle CI tests.
Configure Project for Circle CI
Step 1: Create a folder .circleci at the project root.
Step 2: Create a file named config.yml with the below content in the new folder:
The configuration caches node_modules/ uses npm run to run CLI commands, because @angular/cli is not installed globally. The double dash (–) is used to pass arguments to the npm script.
Step 3: Commit the changes and push it to the repository.
Step 4: Sign up for Circle CI and add your project there. Your project will start building.
Configure project for GitLab CI
Step 1: Create a file named .gitlab-ci.yml at the project root.
The configuration caches node_modules/ in the install job and reuses the cached node_modules/ in the test job.
Step 2: Sign up for GitLab CI. You will need to push a new commit to trigger a build.
Step 3: Commit your changes and push it to the repository.
Configure project for GitHub Actions
Step 1: Create a folder called .github/workflows at the root of your project
Step 2: Create a file named main.yml with the below content at the new folder:
Step 3: You will need to push a new commit to trigger a build.
Step 4: Commit your changes.
Configure CLI for CI Testing in Chrome
You may have to adjust your configuration to run Chrome browser tests, while the CLI command ng-test runs CI tests in your environment.
We are using headless Chrome in the below examples:
Now, run the command to use the –no-sandbox flag:
Note: You have to include the –disable-GPU flag if you’re running these codes on Windows.