Polygon Command
A polygon is a figure formed by the finite number of line segments connected to form a closed circuit.
The categories of the polygon are triangle, quadrilateral, pentagons, hexagon, heptagon (or septagon), octagon, etc. The triangle is a figure with three sides, and an octagon is a figure with eight sides.
The polygon command is used to create polygons in AutoCAD. We need to specify the number of sides to create a polygon.
The maximum number of lines available to create a polygon is 1024
The shortcut command to create a polygon is ‘pol’.
Types (Methods to use Polygon)
There are two types of the polygon, which are given below:
1. Inscribe in Circle
The polygon formed will be drawn inside the circle. The command is best used when we want to create any polygon with its vertices or corners touching the circle.
The shortcut command for inscribing is I.
2. Circumscribe about Circle
The polygon formed will be drawn outside the circle. The shortcut command for circumscribing is C.
Note: A polygon can also be drawn inscribe or circumscribe without the circle.
Let’s understand inscribe and circumscribe with two examples.
Example 1: We will consider the pentagon as a polygon for this example.
The image for such an example is shown below:

Example 2: We will consider hexagon as a polygon for this example.
The image for such an example is shown below:

Examples to create polygon
Example 1:
The steps to create a pentagon (polygon with five sides) are listed below:
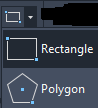
1. Select Polygon from the drop-down list of the Rectangle present on the ribbon panel, as shown in the below image:
Or
Type POL on the command line and press Enter.
2. Specify the number of sides of a polygon. Here, we are creating a pentagon, so we will enter 5.
3. Press Enter.
4. Specify the center of polygon on the viewport or workspace.
5. Enter I or C for Inscribe or Circumscribe.
6. Press Enter.
7. Specify the radius of the polygon. For example, 4.
8. Press Enter. The polygon will be drawn, as shown in the below image:

Example 2:
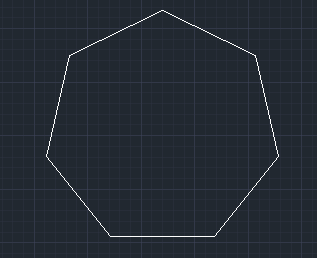
The steps to create a heptagon (polygon with seven sides) are given below:
1. Select Polygon from the drop-down list of the Rectangle present on the ribbon panel, as shown in the below image:

Or
Type POL on the command line and press Enter.
2. Specify the number of sides of a polygon. Here, we are creating a heptagon (also called Septagon), so we will enter 7.
3. Press Enter.
4. Specify the center of polygon on the viewport or workspace.
5. Enter I or C for Inscribe or Circumscribe.
6. Press Enter.
7. Specify the radius of the polygon. For example, 5.
8. Press Enter. The polygon will be drawn, as shown in the below image:
Combined polygons
We can also combine two or more polygons by specifying the edge of the corresponding polygon.
Let’s understand with an example.
The example consists of three pentagons joined together.
The steps for such an example are listed below:
1. Type POL on the command line and press Enter.
2. Specify the number of sides. For the pentagon, we will specify 5.
3. Press Enter.
4. Specify the center of polygon on the viewport or workspace.
5. Enter I or C for Inscribe and Circumscribe.
6. Press Enter.
7. Specify the radius of the polygon. For example, 4.
8. Press Enter. The polygon will be drawn, as shown in the below image:

Now, the steps to create a second pentagon combined with the first.
9. Type POL on the command line and press Enter.
10. Specify the number of sides, 5.
11. Press Enter.
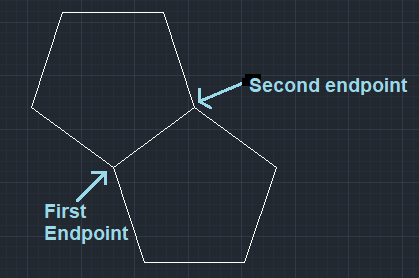
12. Type E (Edge) and press Enter.
13. Specify the first and second endpoint of the edge of the first polygon through the cursor, as shown in the below image:
Now, the steps to create a third pentagon combined with the first and second polygons.
14. Type POL on the command line and press Enter.
15. Specify the number of sides, 5.
16. Press Enter.
17. Type E (Edge) and press Enter.
18. Specify the first and second endpoint of the edge of first polygon through the cursor, as shown in the below image:

We can specify any two endpoints according to the requirements.
Note: If we want to specify a significant value to create a polygon, we can determine the limits for that.