89
Install JfreeChart
The latest version of JfreeChart can be downloaded from:
- There are two versions of the JFreeChart. Download according to your operating system.
| File: | Description: |
|---|---|
| jfreechart-1.0.19.tar.gz | JFreeChart for Linux/Unix. |
| jfreechart-1.0.19.zip | JFreeChart for Windows. |
- After downloading JFreeChart, you need to extract the files at a convenient directory from where required libraries can be linked into your Java program.
- We assume that you have already installed java 1.7.0_60version (jdk1.7.0_60) on your machine before installing JfreeChart.
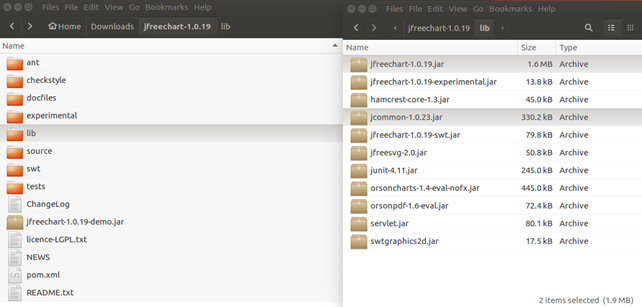
- The top-level directory (jfreechart-1.0.19) contains the files and directories listed in the following table:
| File/Directory | Description |
|---|---|
| Ant | A directory containing an Ant build.xml script. You can use this script to rebuild JFreeChart from the source code included in the distribution. |
| checkstyle | A directory containing several checkstyle property files. These define the coding conventions used in the JFreeChart source code. |
| experimental | A directory containing source files for classes that are not part of the standard JFreeChart API. |
| Gjdoc | A directory containing a script to generate the JFreeChart API documentation using the gjdoc utility. |
| Lib | A directory containing the JFreeChart jar file, and other libraries used by JFreeChart. |
| Source | A directory containing the source code for JFreeChart. |
| Swt | A directory containing the source code for the experimental SWT code. Please note that the API for these classes is subject to change. |
| Tests | A directory containing the source code for the JFreeChart unit tests. |
| ChangeLog | A detailed log of changes made to JFreeChart. |
| jfreechart-1.0.19-demo.jar | A runnable jar files containing demo applications. |
| licence-LGPL.txt | The JFreeChart licence (GNU LGPL). |
| NEWS | Project news. |
| README.txt | Important information – read this first! |
- The following image shows the structure of the directories and files –
- Once the downloaded file is unpacked to the directory of your choice, the classpath of any application using JFreeChart needs to point at least to the jfreechart-1.0.19.jar and jcommon-1.0.23.jar files.
- You can add these JAR files to your favorite IDE’s project.
- In case of installation outside of an IDE, Java SE allows wildcards to be used for specifying JARs in classpaths, so the JARs in the JFreeChart lib directory can be included with a single *.jar expression in the classpath.
- Add complete path of jfreechart-1.0.19.jar and jcommon-1.0.23.jar files to the CLASSPATH shown below:
For windows: Append the Strings “C: jfreechart-1.0.19lib jfreechart-1.0.19.jar” and “C: jfreechart-1.0.19lib jcommon-1.0.23.jar” to the end of the user variable CLASSPATH.
For linux: Export CLASSPATH=$CLASSPATH: /usr/share/jfreechart1.0.19/lib/jfreechart-1.0.19.jar: /usr/share/jfreechart-1.0.19/lib/jcommon1.0.23.jar
-
- For building and running JFreeChart in an IDE such as “ECLIPSE”, we have briefly outlined the steps needed to setup a Java project so that you can create your own JFreeChart graphs.
Steps:
- Start Eclipse OXYGEN (If you do not have Eclipse installed, visit “www.eclipse.org” for downloading the latest version.)
- Go to File -> New -> Project.
- Select “Java Project” and click on Next.
- Enter in a project name and click Finish.
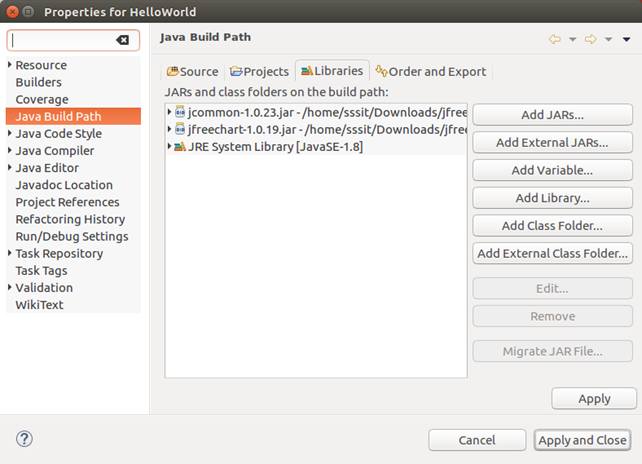
- Select the project in the Package Explorer view. Go to Project -> Properties.
- Click on “Java Build Path” on the left-hand side of the dialog box and on the right-hand side click on the “Libraries” tab.
- Click on “Add External JARs” and locate jfreechart-1.0.19.jar and jcommon-1.0.23.jar, Click on OK.
- The following image shows the property window after adding the external jar files for JFreeChart.
- Select the project in the Package Explorer view. Go to File -> New -> Package. Give the package a name and click on Finish.
- Select the newly-created package in the Package Explorer view. Go to File -> New -> Class. Give the class a name and click on Finish.
- You are now ready to use the JFreeChart library!
- To establish a connection between JFreeChart library and MySql database you need to set the classpath to “mysql-connector-java-5.0.8-bin.jar”.
Next TopicJfreechart’s key classes