Spring Boot Caching
Spring Framework provides caching in a Spring Application, transparently. In Spring, the cache abstraction is a mechanism that allows consistent use of various caching methods with minimal impact on the code.
Cache Abstraction
The cache abstraction mechanism applies to Java methods. The main objective of using cache abstraction is to reduce the number of executions based on the information present in the cache. It applies to expensive methods such as CPU or IO bound.
Every time, when a method invokes, the abstraction applies a cache behavior to the method. It checks whether the method has already been executed for the given argument or not.
- If yes, the cached result is returned without executing the actual method.
- If no, first, the method executes, and the result is cached and returned to the user.
Note: This approach works only for the methods that are guaranteed to return the same result for a given input. It does not matter how many times the method executes.
The developers take care of two things while working with cache abstractions.
- Cache Declaration: It identifies the methods that need to be cached.
- Cache Configuration: The backing cache where the data is stored and read from.
Caching
Caching is a part of temporary memory (RAM). It lies between the application and persistence database. It stores the recently used data that reduces the number of database hits as much as possible. In other words, caching is to store data for future reference.
Why should we use the cache?
The primary reason for using cache is to make data access faster and less expensive. When the highly requested resource is requested multiple times, it is often beneficial for the developer to cache resources so that it can give responses quickly. Using cache in an application enhances the performance of the application. Data access from memory is always faster in comparison to fetching data from the database. It reduces both monetary cost and opportunity cost.
What data should be cached?
- The data that do not change frequently.
- The frequently used read query in which results does not change in each call, at least for a period.
Types of Caching
There are four types of caching are as follows:
- In-memory Caching
- Database Caching
- Web server Caching
- CDN Caching
In-memory Caching
In-memory caching increases the performance of the application. It is the area that is frequently used. Memcached and Redis are examples of in-memory caching. It stores key-value between application and database. Redis is an in-memory, distributed, and advanced caching tool that allows backup and restore facility. We can manage cache in distributed clusters, also.
Database Caching
Database caching is a mechanism that generates web pages on-demand (dynamically) by fetching the data from the database. It is used in a multi-tier environment that involved clients, web-application server, and database. It improves scalability and performance by distributing a query workload. The most popular database caching is the first level cache of Hibernate.
Web Server Caching
Web server caching is a mechanism that stores data for reuse. For example, a copy of a web page served by a web server. It is cached for the first time when a user visits the page. If the user requests the same next time, the cache serves a copy of the page. It avoids server form getting overloaded. Web server caching enhances the page delivery speed and reduces the work to be done by the backend server.
CDN Caching
The CDN stands for Content Delivery Network. It is a component used in modern web applications. It improves the delivery of the content by replicating commonly requested files (such as HTML Pages, stylesheet, JavaScript, images, videos, etc.) across a globally distributed set of caching servers.
It is the reason CDN becomes more popular. The CDN reduces the load on an application origin and improves the user experience. It delivers a local copy of the content from a nearby cache edge (a cache server that is closer to the end-user), or a Point of Presence (PoP).
Cache vs. Buffer
| Cache | Buffer |
|---|---|
| The cache is based on Least Recently Used. | Buffer is based on First-In-First-Out. |
| It is the size of the page cache. | It is an in-memory raw block I/O buffer. |
| It lived for a long period. | It lived for a short period. |
| We read from the cache. | We write into the buffer. |
| It stores the actual file data. | It stores the file metadata. |
| It improves read performance. | It improves write performance. |
Spring Boot Cache Annotations
@EnableCaching
It is a class-level annotation. We can enable caching in the Spring Boot application by using the annotation @EnableCaching. It is defined in org.springframework.cache.annotation package. It is used together with @Configuration class.
The auto-configuration enables caching and setup a CacheManager, if there is no already defined instance of CacheManager. It scans for a specific provider, and when it does not find, it creates an in-memory cache using concurrent HashMap.
Example
In the following example, @EnableCaching annotation enables the cache mechanism.
@CacheConfig
It is a class-level annotation that provides a common cache-related setting. It tells the Spring where to store cache for the class. When we annotate a class with the annotation, it provides a set of default settings for any cache operation defined in that class. Using the annotation, we need not to declare things multiple times.
Example
In the following example, employee is the name of the cache.
@Caching
It is used when we need both annotations @CachePut or @CacheEvict at the same time on the same method. In other words, it is used when we want to use multiple annotations of the same type.
But Java does not allow multiple annotations of the same type to be declared for a given method. To avoid this problem, we use @Caching annotation.
Example
In the following example, we have used the annotation @Caching and grouped all the @CacheEvict annotations.
@Cacheable
It is a method level annotation. It defines a cache for a method’s return value. The Spring Framework manages the requests and responses of the method to the cache that is specified in the annotation attribute. The @Cacheable annotation contains more options. For example, we can provide a cache name by using the value or cacheNames attribute.
We can also specify the key attribute of the annotation that uniquely identifies each entry in the cache. If we do not specify the key, Spring uses the default mechanism to create the key.
Example
In the following example, we have cached the return value of the method studentInfo() in cacheStudentInfo, and id is the unique key that identifies each entry in the cache.
We can also apply a condition in the annotation by using the condition attribute. When we apply the condition in the annotation, it is called conditional caching.
For example, the following method will be cached if the argument name has a length shorter than 20.
@CacheEvict
It is a method level annotation. It is used when we want to remove stale or unused data from the cache. It requires one or multiple caches that are affected by the action. We can also specify a key or condition into it. If we want wide cache eviction, the @CacheEvict annotation provides a parameter called allEntries. It evicts all entries rather than one entry based on the key.
One important point about @CacheEvict annotation is that it can be used with void methods because the method acts as a trigger. It avoids return values. On the other hand, the annotation @Cacheable requires a return value that adds/updates data in the cache. We can use @CacheEvict annotation in the following ways:
Evict the whole cache:
Evict an entry by key:
Example
The following annotated method evicts all the data from the cache student_data.
@CachePut
It is a method level annotation. It is used when we want to update the cache without interfering the method execution. It means the method will always execute, and its result will be placed into the cache. It supports the attributes of @Cacheable annotation.
A point to be noticed that the annotations @Cacheable and @CachePut are not the same because they have different behavior. There is a slight difference between @Cacheable and @CachePut annotation is that the @Cacheable annotation skips the method execution while the @CachePut annotation runs the method and put the result into the cache.
Example
The following method will update the cache itself.
Spring Boot Cache Dependency
If we want to enable cache mechanism in a Spring Boot application, we need to add cache dependency in the pom.xml file. It enables caching and configures a CacheManager.
Spring Boot Cache Example
Let’s create a Spring Boot application and implement cache mechanism into it.
Step 1: Open Spring Initializr http://start.spring.io.
Step 2: Select the Spring Boot version 2.3.0.M1.
Step 2: Provide the Group name. We have provided com.tutoraspire.
Step 3: Provide the Artifact Id. We have provided spring-boot-cache-example.
Step 5: Add the dependencies Spring Web and Spring Cache Abstraction.
Step 6: Click on the Generate button. When we click on the Generate button, it wraps the specifications in a Jar file and downloads it to the local system.
Step 7: Extract the Jar file and paste it into the STS workspace.
Step 8: Import the project folder in STS.
File -> Import -> Existing Maven Projects -> Browse -> Select the folder spring-boot-cache-example -> Finish
It takes some time to import.
Let’s open the pom.xml file and see which dependencies we have added into it.
pom.xml
Step 9: Open the SpringBootCacheExampleApplication.java file and enable cache by adding the annotation @EnableCaching.
Step 10: Create a package in the folder src/main/java with the name com.tutoraspire.model.
Step 11: In the model package, create a class with the name Customer and define the following:
- Define three variables accountno, customername, acounttype, and balance.
- Generate Constructor using fields.
Right-click on the file -> Source -> Generate Constructor using Fields -> Select All -> Generate - Generate Getters and Setters.
Right-click on the file -> Source -> Generate Getters and Setters -> Select All -> Generate
Customer.java
Step 11: Create a package in the folder src/main/java with the name com.tutoraspire.controller.
Step 12: In the Controller package, create a controller class with the name CustomerController and do the following:
- Mark the class as Controller by using the annotation @RestController.
- Define a mapping for the controller by using the annotation @RequestMapping. We have defined the mapping /customerinfo.
- Create a cache for getting the data by using the annotation @Cacheable. We have defined the cache name by using the value attribute of the annotation.
- We have added two customer details in the
CustomerController.java
Now run the application.
Step 13: Open the SpringBootCacheExampleApplication.java file and run it as Java Application.
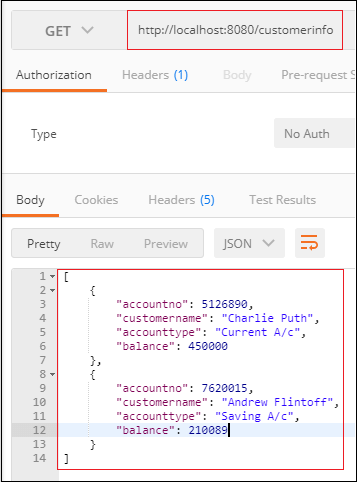
Step 14: Open the Postman and send a GET request with the URL http://locahost:8080/custmerinfo. It returns the customer details, as shown below.