Spring Boot EhCaching
EhCache
EhCache is an open-source, Java-based cache used to boost performance. The current version of Ehcache is 3. It provides the implementation of the JSR-107 cache manager. We can use it directly.
Features of EhCache
- It is fast, lightweight, Scalable, and Flexible.
- It allows us to perform Serializable and Object
- It offers cache eviction policies such as LRU, LFU, FIFO,
- It stores the cache in memory and disk (SSD).
- It depends on SLF4J for logging.
- It has a full implementation of JSR-107 and Jcache
- It supports distributed caching via JGroups or JMS and RMI.
- It uses fluent query language for distributed search.
EhCache Usage Patterns
The cache uses several access patterns. There are following patterns used by EhCache:
- Cache-aside
- Cache-as-SoR (system-of-record)
- Read-through
- Write-through
- Write-behind
Cache-aside
In the cache-aside pattern, first, the application consults with the cache. If the data is found, it returns the data directly. In the opposite scenario, it fetches the data from the SoR, stores it into the cache, and then return.
Cache-as-SoR
The cache-as-SoR pattern represents SoR reading and writing operations to the cache. It reduces the responsibility of the application. It uses the combination of read and write pattern that includes read-through, write-through, and write-behind. It reduces the difficulty of the application. It allows the cache to solve the thundering-herd problem
Read-through
The read-through pattern also copies the cache-aside pattern while reading data from the cache. The difference between the read-through and cache-aside is that read-through pattern implements the CacheEntryFactory interface. It guides the cache how to read an object from the cache. It is better to wrap the EhCache instance with the instance of SelfPopulatingCache while using the read-through pattern.
Write-through
The write-through pattern also copies the cache-aside pattern while writing data in the cache. The difference between write-through and cache-aside pattern is that write-through pattern implements the CacheWriter interface. It configures the cache for both write-through and write-behind pattern. It writes data to the SoR in the same thread of execution.
Write-behind
The write-behind pattern is different form the other three patterns. It modifies the cache entries after a configurable delay. The delay may in seconds, minutes, a day, a week, or for a long time. Simultaneously, it also queues the data to write at a later time in the same thread of execution.
The data write using write-behind pattern happens outside of the scope of the transaction. It means that it creates a new transaction to commit the data in the SoR that is distinct from the main transaction.
EhCaching Storage Tiers
EhCache allows us to use various data storage areas, such as heap, disk and clustered. We can configure a multi-storage cache (uses more than one storage area). It can be arranged and managed as tiers.
The tiers are organized in order. The bottom-most tier is known as authority tier, and the other tier is known as the caching tier. It is also known as nearer or near cache. The caching tier can have more than one storage area. The hottest data kept in the caching tier because it is faster than the authority tier. Other data is kept in the authority tier that is slower but richer in comparison to the caching tier.
There are four types of data storage supported by EhCache:
- On-Heap Store
- Off-Heap Store
- Disk Store
- Clustered Store
On-Heap Store
It stores cache entries in Java heap memory. It shares the storage with Java application. It is fast because it uses heap but has limited storage space. The garbage collector also scans the on-heap store.
Off-Heap Store
It uses the primary memory (RAM) to store cache entries. The garbage collector does not scan it. It is slower than the on-heap store because the cache entries move to the on-heap store before use. It is limited in size.
Disk Store
It uses a disk to store cache entries. It is much slower than RAM-based stores (on and off-heap store). It is better to use a dedicated disk if you are using a disk store pattern. It enhances throughput.
Clustered Store
It stores cache entries on the remote server. It is slower than off-heap storage. It may have a failover server that provides high availability.
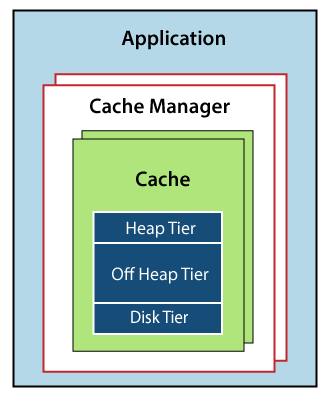
The above diagram shows that:
- An application may have more than one Cache Manager.
- Many caches can be handled by a Cache Manager.
- The caches can use more than one tier for storing cache entries.
- EhCache puts the recently used or frequently used data in the faster tier (caching tier).
Configuring EhCache
- Place the EhCache jar in the classpath.
- Configure the xml and put it in the classpath.
- Create a
- Reference a Cache.
Example of EhCache
In the following example, we are going to configure EhCache in an application.
Step 1: Open the Spring Initializr https://start.spring.io/.
Step 2: Select the Spring Boot version 2.3.0 M2.
Step 3: Provide the Group name. We have provided the Group name com.tutoraspire.
Step 4: Provide the Artifact. We have provided the Artifact spring-boot-ehcache-example.
Step 5: Add the Spring Web dependency.
Step 6: Click on the Generate button. When we click on the Generate button, it wraps all the specifications related to application into a Jar file and downloads it to the local system.
Step 7: Extract the jar file.
Step 8: Copy the folder and paste it in the STS workspace.
Step 9: Import the project.
File -> Import -> Existing Maven Projects -> Next -> Browse -> Select the folder spring-boot-ehcache-example -> Select Folder -> Finish
It takes time to import the project.
Step 10: Copy the following dependency one by one from the Maven Repository https://mvnrepository.com/ and paste it into the pom.xml file.
- spring-boot-starter-cache
- ehcache 3
- cache API.
Note: Do not use the ehcache of the package net.sf.ehcache.
pom.xml
Now, we need to configure the ehcache.xml file. It tells the framework where to find the file.
Step 11: Open the application.properties file and configure the EhCache by using the following property.
application.properties
Step 12: Open the SpringBootEhcacheExampleApplication.java file and enable caching by using the annotation @EnableCaching.
SpringBootEhcacheExampleApplication.java
Note: If we do not want to use annotation @EnableCaching in main application file, we can create a separate CacheConfig class and annotate that call with the annotation.
Step 13: Create a model class. We have created the model class in the package com.tutoraspire with the name Student. In the model class do the following:
- Create five variable id, name, gender, and
- Generate Constructor using Fields.
Right-click on the file -> Source -> Generate Constructor using Fields -> Select All -> Generate - Generate Getters and Setters.
Right-click on the file -> Source -> Generate Getters and Setters -> Select All -> Generate - Generate a toString()
- Right-click on the file -> Source -> Generate toString() -> Generate
After completing all the above steps, the model class looks like the following.
Student.java
Step 14: Create a Service class that manages the student. We have created the service class with the name StudentManager. In this class, we have done the following:
- Annotated the class with the annotation @Service.
- Create an instance of HashMap.
- In the static block, we have added student data in the map.
- By using the annotation @Cacheable, we have defined the name of the cache All the data will be saved in this cache. We have defined the id in the key attribute of the annotation. The cache searches the student on the basis of id.
- We have created a method getStudentById() that parses id as a parameter. It returns the id of the student.
StudentManager.java
Now we need to create ehcache.xml file. It contains the information related to cache such as name of the cache, no of element in the memory, time to live data in the cache, etc.
Step 15: Create a cache configure file named ehcache.xml in the src/main/resources folder.
ehcahe.xml
Now we have created all the required files. After creating all the files, the project directory looks like the following:
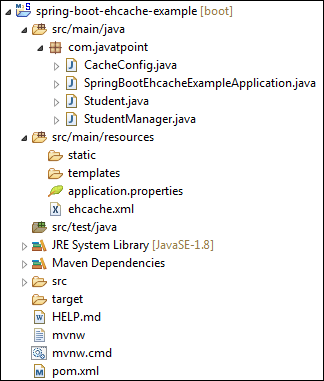
Let’s run the application.
Step 16: Open the SpringBootEhcacheExampleApplication.java file and run it as Java Application.
It shows the following output: