Celery Tutorial Using Python: Must Learn Technology for Python Developer
In this tutorial, we will discuss the most popular, must learn and technology for Python developers. Everybody in the Python developer association has learned about the Celery or may be implemented at least once.
In the era of the fast internet, users want to load the page instantaneously and get the result in seconds. The small tasks can be executed within a second or microseconds, but the heavy task may take many seconds or even a minute.
So here the question arises, how can we provide a fast user experience while our complicated task is still loading?
Here is the asynchronous programming comes into play. Celery is used for the parallel execution of the task.
Celery provides the facility to run the program/jobs in the background when the CPU is sitting ideal. Before diving deeper in this topic, let’s understand the core concept of Celery and why we use it.
In this tutorial, we will discuss the following concepts of Celery.
- What is Celery?
- How does it work?
- What are Tasks Queues?
- What are Message Brokers?
- Why is this Useful?
- How does it work?
- Features of Celery
- Getting Started with Celery
What is Celery?
Celery is an open-source Python library which is used to run the tasks asynchronously. It is a task queue that holds the tasks and distributes them to the workers in a proper manner. It is primarily focused on real-time operation but also supports scheduling (run regular interval tasks). It enhances the end’s user activity amazingly. Celery introduces the various message brokers such as RabbitMQ and Redis.
Celery combines various web frameworks, including Flask, Pylons, web2py, Tryton, and Tornado.
Why is it useful?
Suppose we need to access API every minute (hour), or we want to send multiple emails at the end of the day. Celery can schedule that type of periodic task easily.
Let’s take another scenario: a user sends a request, and the page is taking too long to load. Meanwhile, Celery decreases page load time by running part of the functionality as postponed tasks on the same server or sometime different server.
Celery’s workers can then update the UI via callbacks, process files, send emails, make changes in database and many more.
The main advantage of Celery is that our application can continue to respond to client requests. So the end-users don’t have to wait unnecessarily.
How Does Celery Works?
In the traditional HTTP request-response cycle, when we send the request to the server through the client, the server sends the response to the client. It works appropriately for small tasks, but it may become slow when we try to load the large tasks. Hence, we need to implement a functionality that can decrease the load time.
Let’s understand the working scenario of Celery.
Celery interacts via messages; normally broker works as a mediate between clients and workers. The inward working of the Celery affirms as Producer and Consumer pattern. Celery has the three chief elements at the high level.
Producers – Producers are ‘web nodes’ that manages the web requests. When the application is processing, tasks are assigned to the Celery means forced into the task queue.
Consumer – Consumers are the ‘worker nodes’ that monitors the queue head, the workers take the tasks and perform it. Workers can perform various tasks as well; hence they can also behave as producers.
Queue – It is basically a message broker which acts as a bridge between producer and consumer. It essentially passes messages between web application and the Celery workers. Celery has wide support for RabbitMQ and Redis, also helps Zookeeper, Amazon SQS but with confined abilities.
Features of Celery
Celery is a handy structure that decreases production load through delayed tasks, as it prepares asynchronous and planned jobs. Following are some important features of the Celery.
- Open-source Library – Python Celery is open-source and free software. This feature attracts the organizations or developers to use celery and solve their tasks without paying any penny.
- Straight Forward Installation – It is a lightweight and simple library and it can be installed easily. We can install it from the terminal using the command “pip install -U Celery”.
- Scheduling – We can specify the particular time to run a task using the datetime module along with celery beat. The celery beat can trigger the tasks in regular intervals. We can use the periodic task for the repeated events based on the simple interval.
- Broker Support – Celery supports the multiple message brokers, popularly RabbitMQ and It also supports the Amazon SQS but lacks in some features (monitoring and remote control).
- Integration with Web Frameworks – Celery also incorporates with the various Python web frameworks such as Pyramid, Pylons, Django, Tornado, Trylons, and Flask.
- Fast – Celery can process millions of tasks within a minute.
- Works-flow – It can compose the simple and complex works flows using the set of advance primitives which known as “canvas”.
Getting Started with Celery
In this tutorial, we will implement the Celery with Django, where we will create a simple task queue. Let’s start by following the below steps.
Create a Django Project
First, we will create a Django project named learn_celery in the celery_django folder. But first we will create the virtual environment. All dependencies will be stored in the virtual env.
C:UsersUserDesktopcelery_django>python -m venv myenv
Once the virtual environment is created, we will activate using the below command.
C:UsersUserDesktopcelery_django>myenv/bin/activate
Install the Django using the below command.
pip install django
After the installation of Django, create a project. We are creating project named learn_celery using below command.
C:UsersUserDesktopcelery_django>django-admin startproject learn-celery
If you are not familiar how to create project or app in Django, you can visit our Django tutorial. Now, we are ready to install Celery in our virtual environment.
Installation
We can install Celery using the below command.
pip install celery
After the celery installation, we will configure the Celery in the Django project.
Celery Configuration
Open project’s settings.py file and add the below configuration. We are using redis as a message broker.
# Celery Settings CELERY_BROKER_URL = ‘redis://127.0.0.1:6379’ CELERY_ACCEPT_CONTENT = [‘application/json’] CELERY_RESULT_SERIALIZER = ‘json’ CELERY_TASK_SERIALIZER = ‘json’CELERY_TIMEZONE = ‘Asia/Kolkata’
Choosing a Broker
Brokers are separate services that enable applications, systems, and services to communicate and share information. Let’s simplify this term we assign tasks to workers via a message queue. A message queue is a first-in, first-out data structure which means the message is stored at first place will be executed first. All tasks will perform in the order that we add them.
In this tutorial, we will use the Redis Message Broker.
Redis Installation in Windows
Installation of Redis in Mac/Ubuntu is pretty straightforward but slightly tricky for Window. So here we are describing how you can install redis in Windows.
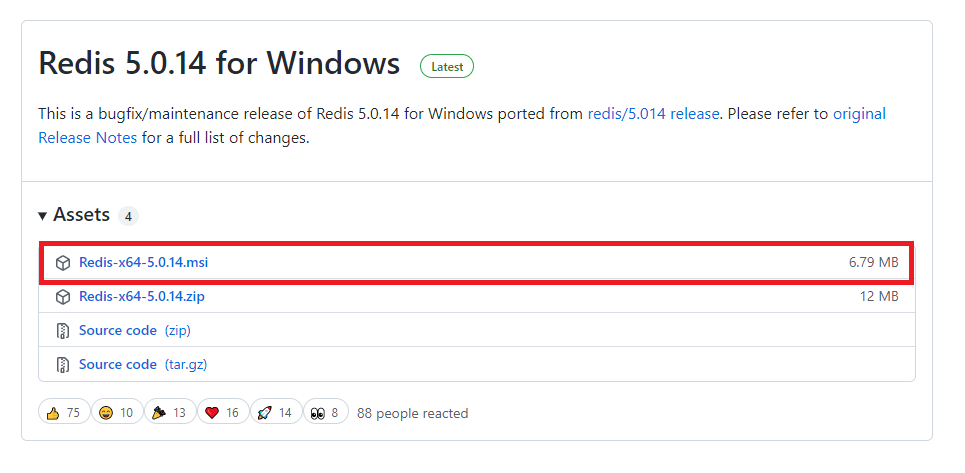
- Visit the Github link https://github.com/tporadowski/redis/releases, and click on Redis-x64-5.0.14.msi. It will download the .msi file.

- Click on the downloaded setup. It will automatically install redis in your system in C: drive. Once it has installed, open the redis-cli and type the PING.
Redis dependency is also required to run the celery program. We can install redis dependency using the below command.
pip install redis
Once the installation is completed, fire up the server using the below command.
redis-server
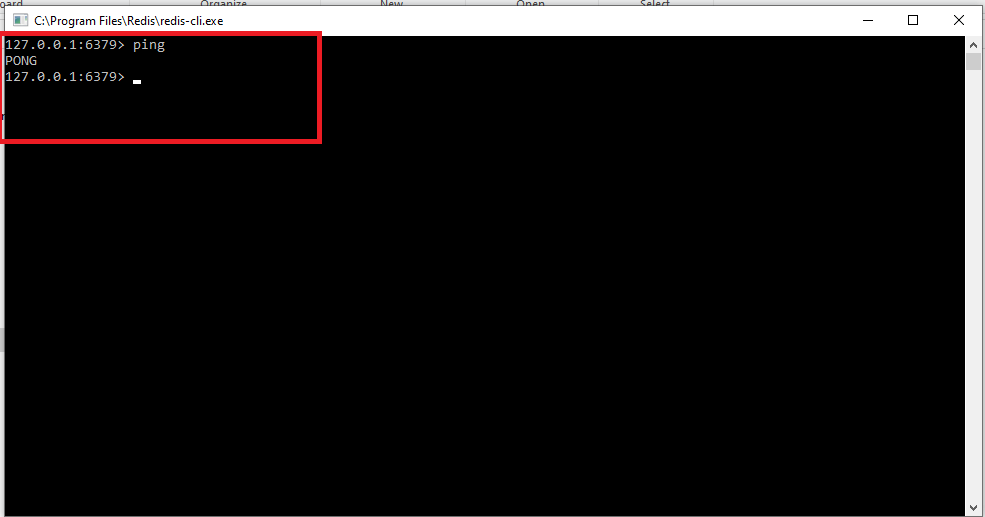
We can test whether Redis is working properly by typing the following command in the terminal.
redis-cli ping
If it replies with the PONG, it is working fine.
PS D:celery> redis-cli ping PONG
Note – Celery and Redis can be installed using the single command which is given below.
pip install -U Celery[Redis]
Create celery.py file
Now open the celery.py file in the Django project and add the below code.
Celery.py
Create a Celery Task
The celery tasks can be created in the tasks.py in the Django app/project. We create an app in working directory using the below command.
Once an application is created, create a task.py file and create a task. The tasks are the regular Python functions that are called with the Celery. For example – We create a function that will print the 1 to 10 integer number.
Now create a view in the view.py file.
view.py
Now we will map this view to URL in the urls.py file.
CeleryApp/urls.py
Note – To see the celery result, install the following third-party app and register in the settings.py file.
Now we are ready to execute our first asynchronous task. Now run the python manage.py runserver and click on the local host link http://127.0.0.1:8000/.
Running Celery Locally
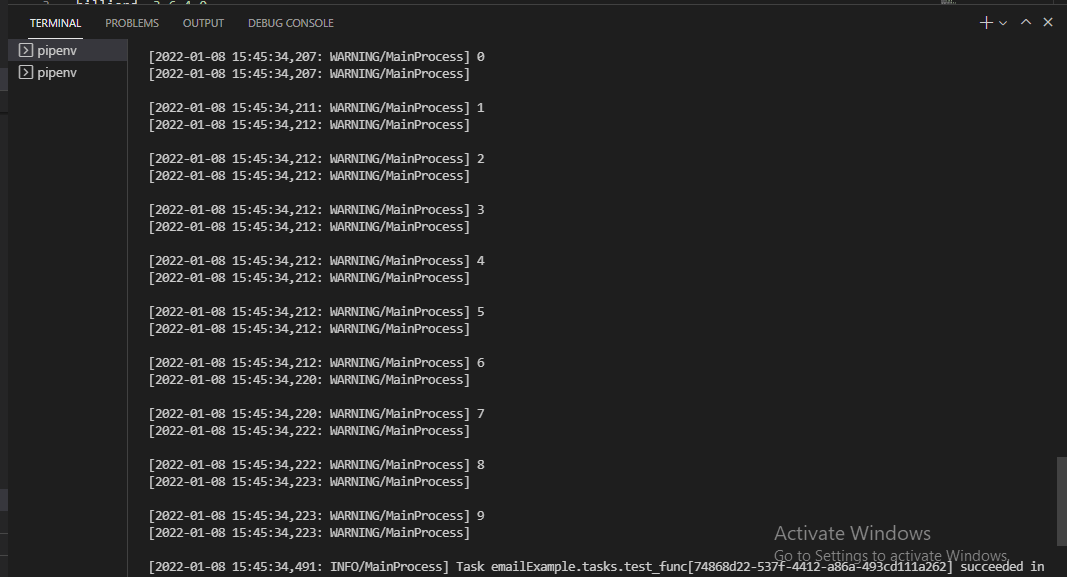
Now open new terminal and navigate to project directory, activate the virtual env. To start the celery worker run the following command.
As we can see that our Celery has started and ready to perform the background jobs. The Redis message broker is running on 6379 port by default.
Every time when we visit http://127.0.0.1:8000/ to make request to Django server, we should see the response and Celery performed the task in the background asynchronously that we have defined in the task.py file. That can be monitored in the Celery terminal.
Conclusion
Celery is a powerful job queue to run the tasks in the background. It is most commonly used to send frequent emails. However, it can be used in multiple ways. We can set up a queue; work with data chunks on the long-running tasks at hand, and define times to execute our tasks.
In this tutorial, we have taken the simple example of Celery using Django. We have defined the basic concept of Celery and how it works. We have also specified how we can implement Celery along with Django. You can take the reference of this tutorial and use Celery to run your asynchronous task.