PostgreSQL Rename Column
In this section, we are going to understand how the PostgreSQL Rename column condition works in the Alter table command for renaming one and various columns of a table.
PostgreSQL Rename COLUMN command
We use the ALTER TABLE command with the Rename Column condition to rename a column of a table.
Syntax
The syntax of the Alter table rename column command is given below:
In the above syntax, we have the following parameters:
| Parameter | Description |
|---|---|
| Alter table | It is a clause, which is used to modify the definition of a table. |
| Table_name | It is used to describe the table name where we want to rename a column after the ALTER TABLE clause. |
| Column_name | It is used to specify the column name after the RENAME COLUMN clause. |
| New_cloumn _name | It is used to specify the new column name after the TO keyword clause. |
In the above syntax, the COLUMN keyword is optional, so we can ignore it as we can see in the below command:
Note:
- PostgreSQL will raise an error if we try to rename a non-existing column.
- For the Rename condition, PostgreSQL does not offer the IF EXISTS option.
We need to execute the ALTER TABLE RENAME COLUMN command several times to rename multiple columns, and we can rename one column at a time as we can see in the below syntax:
OR
If we rename a column which references by additional database objects like foreign key constraints, views, Stored procedures, and triggers and PostgreSQL will also modify all of its dependent objects.
Examples of PostgreSQL RENAME COLUMN
Let us see some examples for our better understanding of where we are going to use the ALTER TABLE RENAME COLUMN.
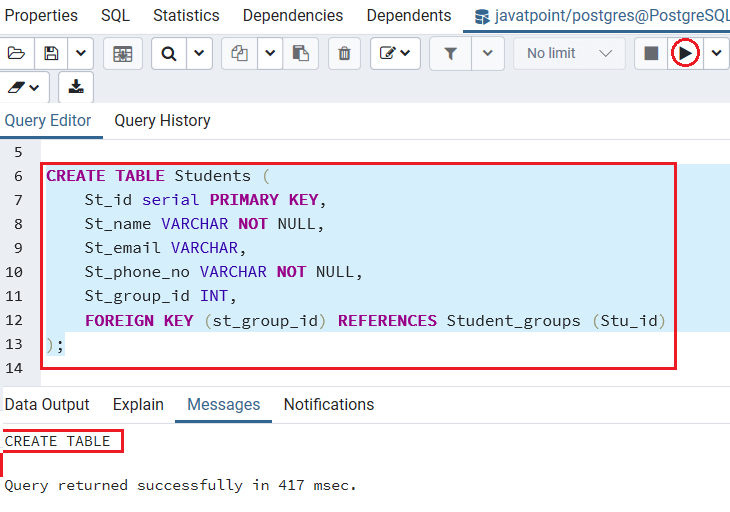
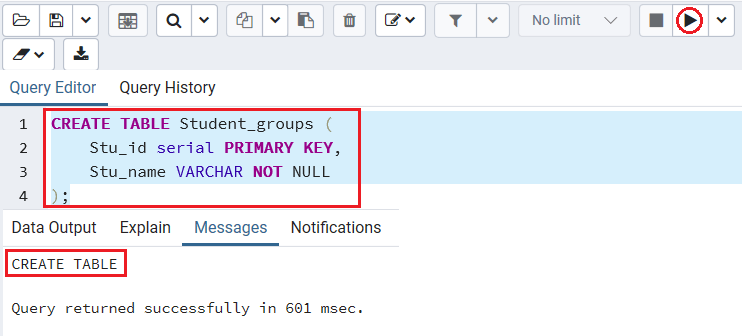
Firstly, we will create two new tables as Students and Student_groups.
Output
After executing the above command, we get the below message window, which says that the Students table has been created.
Output
After executing the above command, we get the below message window, which says that the Student_groups table has been created.
After that, we will create a student_data view, which depends on the above Students and Student_groups tables
Output
After executing the above command, we get the below message window, which says that the Student_data view has been created.

Example of renaming one column using RENAME COLUMN
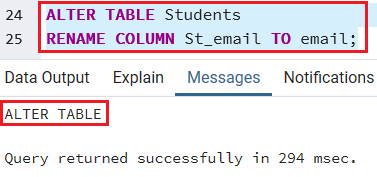
To rename the St_email column to the email of the Students table, we will use the below statement for ALTER TABLE RENAME COLUMN command:
Output
After executing the above command, we get the below message window where the Students table has been altered.
Example of renaming the column which has dependent objects Using RENAME COLUMN
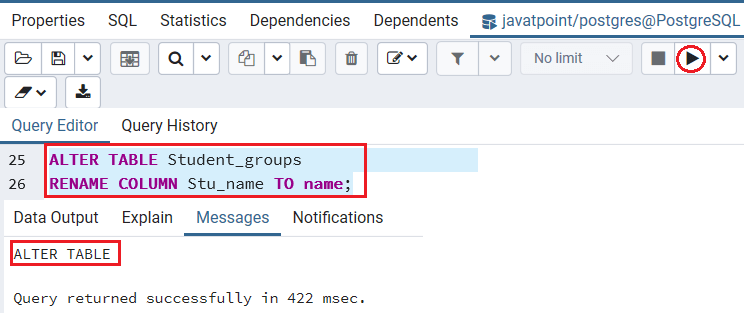
In this example, we will use the ALTER TABLE RENAME COLUMN command to rename the Stu_name column to name of the Student_groups table. And the Stu_name column is used in the Student_data view.
Output
After executing the above command, we get the below message window which says that the student_groups table has been altered.
Now, we can verify whether the column name has been modified or not by using the command given in the below screenshot:
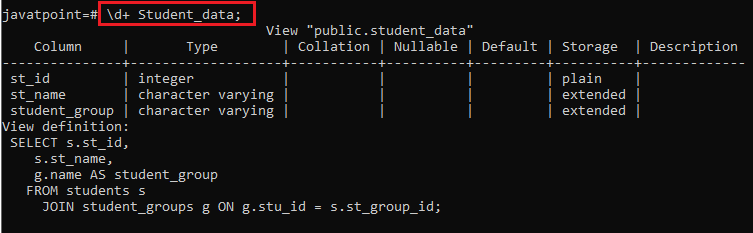
As we can see in the view definition, the Stu_name column has been changed to name.
Examples of renaming the multiple columns using multiple RENAME COLUMN
These statements rename two columns St_name and St_phone_no of the Students table to Student_name and Student_phone_no individually:
Output
After executing the above command, we get the below message window which says that the Students table has been altered.

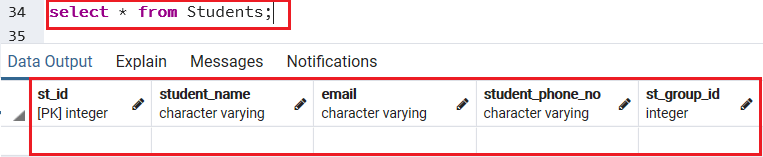
If we want to check that above operations are working fine or not, we will use the SELECT command below:
Output
We will get the below output, once we execute the above command: