How to add Signature in Gmail
Similarly Asked Questions:
- How to change Signature in Gmail
- How to create Signature in Gmail
- How to make a Signature in Gmail
We can easily create signature in Gmail from desktop and on the Gmail app in our Android and IOS device.
What is Signature in Gmail?
It is the professional Signature that includes our name, phone number, title, and company. We can also include the address of our company website, if required.
We can use different signatures and include quotes in the signature to make it more attractive.
The signature is automatically inserted at the end of the email as footer in our Gmail account. It means the signature automatically includes the few lines at the bottom of any outgoing message.
It is also helpful to advertise our business.
Adding Signature in Gmail using Computer
The steps to add signature on our computer are listed below:
1. Open the Gmail account and login using the Gmail ID and password.
We can directly use the URL: https://mail.google.com/.
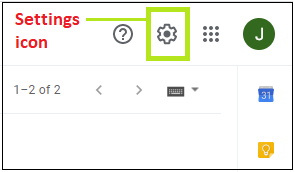
2. On the Home page of our account, click on the ‘Settings’ icon present on the top-right corner of the display, as shown below:
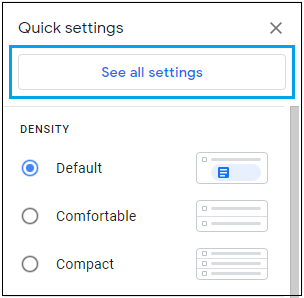
1. A drop-box will appear. Click on the ‘See all settings’ option present on the top of the drop-box, as shown below:
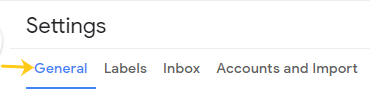
2. A window will appear. The General tab will be selected by default. If not, click on the General option on the top, as shown below:
3. Scroll down until the Signature row appears, which is shown below:
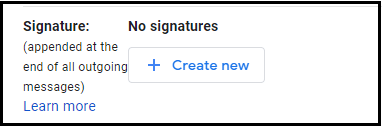
4. Click on the ‘+ Create new’ button, which is shown above.
5. A small dialog box will appear to specify a name for the signature, as shown below:
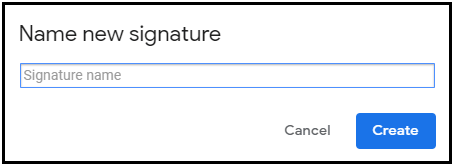
6. Here, we are specifying the name as tutoraspire, as shown below:
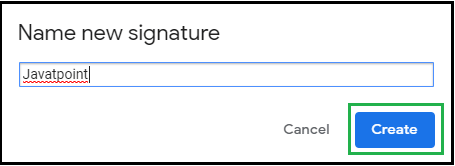
7. Click on the Create button, which is shown above.
8. It will now appear as:

9. We can insert images; apply various text styles, etc., in the box near it.
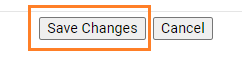
10. After creating the signature, set the ‘Signature defaults’ to the name of your signature (such as tutoraspire), as shown below:

11.Click on ‘Save Changes’ option as the bottom of the page, as shown below:
12. The signature will be added in the outgoing email at the bottom of the message.
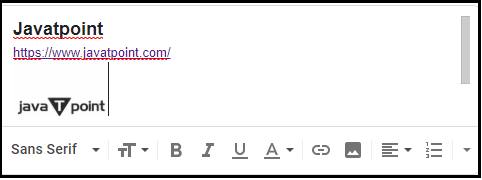
Let’s add a signature for a better understanding.
Follow the below steps:
- Open the Signature column, as explained above.
- We have added the name, website, and an image. We can also add other data accordingly.
It will now appear as the image shown below:
Adding Signature on Android device
The steps to add signature in Gmail using mobile device are listed below:
1. Go to the web URL: https://mail.google.com/ and login using Gmail ID and password.
OR
Open the Gmail app.
2. Click on the Menu button (three horizontal lines) present on the top of the page, as shown below:
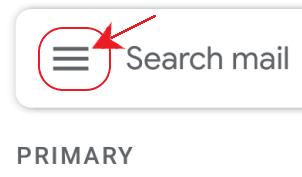
3. Click on the ‘Settings’ option, as shown below:
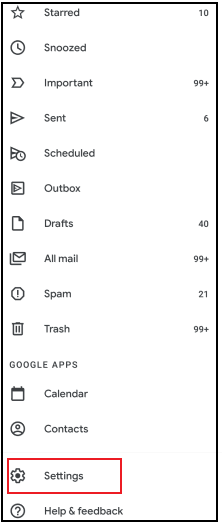
4. Select the Gmail account to create signature if having multiple accounts.
5. A page will appear, as shown below:
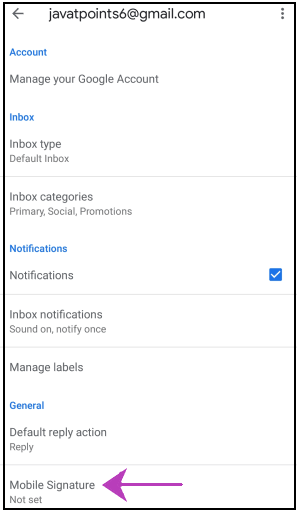
6. Click on the ‘Mobile Signature’ option, as shown above.
7. A small dialog box will appear to specify the signature. We can add information as per our choice. It will look like the image shown below:
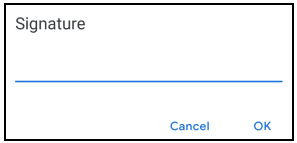
8. Here, we have specified the signature as:
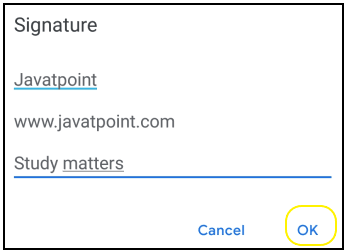
9. Click on the ‘OK’ button after adding the changes to the Signature, as shown above.
10. The signature will be added in the outgoing emails at the bottom of the message.
Adding Signature on IOS device
The steps to add signature on IOS device are listed below:
1. Open the Gmail app on the iPhone or iPad.
2. Click on the Menu button (three horizontal lines) present on the top of the page, as shown below:

3. Scroll down and click on the ‘Settings’ option.
4. Select the appropriate account to create signature if you have multiple accounts.
5. Click on the ‘Signature Settings’ option.
6. Turn ON the ‘Mobile Signature’ settings.
8. To save, tap back.
9. The signature will be saved.
Note: We can also edit the signature by following the same steps. We only need to click on the Edit signature option to edit it.